
UPDATED - Set Up Pay-as-you-go M365 Chat & SharePoint Agents

Introduction to Pay-as-You-Go Agents in Microsoft 365
Microsoft has introduced a flexible way for organizations to leverage AI capabilities without requiring a full Microsoft 365 Copilot license. Through the pay-as-you-go (PAYG) model, users can now access Microsoft 365 Copilot Chat and create AI-powered agents that help with specific tasks, paying only for what they use. This approach makes advanced AI capabilities accessible to more organizations while providing cost control. In this guide, I’ll walk you through the complete process of setting up pay-as-you-go billing for both Microsoft 365 Copilot Chat agents and SharePoint Online agents, explain how the consumption-based pricing works, and address current limitations.
Understanding the Pay-as-You-Go Model
The pay-as-you-go model for Microsoft 365 Copilot Chat and SharePoint agents works on a consumption basis. Instead of paying a fixed fee per user (like the regular Microsoft 365 Copilot license at $30/user/month), organizations pay only for the actual usage of agent services.
How Consumption is Measured and Priced
- Usage is measured in “messages,” which are units of consumption
- The cost is $0.01 per message, or you can purchase message packs at $200 for 25,000 messages/month
- Different agent features consume different numbers of messages:
| Copilot Studio feature | Billing rate |
|---|---|
| Classic answer | 1 message |
| Generative answer | 2 messages |
| Autonomous action | 25 messages |
| Tenant Microsoft Graph grounding for messages | 30 messages |
| Text and generative AI tools (basic) | 0.1 message |
| Text and generative AI tools (standard) | 1.5 messages |
| Text and generative AI tools (premium) | 10 messages |
| Web grounded answers | 0 messages |
For example, if an agent uses data from SharePoint to answer employee questions about HR policies and consumes 200 generative answers and 200 tenant Graph grounding operations in a day, it would cost 6,400 messages or $64 for that day.
SharePoint Agents: Each successful question-and-answer interaction in a SharePoint agent consumes a flat 12 messages ($0.12 per interaction).
Prerequisites for Setting Up Pay-as-You-Go Billing
Before you begin setting up pay-as-you-go billing, ensure you have:
- An active Azure subscription in the same tenant as Microsoft 365
- One of the following Microsoft 365 administrator roles:
- Global Administrator
- Billing Administrator
- AI Administrator
- Owner or Contributor Azure role on the Azure subscription and resource group
- An Azure resource group in that subscription
Tip: You can create an Azure subscription and resource group directly within the billing policy creation wizard in the Microsoft 365 admin center — no need to visit the Azure portal separately.
Setting Up Pay-as-You-Go Billing
The setup for both Microsoft 365 Copilot Chat and SharePoint agents is now done through a unified workflow in the Microsoft 365 admin center. It consists of two steps: creating a billing policy and connecting that policy to one or more services.
Step 1: Add a Billing Policy
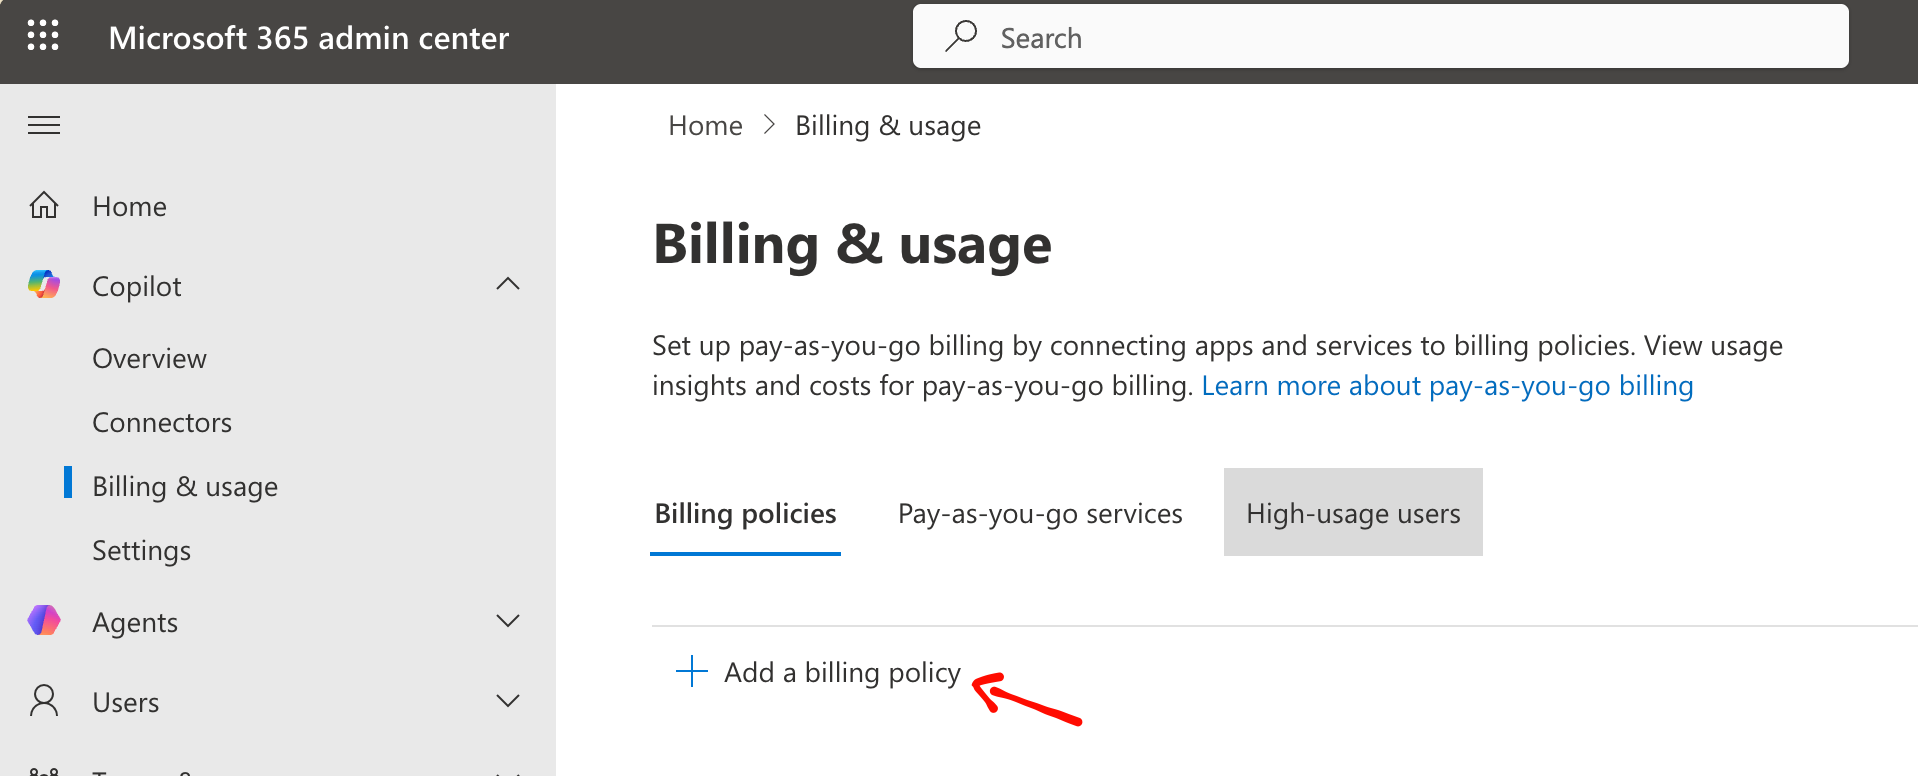
- Sign in to the Microsoft 365 admin center
- Go to Copilot > Billing & usage
- On the Billing policies tab, select Add a billing policy
- On the Billing details page, fill in:
- Policy name – a descriptive name for this billing policy
- Azure subscription – select from your available subscriptions
- Resource group – select an existing group or create a new one
- Region – determines where tenant ID and usage data are stored
- Read and accept the pay-as-you-go terms of service, then select Next
- On the Users page, choose the user scope:
- All users – everyone in the tenant is included
- Specific group – search for and add a single security group
- (Optional) On the Budget page, configure a spending limit and email alert recipients
- On the Review and finish page, confirm the details and select Create policy
Note: Setting a budget triggers alert emails when the threshold is reached but does not block usage — service continues even if the budget is exceeded.
Step 2: Connect the Billing Policy to a Service
After the policy is created, connect it to the services you want to enable:
- On the Billing & usage page, select the Pay-as-you-go services tab
- Select Microsoft 365 Copilot Chat or SharePoint Agents
- Switch the toggle of the billing policy (Connection Status) you just created to Connected for the selected service
- Save the changes
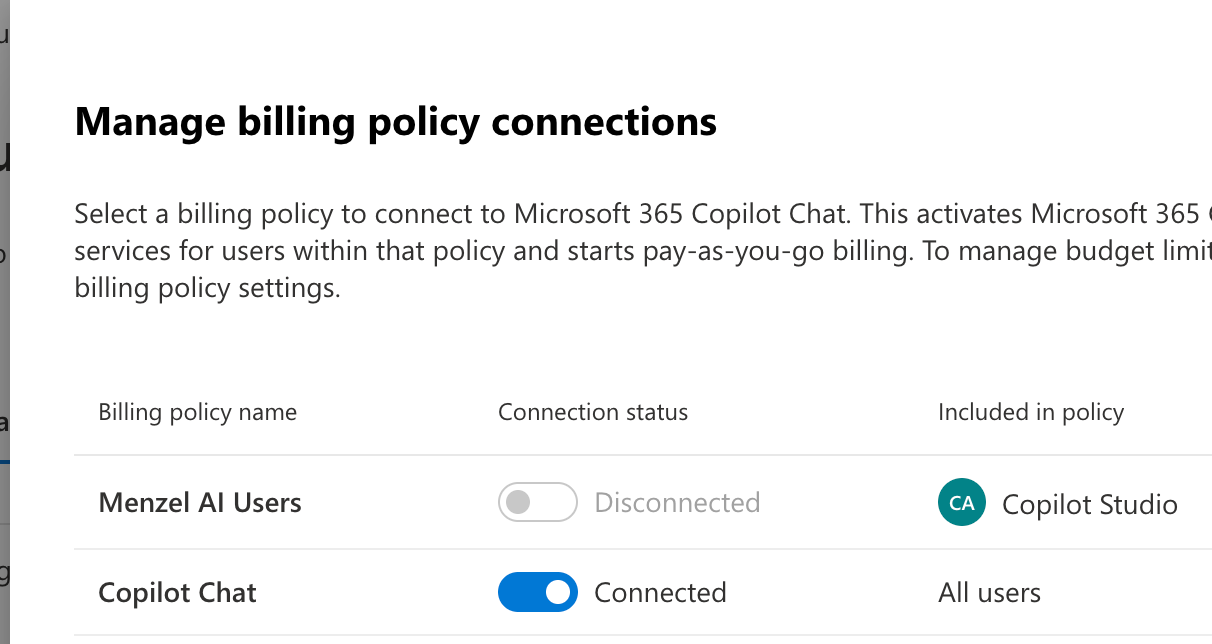
Once connected, users covered by the policy can immediately start using agents, billed through the linked Azure subscription. You can connect one policy to multiple services or create separate policies for different user groups or cost centers.
Setting Up via Power Platform Admin Center for Copilot Studio Agents
You also need to set up pay-as-you-go for Microsoft 365 Copilot Studio through the Power Platform admin center — useful if you want to manage billing alongside other Power Platform resources or allocate prepaid message capacity packs:
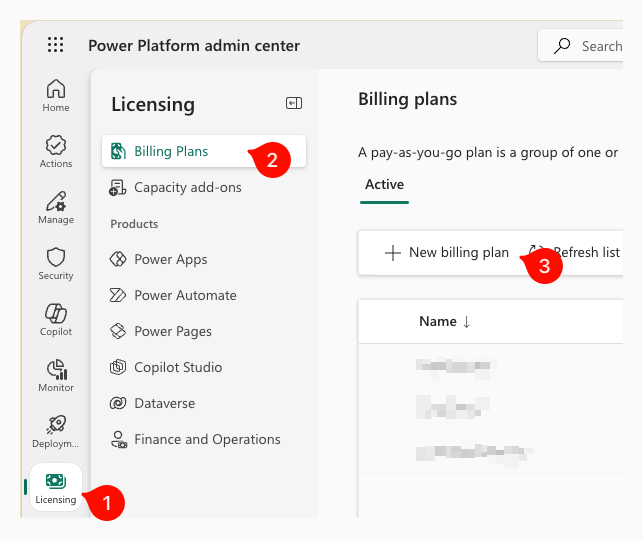
Log in to the Power Platform admin center
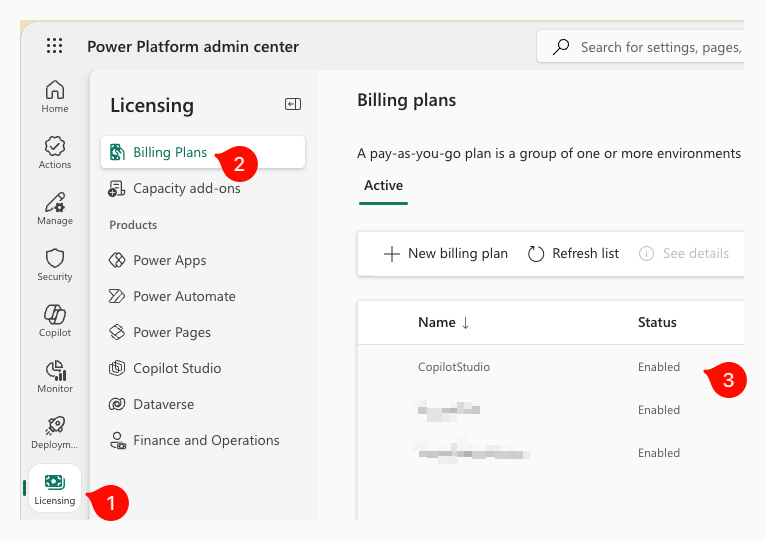
- In the navigation pane, select Licensing
- Under Licensing, select Billing plans
- Click New billing plan
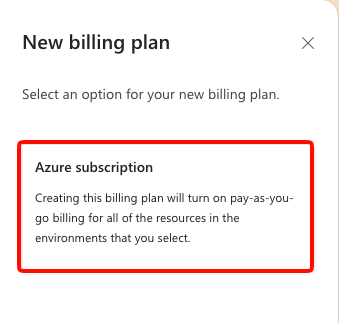
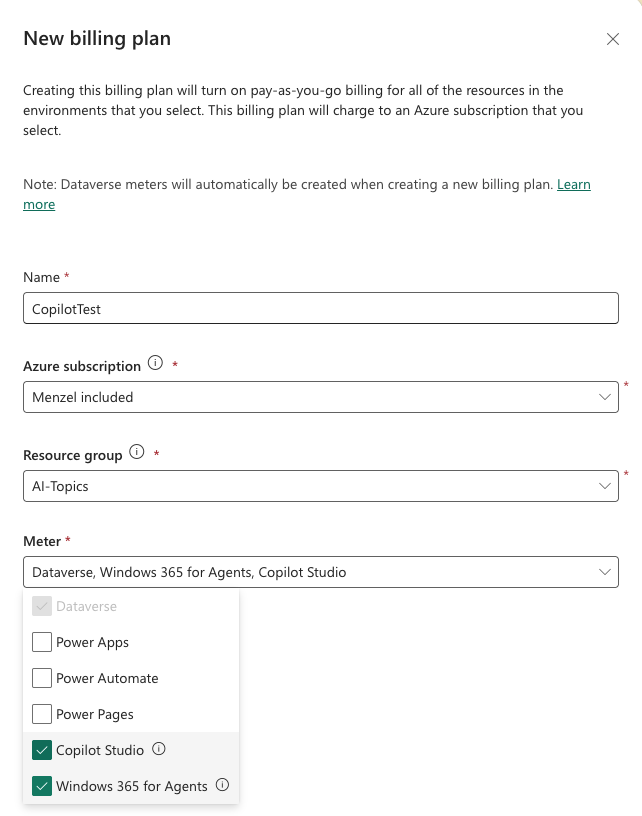
- Select Azure Subscription
- Provide a name for the billing plan
- Select your Azure subscription and resource group and assign Copilot Studio in the Meter section to link it to the billing plan
- Click Save
A new Microsoft 365 Copilot Chat environment is automatically provisioned and linked to the billing plan. After a few minutes, verify the status shows Enabled under Licensing > Billing plans > Status.
Configuring Access for Copilot Studio Agents
Agent (authoring) access is controlled in two ways:
During billing policy setup (recommended): When creating a billing policy in the Microsoft 365 admin center, you choose All users or a Specific group as the user scope. Only users in scope can interact with metered agents.
Via Power Platform Admin Center: You can further restrict who can build agents in Copilot Studio
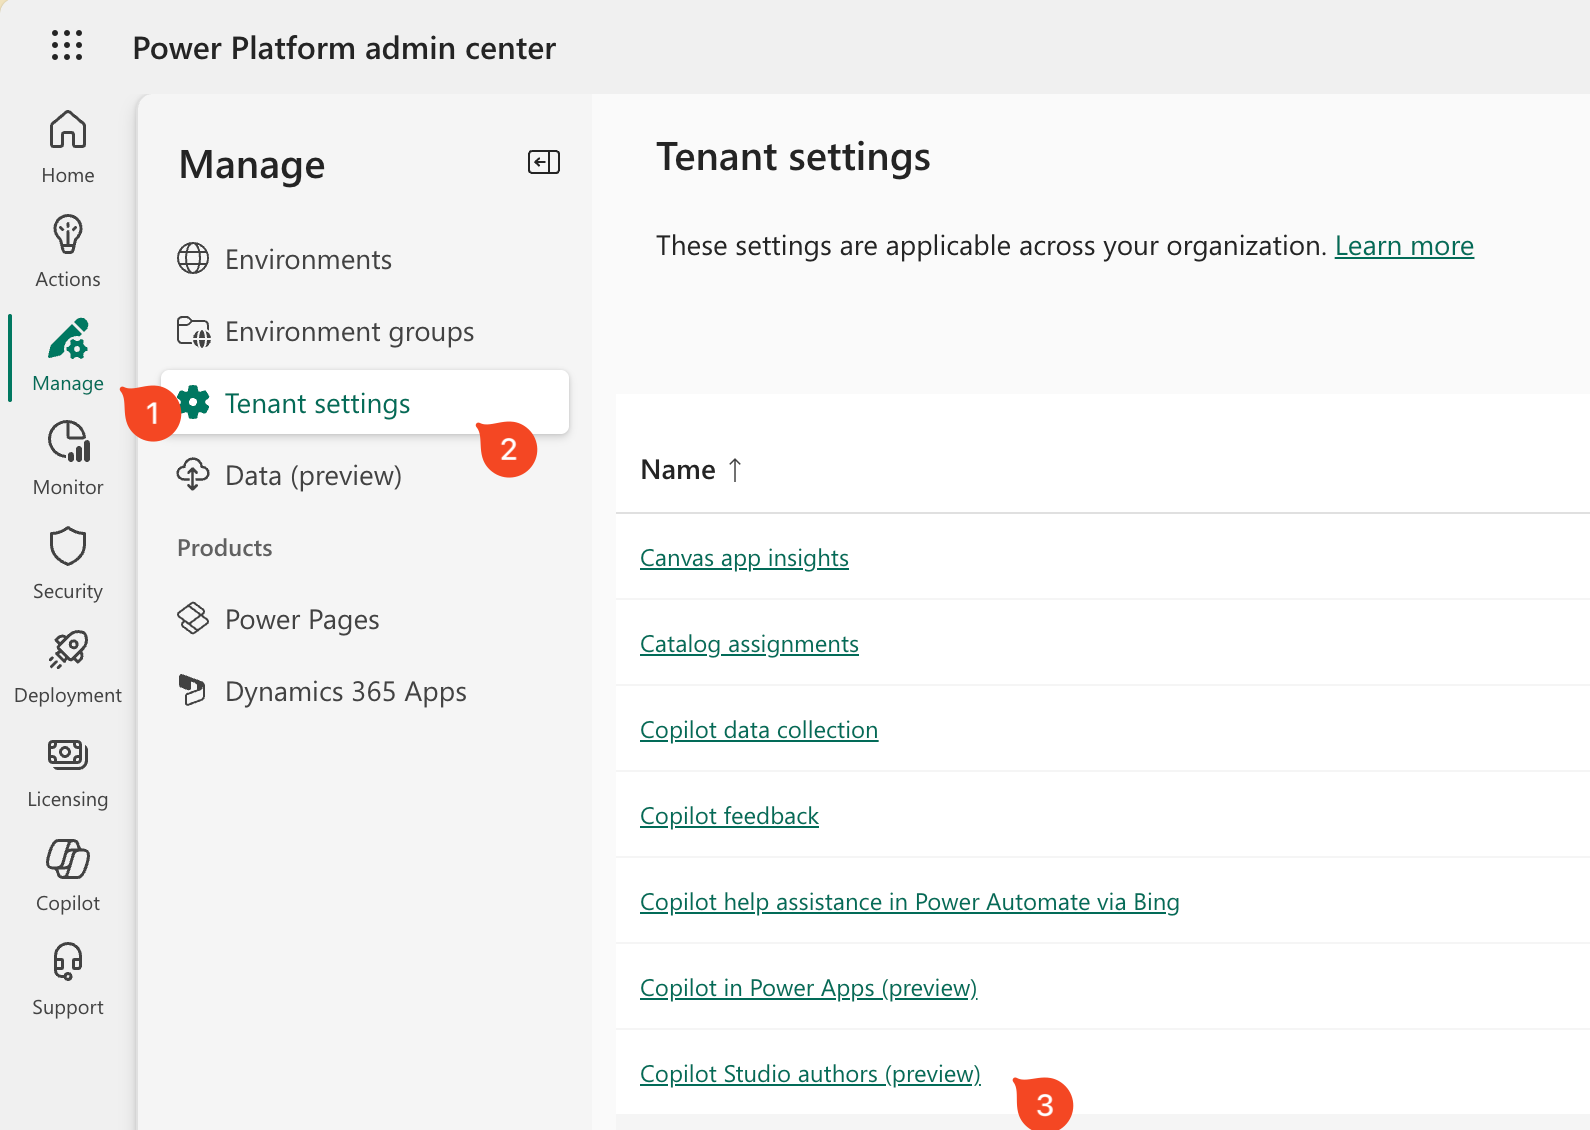
- In the Power Platform admin center, go to Manage > Tenant settings
- Select Copilot Studio authors
- Either keep the default (all users can author) or select a Microsoft Entra group to limit authoring to specific users
Note: To make sure only intended users can create agents, you should disable self-service trials for Copilot Studio in the Microsoft 365 admin center or through PowerShell, as users can otherwise bypass your governance by signing up for a trial license.
Alternatively, assign users the free Microsoft Copilot Studio user license ($0) via the Microsoft 365 admin center (if you have those available) to grant authoring rights.
Configuring who can use Agents
In cases where you want to start small with rolling out agents, you can limit access to specific users or groups:
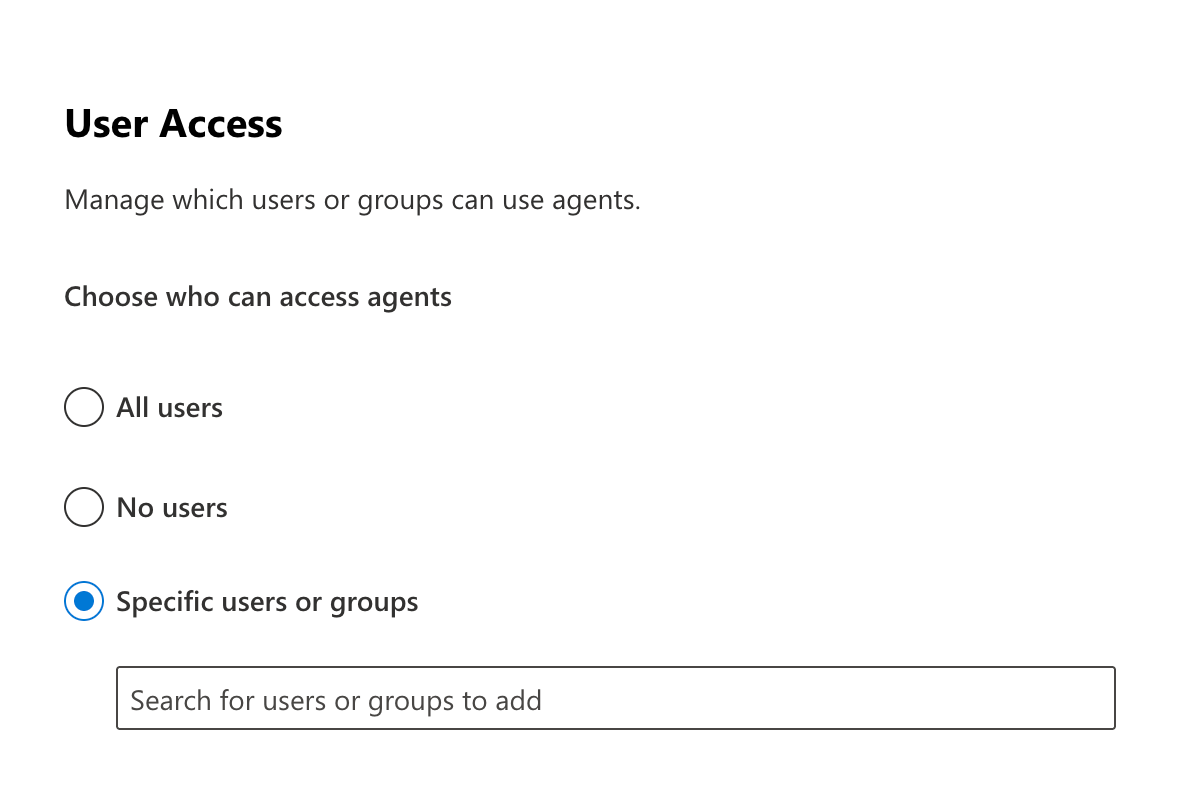
- In the Microsoft 365 admin center, go to Copilot > Settings > User access.
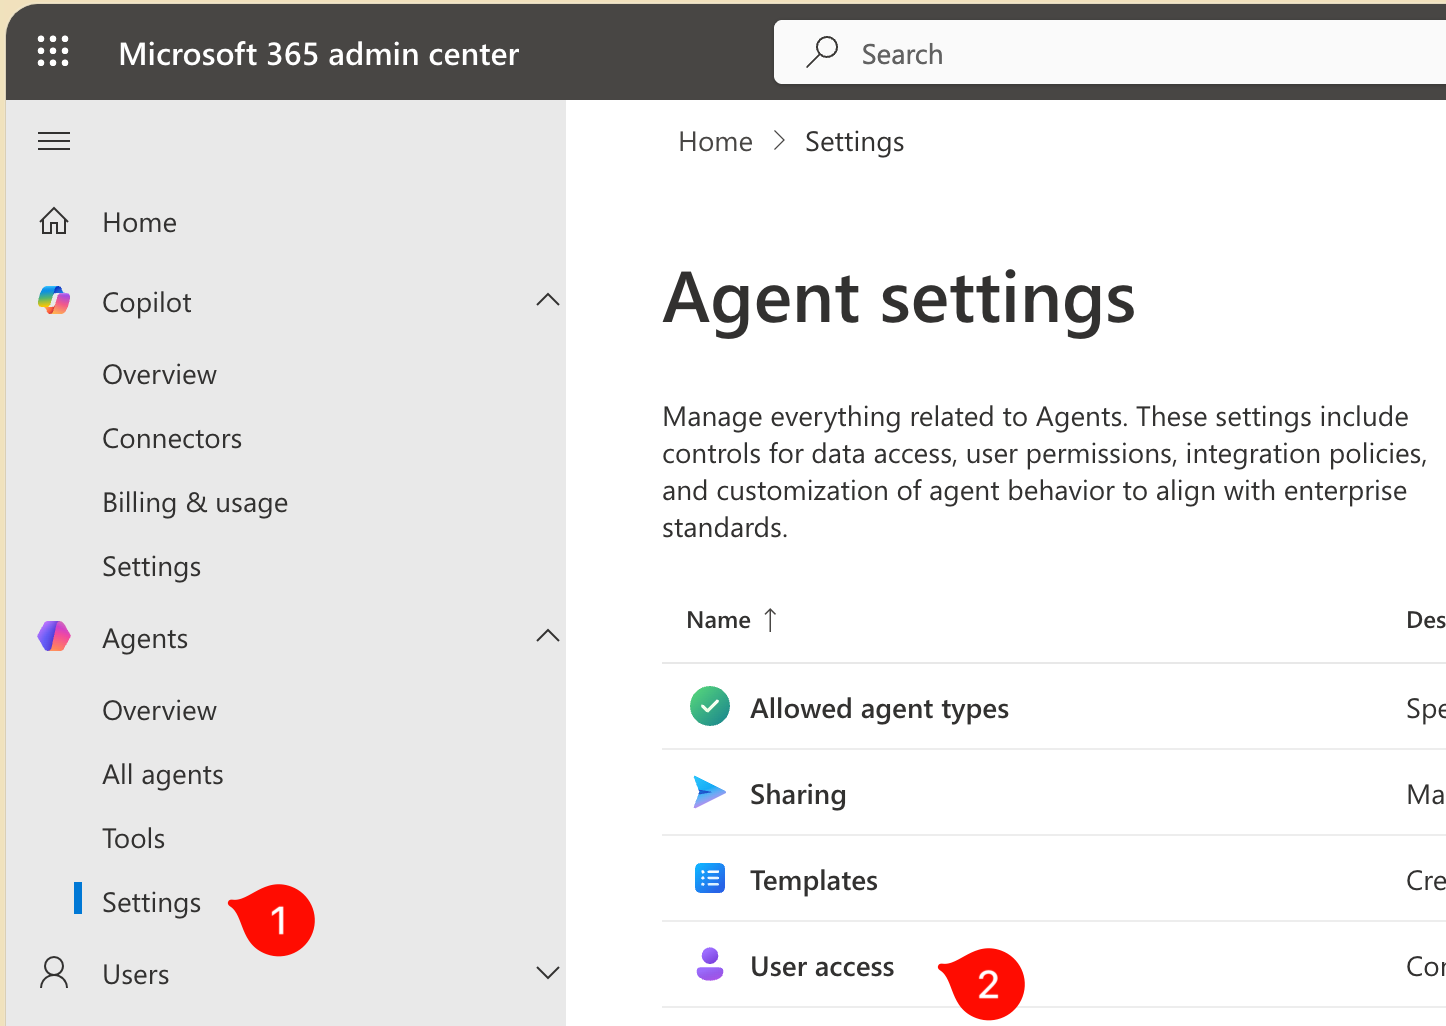
- Select the option to limit access to specific users or groups (All users, No users, or Specific users/groups)
- Click Save
Monitoring Usage and Managing Costs
To keep track of your agent usage and associated costs:
Microsoft 365 Admin Center (Built-in Budget Monitoring):
- Go to Copilot > Billing & usage and select a billing policy to view its Budget tab
- See current spending vs. budget and manage alert recipients directly from the admin center
- Budget alert emails are sent when your usage reaches configured percentage thresholds (up to 24 hours latency)
Azure Cost Management:
- Monitor consumption through the Azure Cost Management portal
- View detailed usage reports for your Microsoft 365 pay-as-you-go services
- Analyze trends over time and create budget alerts at the Azure level
- Requires at least read access to the billing resource group
Power Platform Admin Center:
- Check agent usage statistics through Licensing > Copilot Studio
- Review message consumption by agent type and feature
Turning Off Pay-as-You-Go When Needed
To disable pay-as-you-go billing for a service:
- In the Microsoft 365 admin center, go to Copilot > Billing & usage
- Select the Pay-as-you-go services tab
- Select the service to disconnect (e.g., Microsoft 365 Copilot Chat or SharePoint Agents)
- In the Manage billing policy connections panel, clear the checkbox next to the billing policy
- Read and accept the confirmation to complete the disconnection
Note that it can take up to two hours for users to lose access to agents after disconnecting. Any usage incurred up to the disconnection point will still be billed through your Azure subscription.
If you no longer need the billing policy at all, you can delete it from the Billing policies tab after disconnecting all services.
Have you tried setting up pay-as-you-go agents in your organization? Share your experiences and any tips you have in the comments below!
Additional Resources
- Set up pay-as-you-go for Microsoft 365 Copilot services (IT admin guide)
- Set up or disconnect pay-as-you-go billing in the Copilot node
- Use agents in SharePoint with pay-as-you-go billing
- Manage trial access to SharePoint agents with PowerShell
- Billing rates and management for Copilot Studio messages
- What’s new with pay-as-you-go services in Microsoft 365
Published on:
Learn moreWe can help you with UPDATED - Set Up Pay-as-you-go M365 Chat & SharePoint Agents
If you want help implementing, troubleshooting, or improving this product, contact us and we’ll point you in the right direction.
Related posts
Creating Copilot Studio Agents Without an M365 Copilot Premium License
A common assumption when getting started with Copilot Studio is that you need a full Microsoft 365 Copilot Premium license. That assumption is...
Power Automate: Get events (V4) shared mailbox fix
When your flow reads a shared mailbox calendar using the Office 365 Outlook → Get events (V4) connector, it can fail in a way that looks like...
Using Managed Identity with Azure Automation & PnP.PowerShell
How to Set Up a Managed Identity for Azure Automation Runbooks and Use It in PowerShell Scripts with PnP.PowerShell This guide walks you throu...
How to Use Flexible Sections in SharePoint Pages and News
If you’ve been using SharePoint Online to build pages or share news, you know how important it is to have a layout that works for your c...
What's New in SharePoint Pages
1. New Carousel Layout in the Hero Web Part The Hero Web Part has always been a fundamental element of SharePoint pages. The new Carousel Layo...
Power Platform Solutions Made Simple
Introduction to Power Platform Solutions Power Platform Solutions offer many benefits, especially when moving from standalone flows and apps t...
Use your Bluesky post for comments on your Hugo Blog
Since Bluesky is getting really popular by people I interact with, I decided to switch my blog comments to Bluesky posts. In this blog post, I...
Exploring SharePoint Online's SiteAssets Library
The SiteAssets library in SharePoint Online often seems like a mystery to a lot of users I talk to, but it’s important to understand it ...
Step-by-Step Guide to Copy Pages between SharePoint Online
Unfortunately you can’t copy pages in SharePoint through the UI. But sometimes you may need to copy pages and their associated SiteAsset...
Re-creating Multilanguage Links: A Step-by-Step Guide
Maybe you’ve also stumbled upon the issue of missing multilanguage links in your SitePages library in SharePoint Online. This can happen...