
How to apply custom image while creating batch pool and node for Python runtime?

When we use Azure Batch node to process task with Python, we need to install Python runtime and package. In the common scenario, start task is recommended to be used to prepare the operating environment, including installing the applications that your tasks run, or starting background processes when batch node is first added to the pool and when it is restarted or reimaged. However, the package might be in big size so that it would take very long time to install. The installation might fail due to unexpected issue and time is waste in worse situation even.
The better alternative for this kind of challenge is using pre-packaged custom image to allocate batch node. You could refer to this guidance. In this blog, I will share how to create a batch pool/node with custom image of Windows/Linux VM with pre-installed Python packages.
Windows OS:
1.We need to create a new VM / use an existing VM with Windows system. There are some important points here:
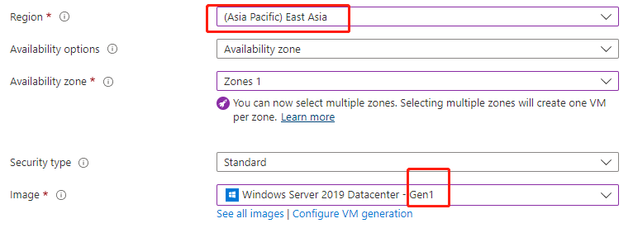
The generation of the VM system is recommended to be 1, not 2, because gen 2 is not supported by all VM families.
The location of the VM must be as same as Batch Account.
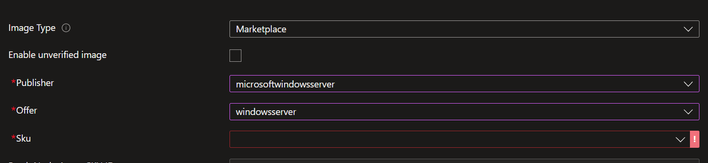
The system version must be supported by Batch service. You can have a check of all supported OS Sku in the page of creating a new pool by selecting following options:
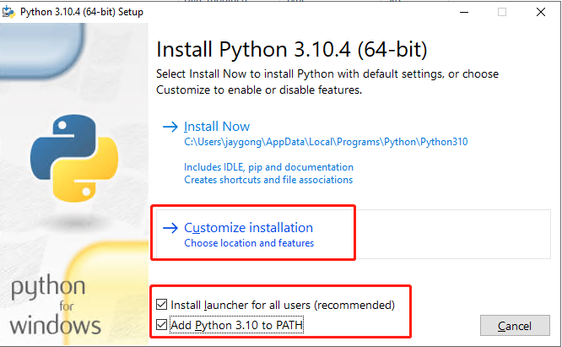
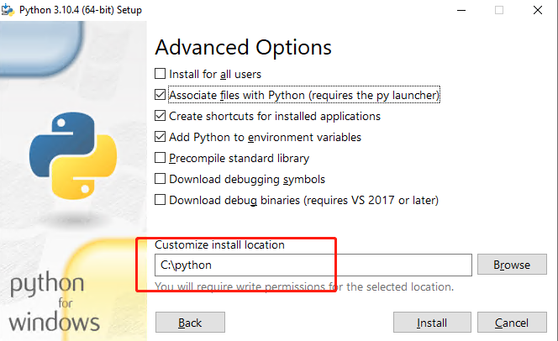
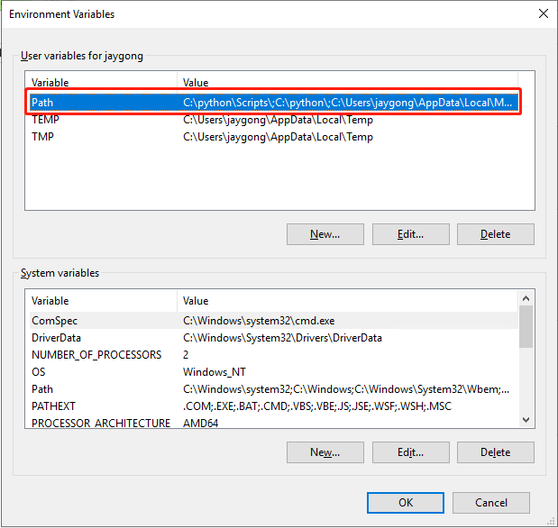
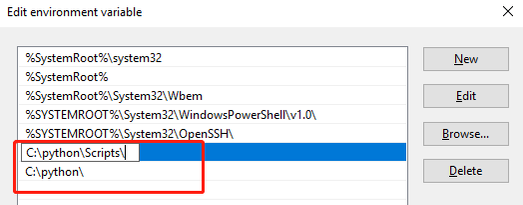
2.Once the VM is started, we can RDP into the instance and install everything which we need including Python runtime. Here I installed Python 3.10.4. And the important thing is to customize the installation to a path under disk C and manually add the installation path and pip path into system environment variable. Because the Python installation would only add it into user environment variable but not system environment variable. When we capture the image and use this image to create a new VM (Batch node), all the setting and software installed for user will be cleaned.
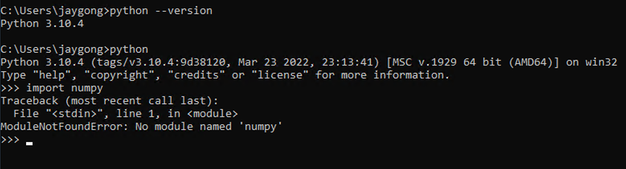
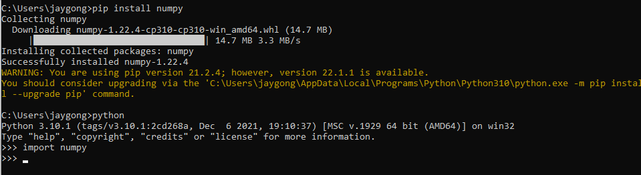
3.After the Python is successfully installed, we can test it in CMD. Initially, the Python will not contain numpy package (as example). The first import failure is expected. Then we can use pip tool to install this package and verify again that it is installed.
4.Until this step, the environment in Windows VM is prepared. We could move to capture the image. The detailed steps can be found from this link Capture an image of a VM using the portal - Azure Virtual Machines | Microsoft Docs:
In Azure Portal, Windows VM Overview page, click Capture button to start.

Please only set the configurations which are highlighted below. We need to create a resource group to save this image (I used same one of this VM itself), select existing or create a new Azure Compute Gallery, and create a new VM image definition. In the create VM image definition page on the right side, we need to give a definition name. The publisher, Offer and SKU should be auto-filled already.
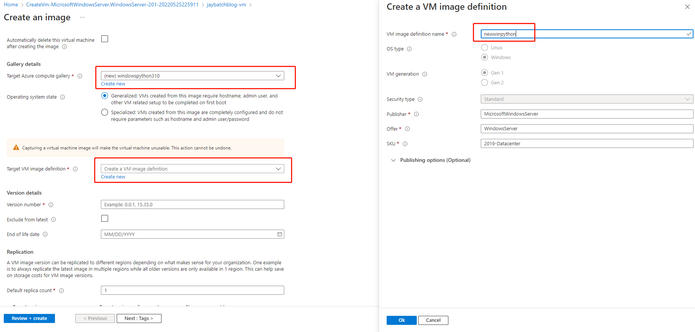
Then please set the version number as you want, such as 1.0.0. Then review + create this resource.

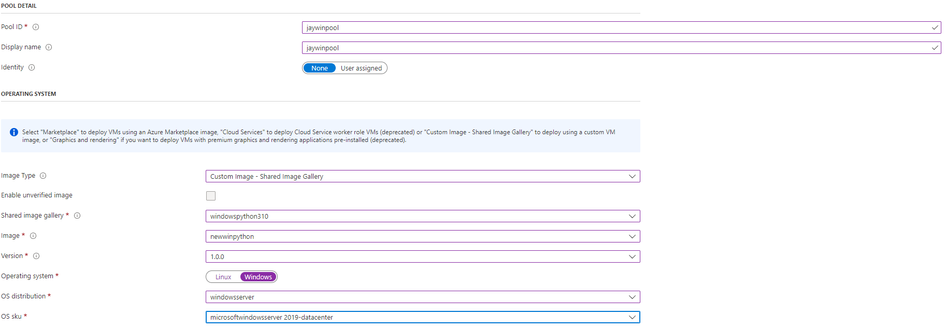
5.The step 4 would create three kind of resources: Azure Compute Gallery, Custom Image definition and Custom Image Definition Version. Once they were all created, we could create a new Batch pool to use this image. In the pool creation page, we could select the option as the following screenshot to use the image from Shared Image Gallery, which is another name of Azure Compute Gallery. The start task is not necessary because our environment is already prepared. Please pay attention to the OS sku option. If this option was not matching your custom image, the node would be unable to start.
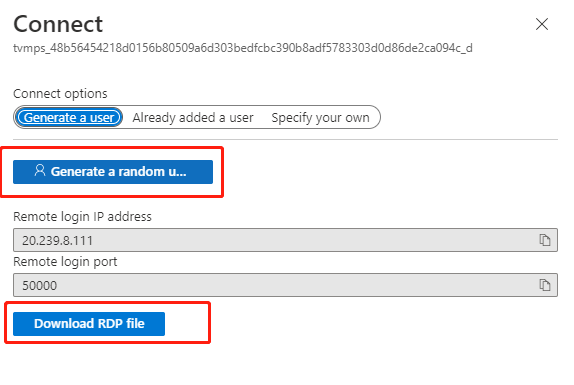
6.Once the node is allocated, we could RDP into this node and verify:


Linux OS:
We only need to change the top three steps of the above guideline which are related to the preparation of the Virtual Machine. The other steps regarding how to capture image and how to create Batch pool based on that image are totally same.
1.We created an Azure VM with Linux Ubuntu 18.04 LTS, gen 1. As same as Windows OS, the VM must be in the same region as Batch account.
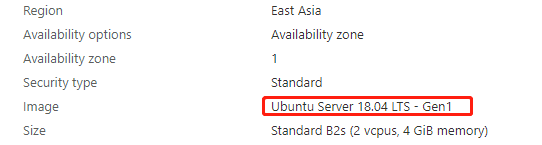
2.Once the VM is ready, we could use SSH to connect to this VM and ran following commands step by step. These commands would install Python 3.8 and the corresponding Pip tool.
sudo apt-get update
sudo apt install -y python3.8
sudo apt-get -y install python3-pip
sudo python3.8 -m pip install --upgrade pip
Once the above commands are completed, we could use python3.8 to call out the python window with version 3.8.0.

3.Run sudo python3.10 -m pip install requests to install external package. Then verify the installation of it.
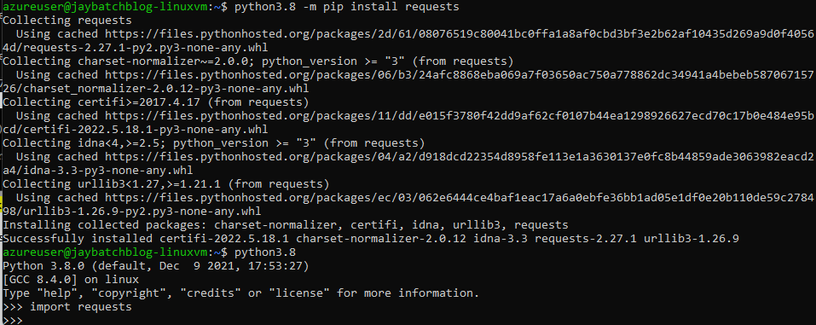
Important tips:
- When you install your real environment, all the packages should be installed by sudo python3.8 -m pip install xxx instead of pip3/pip install xxx. Otherwise, it might be installed into default 3.6 version python.
- The sudo can’t be ignored otherwise the installed package can’t be recognized by other users.
4.Once the required python packages are installed completely, you could refer to the steps in this official document to deprovision this Linux VM by executing command sudo waagent -deprovision+user. Please kindly notice that once we run this command, we can no longer connect to this VM anymore.
Reference links:
1.Start task in the batch service
https://docs.microsoft.com/en-us/azure/batch/jobs-and-tasks#start-task
2.Use a managed image to create a custom image batch pool
https://docs.microsoft.com/en-us/azure/batch/batch-custom-images
3.Create an image of a VM in the azure portal
https://docs.microsoft.com/en-us/azure/virtual-machines/capture-image-portal
4.Create managed image of a Linux virtual machine
Published on:
Learn moreRelated posts
Azure Storage - TLS 1.0 and 1.1 retirement
Overview TLS 1.0 and 1.1 retirement on Azure Storage was previously announced for Nov 1st, 2024, and it was postponed recently to 1 year later...
Efficient Management of Append and Page Blobs Using Azure Storage Actions
Overview In Azure Storage, Blob Lifecycle Management (BLM) allows you to automate the management of your data based on rules defined by...
[Azure AI Search] Internal Server Error when creating CMK encrypted objects
Scenario Customers follow the Microsoft doc to create CMK encrypted objects (data source, index etc.), but get the 500 Internal Serv...
Optimizing Azure Table Storage: Automated Data Cleanup using a PowerShell script with Azure Automate
Scenario This blog’s aim is to manage Table Storage data efficiently. Imagine you have a large Azure Table Storage that accumulates logs from ...
Optimizing Azure Table Storage: Automated Data Clean-up using a PowerShell script with Azure Automat
Scenario This blog’s aim is to manage Table Storage data efficiently. Imagine you have a large Azure Table Storage that accumulates logs from ...
Restoring Soft-Deleted Blobs with multithreading in Azure Storage Using C#
Blob soft delete is an essential feature that safeguards your data against accidental deletions or overwrites. By retaining deleted data for a...
Performing simple Azure Table Storage REST API operations using curl command.
The blog provides guidance to perform simple Table Storage REST API operations such as Create table, Delete Table, Insert entity, Delete entit...
Bulk delete all the old jobs from the batch account
Deleting a Job also deletes all Tasks that are part of that Job, and all Job statistics. This also overrides the retention period for Task dat...
Utilizing Azure Storage and Runbooks for scheduled automated backups of Azure SQL Databases
In this article, we are going to provide detailed steps to create a scheduled Azure SQL Database backup to storage account using automation. T...
[Azure Service Bus] JMS messages getting dead-lettered
The article discusses a problem where numerous messages end up in the dead letter queue (DLQ) when the JMS service bus consumer connects to th...