Software Defined Networking: Multisite - A Tale of 2 SDN Sites
It was the best of times, it was the worst of times, it was the age with SDN Layer 3 gateways between sites, it was the age of no Layer 2 connectivity, it was the epoch of a clunky policy management system, it was the season of Darkness – I never actually read “A Tale of Two Cities” as you can tell. However, I am here to tell you about this great new feature called MultiSite coming to Azure Stack HCI’s Software Defined Networking product in 23H2 that’s about to change everything… well, maybe not everything. It won’t change your morning routines or whether I’ll ever read “A Tale of Two Cities”, but for your networking needs, Multisite will provide you with native Layer 2 and Layer 3 connectivity for virtualized workloads spread across multiple locations. Additionally, it will also provide unified network policy management for your workloads thus eliminating the need to update policies when a workload VM moves from one location to another. This feature is now available with HCI 23H2 Public Preview and will GA with 23H2 GA.
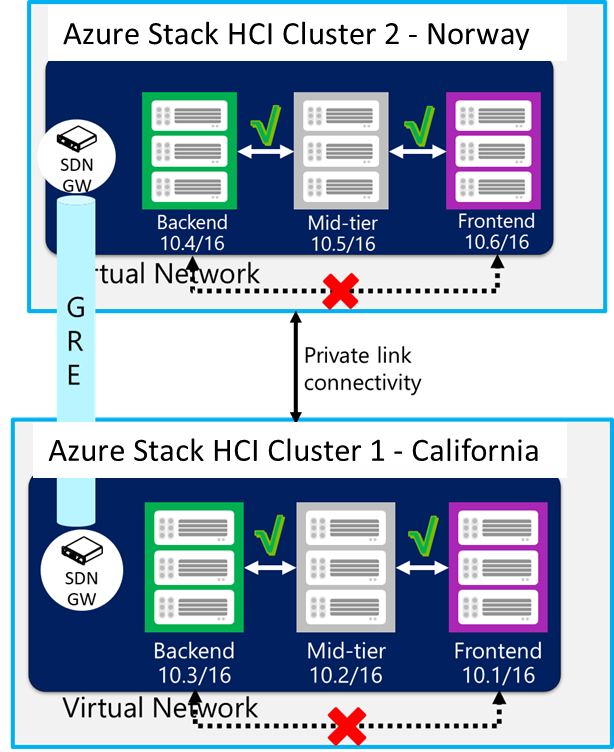
Imagine this scenario, you have two Azure Stack HCI clusters, one in Norway and another one in California. In the past, to allow workload communication across the clusters, you would have to set up a SDN GRE gateway connection between them. With a GRE gateway, you had additional overhead as you had to provision another additional resource (SDN gateway VMs) for Layer 3 connectivity across physical sites while still ensuring availability for said gateway. Ultimately, with this configuration, you’re adding an extra hop in your data path. You would also have to manage all the IP and policy configurations between the clusters to ensure alignment in the case of migration or failover. The bottom line is that there would be additional complexity in your network design while also having additional operational costs, both in time and money.

Figure 1: SDN without multisite
With SDN Multisite, a lot of these hurdles and complexities have been removed. If you want to link the same two clusters together in one SDN ecosystem, then you will have to setup separate SDN infrastructure at each site and peer the two sites together. Peering here is very similar to virtual network peering, if you are familiar with that concept. Once peering is initiated and completed, your cluster will now have support for services such as stretch clustering, migrating workloads without the need for network changes, and many more!

Figure 2: Software Defined Networking with Multisite
As fantastic as this new feature is, it is still currently limited to 2 physical locations but don’t fret. Scaling out is on our roadmap!
Deployment Options
Prerequisites
Before you begin, please ensure the following prerequisites are met:
- There must be underlying physical network (Provider Network) connectivity between two sites. Moreover, the Provider Network name must be the same on both sites.
- TCP port 49001 must be permitted by firewalls for cross-cluster communication.
- SDN must be installed on both sites separately, using SDN Express scripts or using Windows Admin Center. Hence, SDN infrastructure like Network Controller VMs, SLB MUX VMs and SDN Gateway VMs are unique to each site.
- At least one of the two sites must not have any virtual networks and/or Network Security Groups (NSGs) and/or user defined routes configured.
- The SDN MAC pool must not overlap between the two sites.
- The IP pools for the logical networks (HNV PA, Public VIP, Private VIP, GRE VIP, L3) must not overlap between the two sites.
Step-By-Step

- To setup multisite through Windows Admin Center, first click on the Network Controller tab in the extension column in Tools.
NOTE: You will need Windows Admin Center 2311 Preview version to install the SDN multisite feature. This can be downloaded here: Download Windows Server Insider Preview (microsoft.com)
2. From there, click on New to add a second site
3. Once you’ve clicked on New, another window will pop up asking for the following:
- Name – The name of the second site
- Network Controller REST Uri – REST URI of your second site
- Cluster Name for New site – Cluster name of your second site
- Network Controller VM name for new site – Any NC VM name of your secondary site
- Network Controller VM name – NC VM for your primary site
4. Once you’ve entered all the fields, simply click on Submit and you’re all done
For those of you who enjoy a demo of the setup, I’ve included a link below to our Windows Admin Center deployment as well as step-by-step instructions.
Note: PowerShell video mentioned at the beginning of the demo will be posted soon
Since this feature is in public preview now, please refer to this link (Join the Azure Stack HCI preview channel - Azure Stack HCI | Microsoft Learn) to get instructions for access.
Next Up…
Last, but not least, if you’d like to learn more about this feature from deployment to removal, stay posted for our technical documentation coming out next month!
And if all else fails, feel free to reach out to our email [email protected] to get our attention. We’d be more than happy to work with you on setup and to hear all the feedback you might have.