Populate SharePoint List mulitple choice column with Microsoft 365 Groups-and add some List formatting

Recently, a customer asked me if I could automagically populate Microsoft 365 Group Names to a multiple choice column in a SharePoint list. Of course I told them that one can create an ootb Person field and allow group selection, but that not quite what they wanted. So I built a simple Power Automate flow that would populate the choice column and and applied some nice list formatting to it.
The Power Automate flow
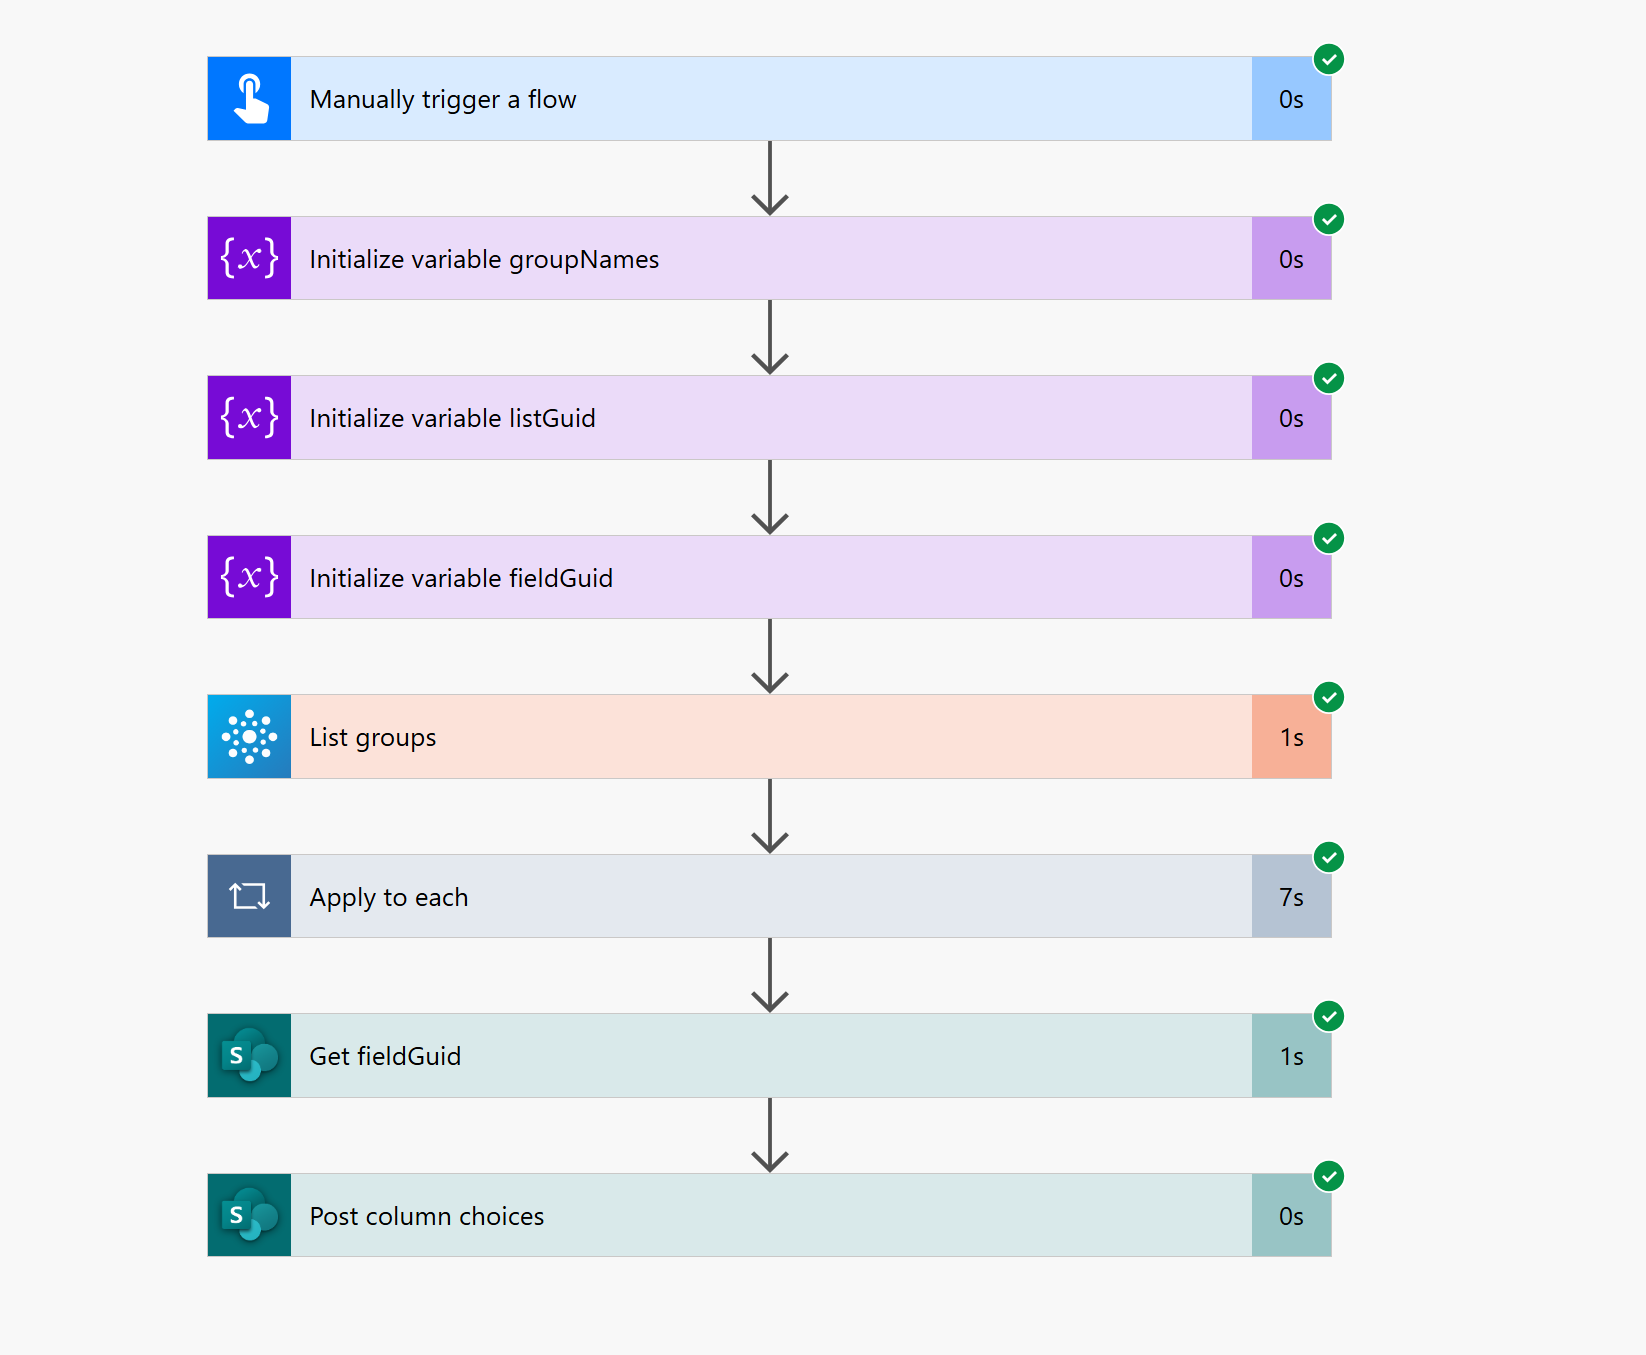
Get your groups
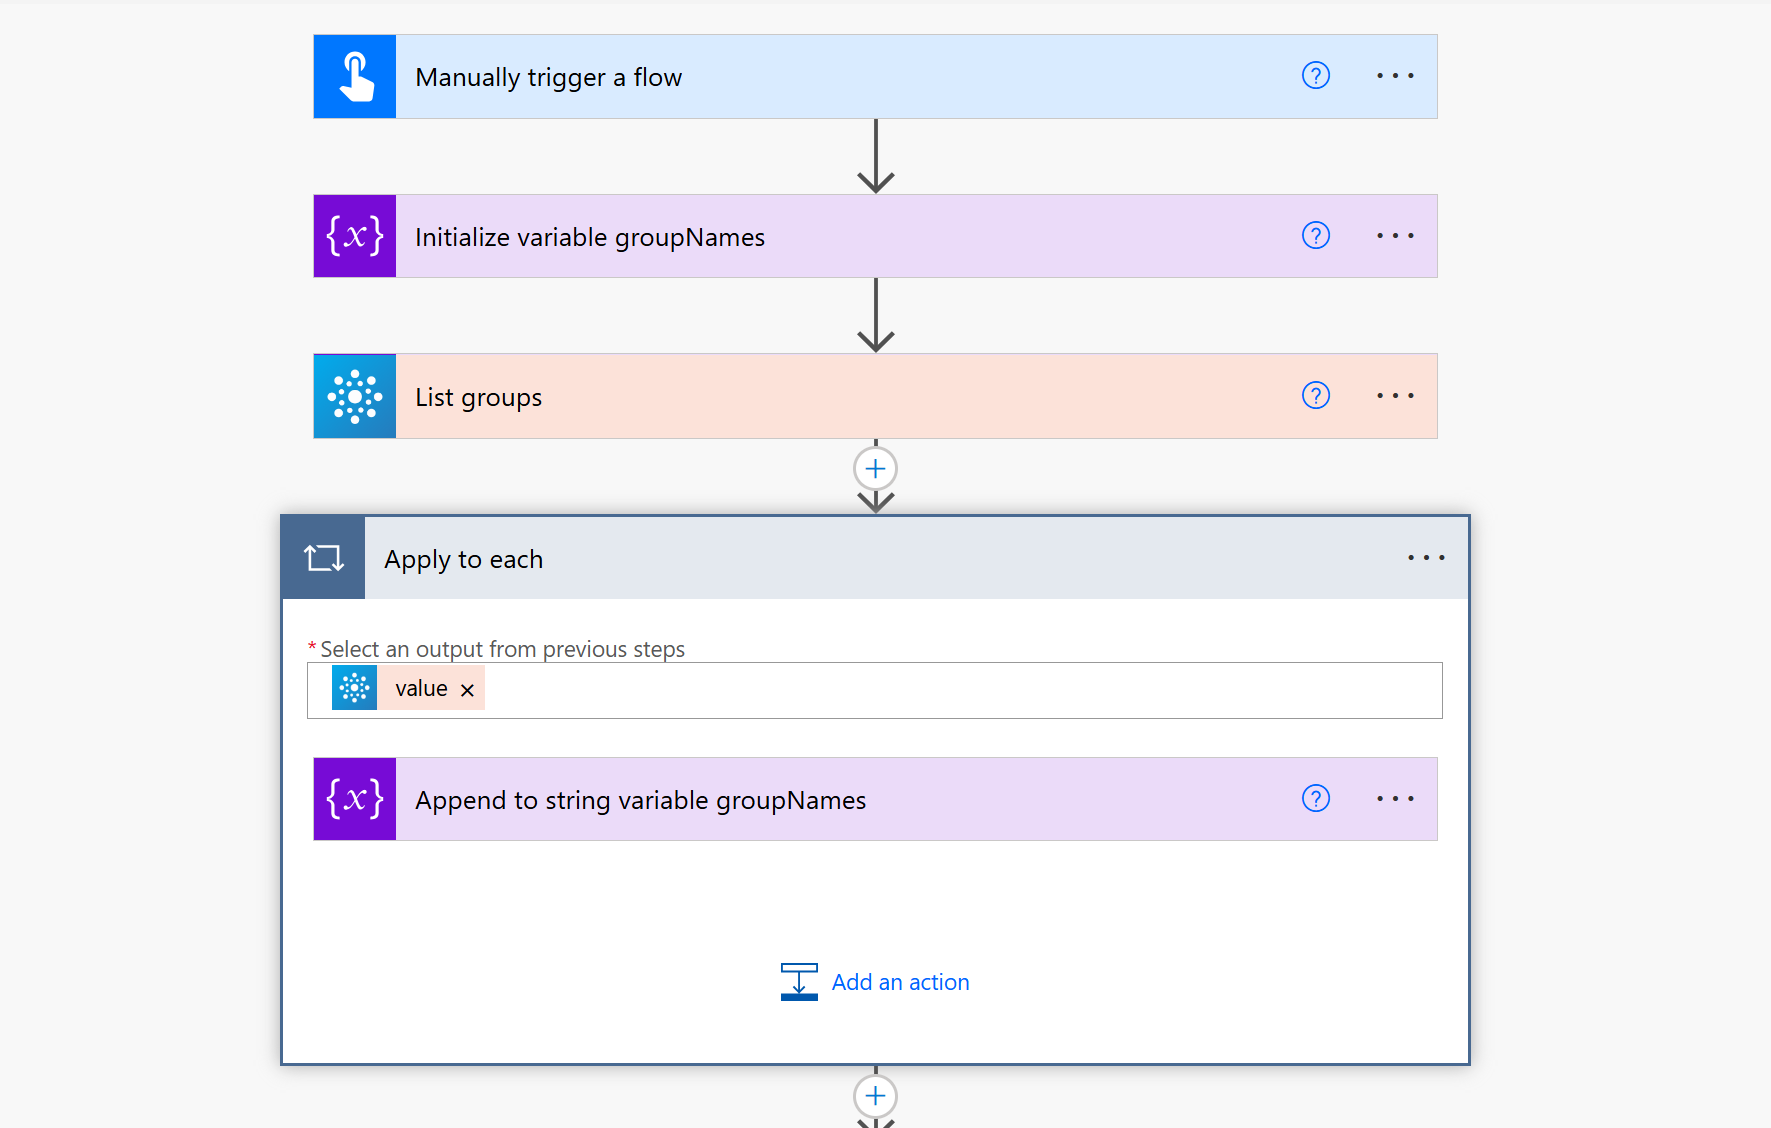
- We trigger the flow as per our needs (manually, if there is not a lot of change in groups) or on a schedule (if there is a lot of changes in groups)
- we then initialize a variable (I used string, but you can also do an array) for the
groupNames - then we use the Azure AD Groups - List Groups action to list all groups. Filter if needed!
- Then we append the
Name(and a comma) in a loop to ourgroupNamesvariable
Obtain listguid and fieldguid
Now we need to obtain 2 things
- the listguid of our SharePoint list: Select the Settings gear ⚙️ on your list, List Settings, you will find it in the URL. The List guid sits right in between
%7Band%7D(Of course there are a gazillion of other ways to obtain this, but that is a super easy one) - the fieldguid of the field that we are trying to populate: You can either follow this post here or stick with me and:
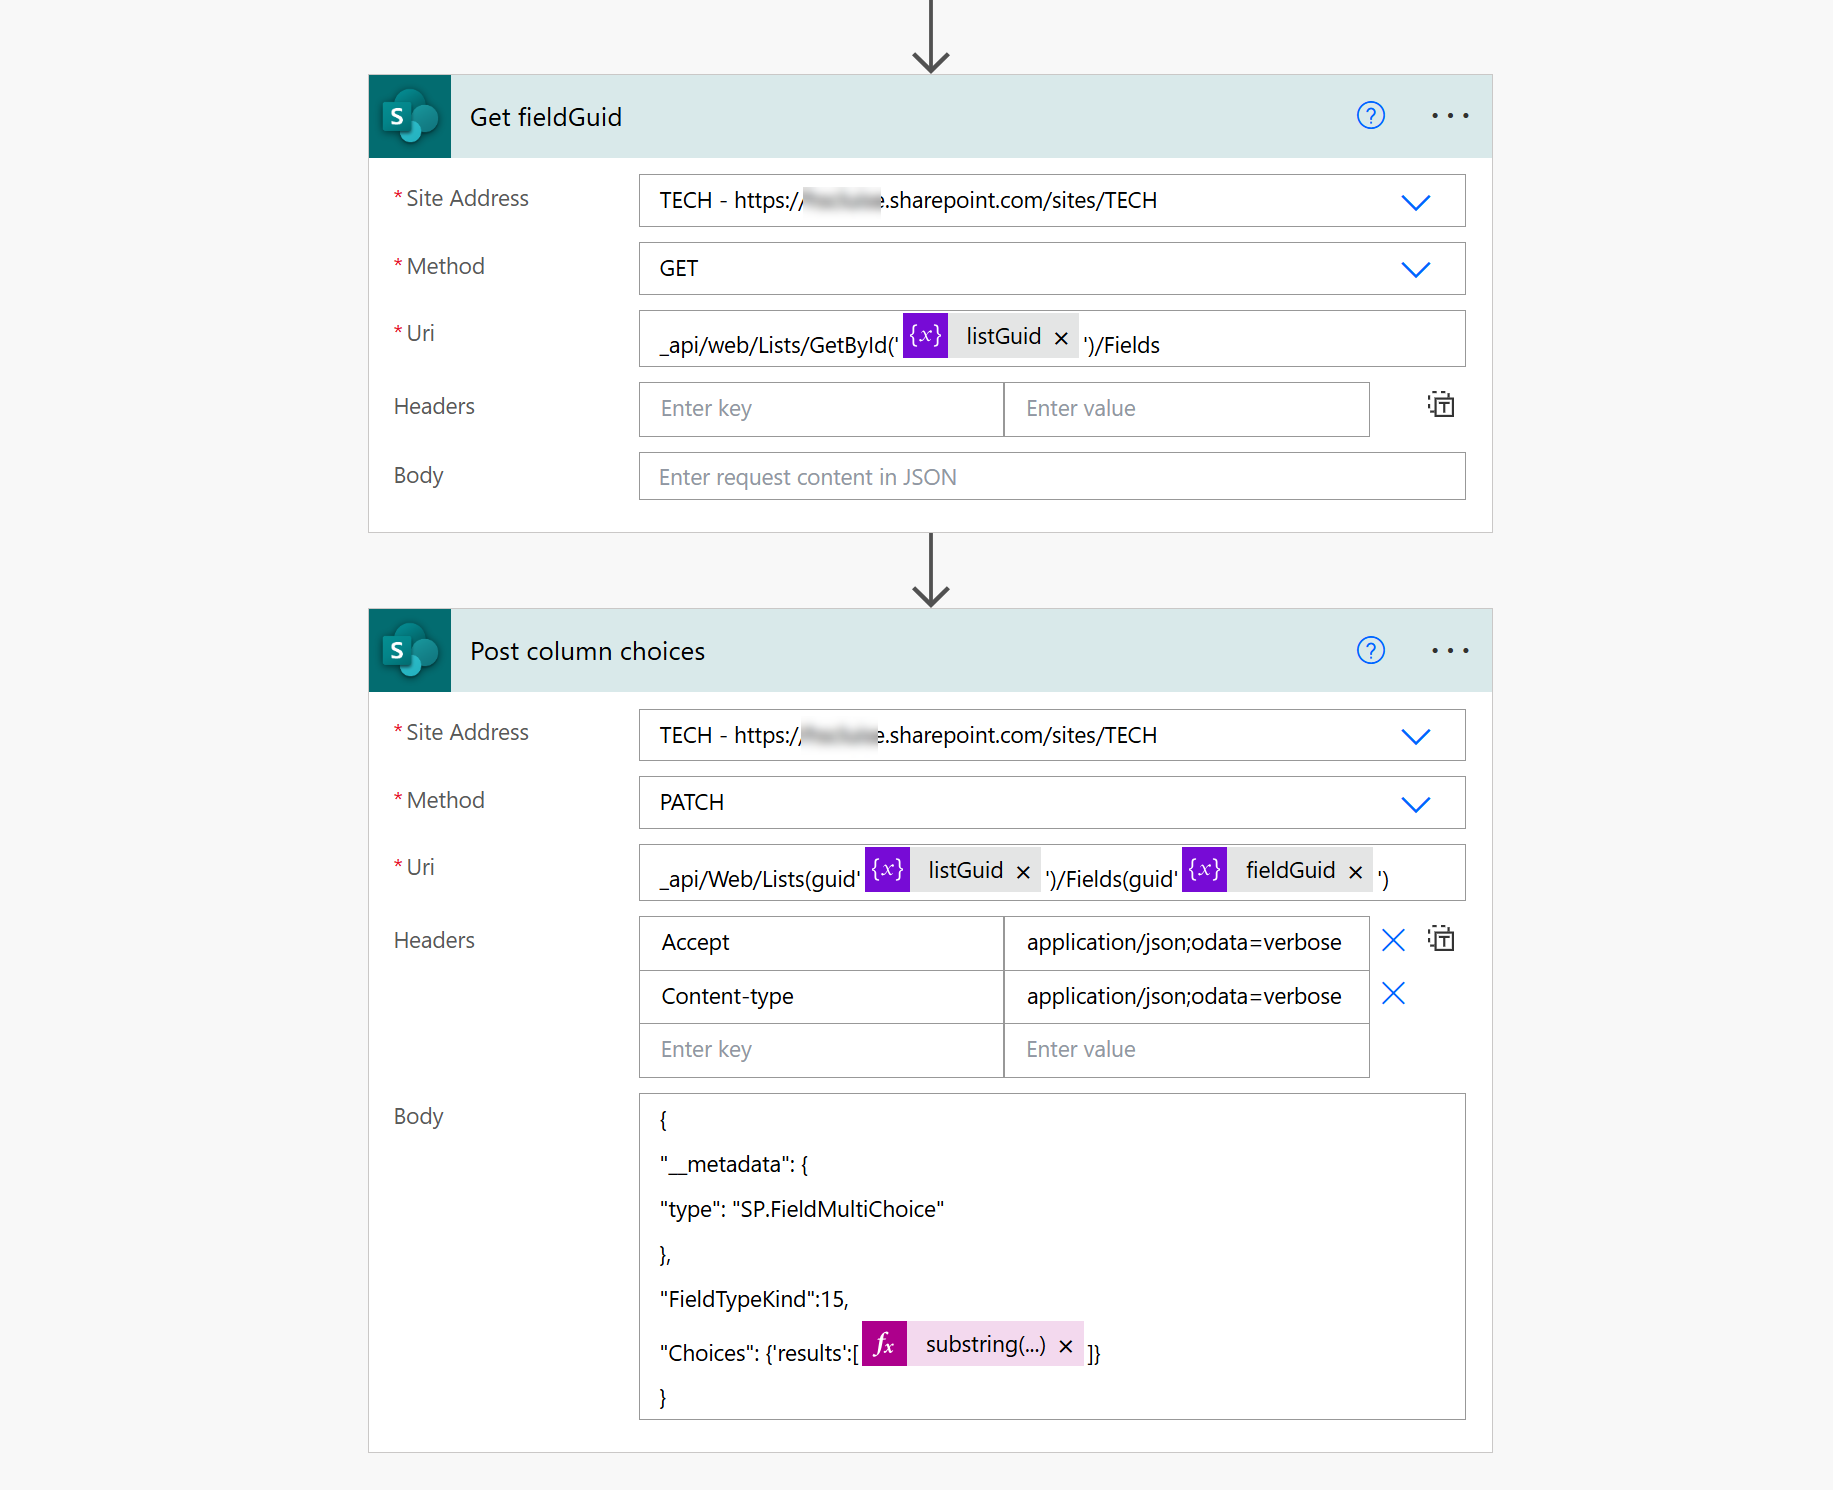
- Use Send an HTTP request to SharePoint
- Method: Get
- URI:
_api/web/Lists/GetById('@{variables('listGuid')}')/Fields
This will return a massive json object from which you can now find the id of the field you are interested in.
Patch the choice column
As a last step, we just patch our choice column with the groupNames. As we comma-separated the variable, we need to make sure that we remove that comma now:
- Use Send an HTTP request to SharePoint
- Method: Patch
- URI:
_api/Web/Lists(guid'listGuid')/Fields(guid'fieldguid') - Headers:
- Accept: application/json;odata=verbose
- Content-type: application/json;odata=verbose
- Body:
{
"__metadata": {
"type": "SP.FieldMultiChoice"
},
"FieldTypeKind":15,
"Choices": {'results':[@{substring(variables('groupNames'),0, sub(length(variables('groupNames')),1))}]}
}
If we now check in SharePoint, this already looks good, but I want to improve the experience with some colors.
Some List Formatting
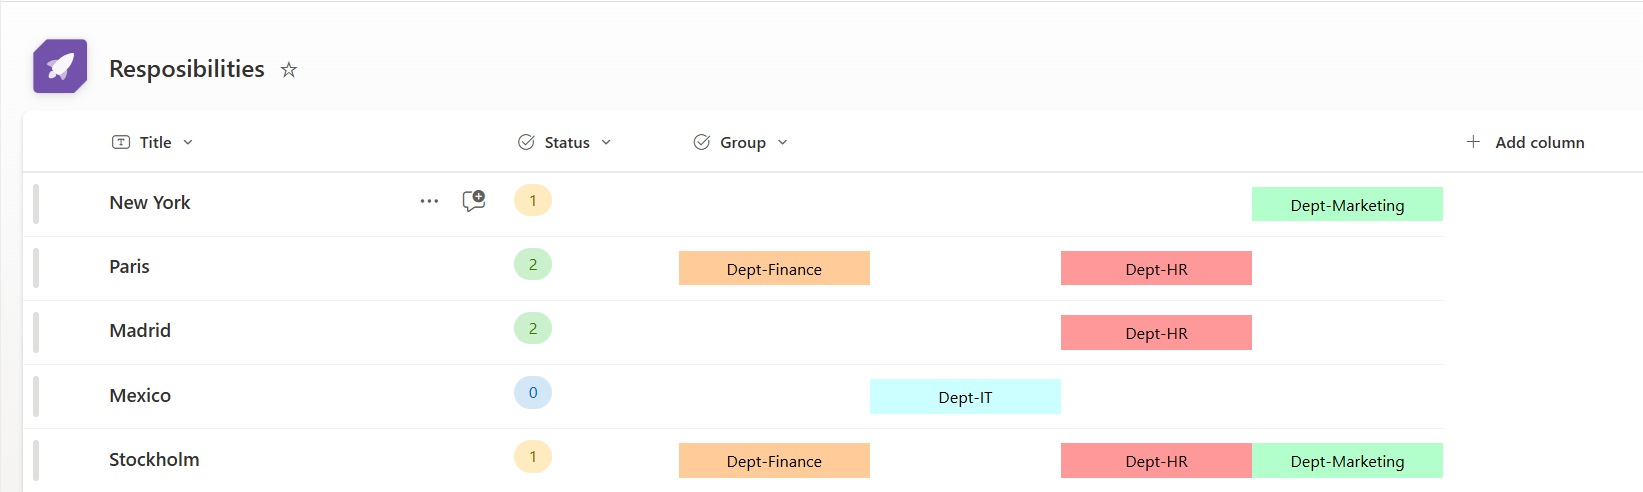
What I want is a refection of which department is selected - remember that this is a multiple choice field? Let’s make that happen!
- Go tou your list
- Select the multiple choice field > Column settings > Format this column
- Select Advanced mode
- Delete the code in the box
- Paste in this snippet
{
"$schema": "https://developer.microsoft.com/json-schemas/sp/v2/column-formatting.schema.json",
"elmType": "div",
"children": [
{
"elmType": "div",
"txtContent": "=if(indexOf(@currentField, 'Dept-Finance') >= 0, 'Dept-Finance', '')",
"style": {
"display": "inline-block",
"width": "25%",
"background-color": "=if(indexOf(@currentField, 'Dept-Finance') >= 0, '#ffcc99', 'transparent')",
"color": "black",
"text-align": "center",
"padding": "5px"
}
},
{
"elmType": "div",
"txtContent": "=if(indexOf(@currentField, 'Dept-IT') >= 0, 'Dept-IT', '')",
"style": {
"display": "inline-block",
"width": "25%",
"background-color": "=if(indexOf(@currentField, 'Dept-IT') >= 0, '#ccffff', 'transparent')",
"color": "black",
"text-align": "center",
"padding": "5px"
}
},
{
"elmType": "div",
"txtContent": "=if(indexOf(@currentField, 'Dept-HR') >= 0, 'Dept-HR', '')",
"style": {
"display": "inline-block",
"width": "25%",
"background-color": "=if(indexOf(@currentField, 'Dept-HR') >= 0, '#ff9999', 'transparent')",
"color": "black",
"text-align": "center",
"padding": "5px"
}
},
{
"elmType": "div",
"txtContent": "=if(indexOf(@currentField, 'Dept-Marketing') >= 0, 'Dept-Marketing', '')",
"style": {
"display": "inline-block",
"width": "25%",
"background-color": "=if(indexOf(@currentField, 'Dept-Marketing') >= 0, '#b3ffcc', 'transparent')",
"color": "black",
"text-align": "center",
"padding": "5px"
}
}
]
}
How does this list formatting work?
We separate into the number of <div> we need (note this is just an example, there were way more groups to select from) and that set the width to the percentage the <div> may consume. The colors are applied dynamically using indexOf(@currentField, 'Dept-Name') >= 0, which checks if the department is selected in the column. Each part of the cell shows the department name if it is selected. If the department is not selected, the <div> will be empty and have no background color (transparent).
Conclusion
Good old Send and HTTP request to SharePoint saved the day again! No need for app registrations, but a super straight forward flow that populates the multiple choice colum to our needs. Of course you don’t need to do groups, but can apply any array that you fits your use case!
Published on:
Learn moreRelated posts
Every Microsoft 365 App Explained
Microsoft Defender for Office 365: AIR Investigation Experience Improvements
Microsoft Defender for Office 365’s AIR experience will add a manual refresh button, replacing auto-refresh, and simplify investigation ...
Using User Assigned Managed Identities with Microsoft 365 Automation
A user assigned managed identity (UAMI) is a secure method to authenticate with many important endpoints, including the Microsoft Graph. It’s ...
Save Docusign Document To SharePoint With Power Automate
When all Docusign document signatures have been collected Power Automate can save the signed PDF ... The post Save Docusign Document To ShareP...
Microsoft Copilot (Microsoft 365): Use Agent 365 agents within Microsoft 365 Copilot Chat and Declarative Agents
Agents that are published to Agents 365 are already managed in the Microsoft 365 Admin Center. If the agent implements the Agent2Agent protoco...
Microsoft Teams: External phone call routing (GCC High, DoD)
External call routing will provide users the ability to redirect all external phone calls to either voicemail or their unanswered settings. Pr...
Microsoft Purview: Information Protection – Auto-labeling scale increase for SharePoint and OneDrive
We are increasing the maximum auto-labeling capacity for SharePoint and OneDrive from 100,000 up to 500,000 files per tenant per day. This hel...
Microsoft Viva: Copilot Analytics – Agent 365 dashboard for managers
Managers in organizations can now access their Agent 365 data through the Agent Dashboard in Copilot Analytics (Insights), enabling them to un...
Dynamics 365 Sales – Teams owned opportunities to be researched by Sales Opportunity Agent
We are announcing the ability to utilize the Sales Opportunity Agent to research opportunities owned by specific Owner teams in Dynamics 365 S...