Round Robin assignments in Power Automate

When distributing tasks or tickets across a team, fairness matters, and so does flexibility. With Power Automate, we can implement a round robin pattern that always picks the next person in line, and wraps around once we hit the last.
I got asked by a customer on how to achieve this - so it might be helpful to you as well.
What we’re solving
Let’s say your team handles incoming forms—support requests, process suggestions, or tickets. You want those distributed evenly across your team, but also automatically.
The round robin logic makes sure that in a team 3 people:
| Request # | Assigned to |
|---|---|
| 1 | Person 1 |
| 2 | Person 2 |
| 3 | Person 3 |
| 4 | Person 1 again |
… and so on. No skipping, no duplication, no manual effort.
Setup
SharePoint list: AssignmentIndex
Create a simple list called AssignmentIndex. It only needs one row and one column (besides the Title):
| Title | LastIndex |
|---|---|
| Assignment | 0 |
LastIndexmust be a number column- This acts as memory across runs, telling us who got the last task
Microsoft Forms form
Set up a basic form with questions like Title, Description or similar. We will use this to trigger an upcoming support request.
Flow overview
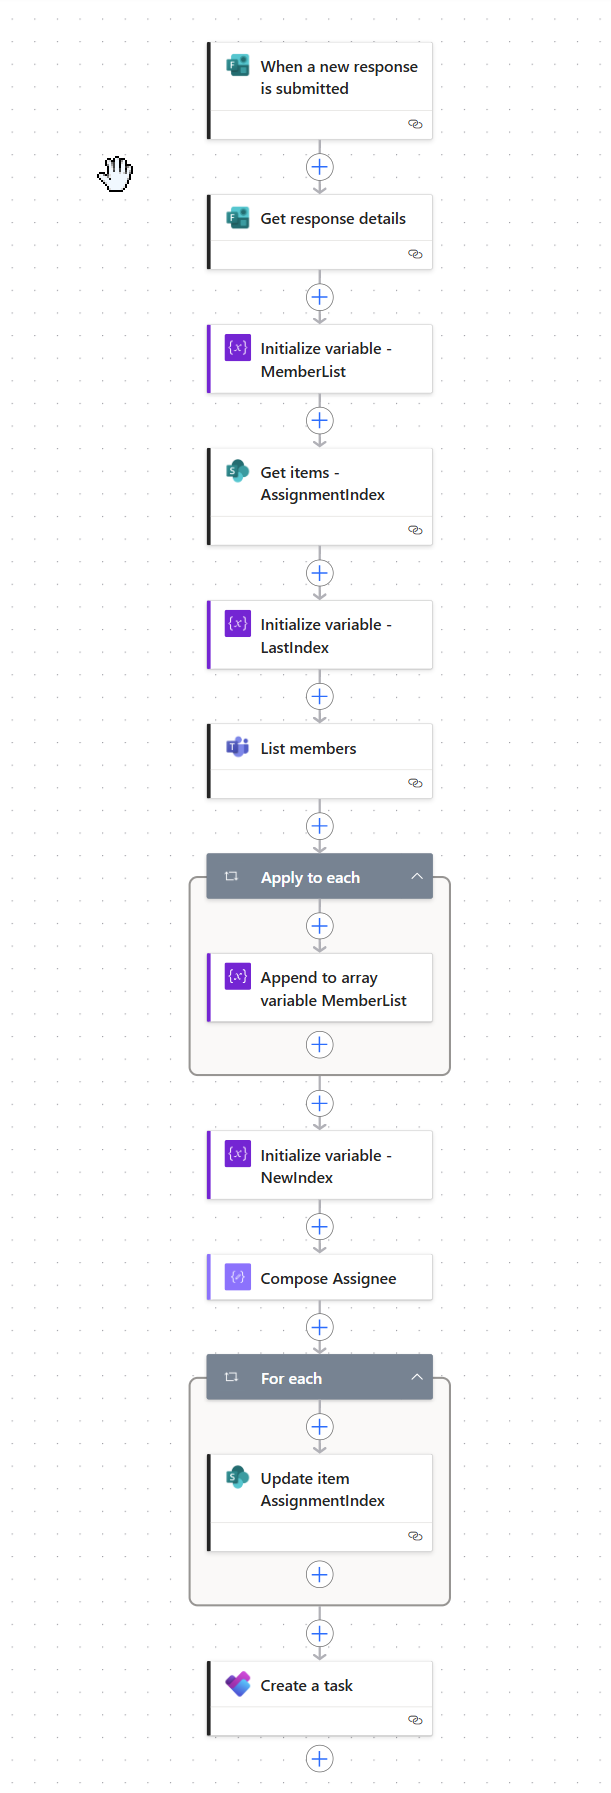
Let’s break this down into steps:
Microsoft Forms trigger
Use the trigger When a new response is submitted
Get Form Details
Use the actions: Get response details, this gives us the data we want to assign: title, description, urgency, etc.
Initialize MemberList
- variable of type Array
- leave value empty
Get SharePoint Index
Use Get items to pull the one row from the AssignmentIndex list. Use a filter condition Title eq 'Assignment'.
Initialize LastIndex
Now initialize a variable of type Float: body('Get_items_-_AssignmentIndex')? ['value'][0]?['LastIndex'] - this lets us store the value of the LastIndex column.
Get Microsoft Teams members
Use the action List members from Microsoft Teams connector to list the members of your Team. Select a team and channel from the dropdown. The output will be an array of team members (emails, names, etc.).
Get the email addresses
Add an Apply to each loop with the input: body('List_members')?['value']. Inside of the loop, add an Append to array variable - Choose the MemberList from the dropdown and put this into the value as an expression: items('Apply_To_Each')?['email']
This will loop through the array of objects we get from the Teams action, extract only the email addresses of the team members and add them to our array variable.
Calculate the new index
We now want to move one step/person forward in the team list. Initialize another variable NewIndex of type Float and use an expression:
mod(add(variables('LastIndex'), 1), length(variables('MemberList')))
This is where the magic happens. The mod() (Modulo) function will return the remainder of a division (dividend : divisor). In our case, it will give us the remainder of the division of LastIndex + 1 and the amount of items we got from the Memberlist variable (we calculate this with the length function).
What does mod() do here?
Let’s make that clear with a table:
| LastIndex | Team size | NewIndex calculation | Result |
|---|---|---|---|
| 0 | 3 | (0 + 1) mod 3 = 1 | 1 |
| 1 | 3 | (1 + 1) mod 3 = 2 | 2 |
| 2 | 3 | (2 + 1) mod 3 = 0 | 0 |
The mod() function ensures we loop back to the beginning after reaching the end of the list.
Now let’s finally find the right person to assign the new task to. We already know the NewIndex, all is left for us now is to get the NewIndexth (sic!) item from our MembersList: Add a Compose action and call it Assignee. Use this expression: variables('MemberList')[int(variables('NewIndex'))], which will then return the email address, and due to our round-robin logic it will always be the next person in the list. You might have noticed, that we make an integer out of our float variable - this is needed because the index needs to be an integer (as an index can’t be 9 3/4 or similar).
Assign the task
You can use this pattern for different use cases, for example
- Assigned To fields (Planner, SharePoint, Approvals)
- Emails
- Logging
Do as you please, your Assignee action is now always the correct person.
Update the SharePoint index
Finally, don’t forget to update the LastIndex field in SharePoint List so we know who got the last assignment and the list stores the correct value for the next flow run.
Use Update item with:
- ID = dynamic content
IDfrom our Get items action - LastIndex =
variables('NewIndex')
Done! 👌
Looking for more blog posts on Power Automate? I got you: https://www.m365princess.com/categories/power-automate/
Published on:
Learn moreRelated posts
Handling Dataverse Customer Columns in Power Automate
In Dataverse, a Customer column is a special type of lookup. Unlike a standard lookup, it can reference either an Account or a Contact. That f...
Understanding Power Automate flow performance
In this post I'm looking at performance of Power Automate flows. For some flows this may not really matter too much, however when you have a n...
How to Automate Project Assignment in Dynamics 365 Using Power Automate and Power Apps Code Apps
This blog demonstrates how to automate project assignments in Microsoft Dynamics 365 using Microsoft Power Automate and Power Apps Code Apps, ...
Power Automate: Select Action
The Select action reshapes arrays in Power Automate without loops. Faster than Apply to each, with text mode and calculated fields for clean t...
New Designer Run After Settings in Power Automate
I will start this post with a warning about the New Designer Run After settings. The steps described in this post do not make it easier to und...
Power Automate: range function
The 'range' function in Power Automate creates arrays of consecutive integers. Use it to replace counter variables and skip the count-vs-end t...
Power Automate: Teams - When I'm @mentioned
The Power Automate "When I'm @mentioned" Teams trigger fires for chat and channel mentions in near real time. Webhook based, fires on replies,...
Power Automate – Debug flows using variable default values
We are announcing the ability to debug flows using variable default values in Power Automate. This feature will reach general availability on ...
Power Automate – Export object-centric process mining data to Microsoft Fabric semantic model
We are announcing the ability to export object-centric process mining data to the Microsoft Fabric semantic model in Power Automate. This feat...