Azure Data Components Network Architecture with secure configurations

Use Case :
•When there is a need for the Data Components – ADF,ADB and SQL-Pool code to be promoted to higher environment securely without public internet access this blog is useful
•We have integrated the data components to VNET’s, and public access has been disabled for the above use case
•We have built deployment(CI-CD) pipelines in such a way that they can only deploy securely via a Self-hosted agent which has the access to VNET
This Blog will guide you to setup the data components securely with Network diagram included
Network Architecture for Azure Data Resources in V-NET
-
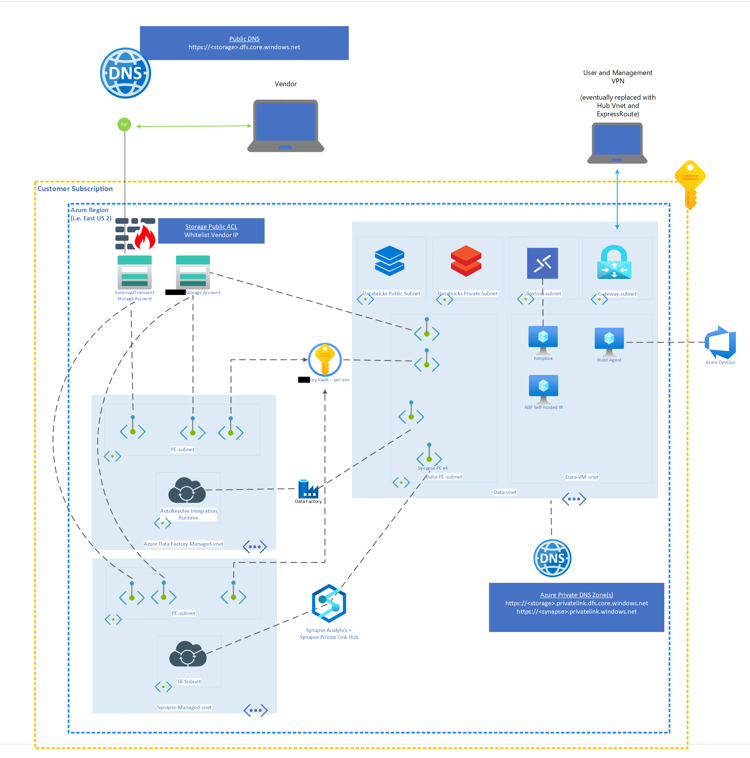
The Network Architecture diagram below shows the Azure Data Components(Azure Data Factory, Azure Data bricks, Azure Synapse) in Secure Virtual Networks.
-
All these Azure Data Components cannot be accessible from public internet and are connected to each other securely.
-
Virtual Networks and components in the Network Architecture Diagram:
- Azure Synapse workspace and Azure Data Factory are provisioned with Managed Virtual Networks(Azure Data Factory Managed VNET, Synapse Managed VNET)
- The Azure Databricks is within a custom Virtual Network(Data VNET)
- The Azure Storage Accounts, Azure Key Vault , Azure Synapse workspace and Azure Data Factory are connected to the Data VNET by using Private Endpoints so that data transfer between these components is secure.
- A virtual machine (within the Data VNET/separate SUBNET) is configured as ADF SHIR(Self Hosted Integration Runtime) to run Azure Databricks notebooks from Azure Data Factory.
- A virtual machine within the Data VNET is configured as Azure DevOps Self Hosted Build Agent for CI-CD (Continuous Integration, Continuous Deployment) Pipelines to run as these Data components cannot be accessible from public internet.
- A virtual machine used as a jumpbox with Bastion login is configured so that application code can be accessed securely ONLY in the DEV environments. (This machine will not be present in any higher environments)
Azure Data Components Secure Network Setup
- This section explains how the data components are configured securely so that only components within the virtual networks can access them and the public internet access is restricted.
Synapse Secure Network setup:
- Synapse Workspace is setup with a managed VNET
- Synapse Workspace is configured using private link hub
- Synapse Workspace must be connected via private endpoints through the private link hub.
- Public Network Access to workspace endpoints must be disabled
- TDE(Transparent Data Encryption) needs to be enabled
- Managed identity needs be provisioned during creation
- SQL Active Directory Admin should be enabled as a group, not for one specific user
- Azure Resource Locks should be turned on to prevent accidental user deletion
Databricks Workspace Secure Network Setup:
-
Enable Databricks IP access list API in order to:
- Restrict Portal access to Databricks workspace for specific IP addresses
- Restrict Databricks API calls to specific IP addresses
-
Configured Databricks Workspace with VNET injection and with no public IP (NPIP) enabled
-
Encrypt communication between Databricks nodes using global init scripts
- Configure an <init-script-folder> with the location to put the init script.
- Run the notebook below to create the script enable-encryption.sh.
- Configure the Databricks workspace with the enable-encryption.sh global init script using the global init script REST API.
- Below is the notebook to create enable-encryption.sh:
- Follow this documentation for further details to set up encryption as a global init script: https://docs.microsoft.com/en-us/azure/databricks/security/encryption/encrypt-otw
Azure Data Factory Secure Network Setup:
- This ADF is provisioned with a managed VNET
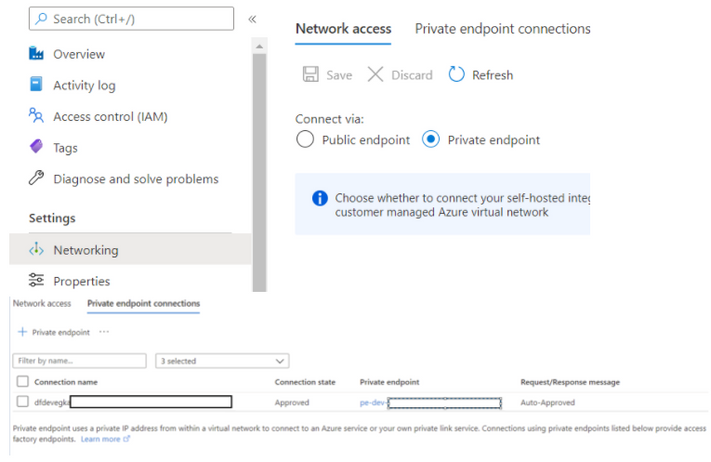
- The network access of ADF is set to connect via private endpoints to the Data VNET(Custom VNET)
- Create a SHIR (Self Hosted Integration Runtime) for the Data Factory to access resources within the Data VNET.
- SHIR in Linked Services
- Datafactory is connected to databricks via SHIR that is in the same databricks vnet, but on a seperate subnet. This is authenticated via managed identity and must be having contributor RBAC permissions on that subnet.
- Example of databricks linked service
{
   "name": "ls_databricks",
   "properties": {
       "description": "Linked Service for connecting to Databricks",
       "annotations": [],
       "type": "AzureDatabricks",
       "typeProperties": {
           "domain": "https://adb-XXXXX.net",
           "authentication": "MSI",
           "workspaceResourceId": "/subscriptions/XXXXXX/resourceGroups/rg-dev/providers/Microsoft.Databricks/workspaces/XXXXX",
           "newClusterNodeType": "Standard_DS4_v2",
           "newClusterNumOfWorker": "2:10",
           "newClusterSparkEnvVars": {
               "PYSPARK_PYTHON": "/databricks/python3/bin/python3"
           },
           "newClusterVersion": "8.2.x-scala2.12",
           "newClusterInitScripts": []
       },
       "connectVia": {
           "referenceName": "selfHostedIr",
           "type": "IntegrationRuntimeReference"
       }
   }
}
- Create Managed Private Endpoints for accessing resources outside the ADF managed V-net(which don't have public internet access). For Example, Synapse SQL pool cannot be accessed by the public internet and it will be outside the ADF managed vnet. Therefore a Managed Private Endpoint needs to be created for Data Factory access to Synapse SQL Pool.
Azure Key Vault
- Azure KeyVault should be configured with a private endpoint to prevent access from the public internet.
- In addition to using Azure KeyVault for secret scope management, it can be integrated with Azure Databricks for Azure KeyVault-backed scope.
Azure Datalake Storage Accounts
- Public Access to all Data Lakes should be disabled.
- Private Endpoint Access should be configured for all Data Lakes
- VNET Access is configured where necessary for Azure Storage Explorer on custom VNET located VMs.
- ACL permissions to containers are programmatically handled via PowerShell code
- RBACs are restricted to Azure Resource Managed Identities when specifically required e.g Azure Data Factory Storage Blob Data Contributor Role.
- Along with the above mentioned points, here are the storage exception and Network routing
Self Hosted Agent Installation Procedure:
Purpose:
In order to run CI and CD pipelines through a secure VNET. We need to install a VM(connected to a VNET/SUBNET) as a self hosted agent in Azure Devops.
Installation Procedure:
- Log on to the VM you want the self hosted agent installed on via Bastion
- Within the Virtual Machine, navigate to the Azure Devops website using a web browser and log in.
- Create a new agent pool or use an existing pool
- Navigate to project settings/agent pools within azure devops to create a new pool or view the existing pool that you want to use
- Follow the add pool dialogue to create a new pool if needed
- Within the pool you want to use, navigate to the agents tab and select new agent.
- Follow the instructions outlined here: https://docs.microsoft.com/en-us/azure/devops/pipelines/agents/v2-windows?view=azure-devops
- This will show you how to create a PAT token to authenticate the agent (this token is only used once at authentication time and never used again)
- Make sure to install the agent to run as a service
Self Hosted Agent Dependencies for Pipelines:
Because the agent will be installed on a brand new blank windows image, other dependencies/packages need to be installed on the virtual machine in order for our CI/CD pipelines to run.
Example:
Let's consider an example scenario that we need to install some modules like below
Here is a list of packages to install and where to install them.
- Log on to the VM using Bastion again and manually install these packages
- Packages:
- sqlpackage
- Link to .msi installation file: https://go.microsoft.com/fwlink/?linkid=2157201
- Follow instructions detailed here: https://docs.microsoft.com/en-us/sql/tools/sqlpackage/sqlpackage-download?view=sql-server-ver15
- Make sure to add
sqlpackageto the system PATH in order for azure devops to recognize this as a capability for this machine
- sqlpackage
- AZ CLI
- Link to installer: https://aka.ms/installazurecliwindows
- PowerShell Modules:
- Az.Accounts
- Az.Resources
- Az.Datafactory
- For all these modules above, open up a powershell session as an adminstrator and type
Install-Module 'name-of-module'
- Packages:
ADDING SELF HOSTED AGENTS IN OUR CI-CD YAML deployment PIPELINES:
•The code shows how to run your release agent on a specific self hosted agent(connected to VNET):
- Take note of the pool and demands configuration
Considering we are deploying Data bricks notebooks in the below case
•In the continuous deployment pipeline, we must deploy the artifacts build to Dev , QA, UAT and prod environments. We will have approval gates setup before the deployment to each environment(stage) gets started.
Published on:
Learn moreRelated posts
Microsoft Purview: Data Lifecycle Management- Azure PST Import
Azure PST Import is a migration method that enables PST files stored in Azure Blob Storage to be imported directly into Exchange Online mailbo...
How Snowflake scales with Azure IaaS
Microsoft Rewards: Retirement of Azure AD Account Linking
Microsoft is retiring the Azure AD Account Linking feature for Microsoft Rewards by March 19, 2026. Users can no longer link work accounts to ...
Azure Function to scrape Yahoo data and store it in SharePoint
A couple of weeks ago, I learned about an AI Agent from this Microsoft DevBlogs, which mainly talks about building an AI Agent on top of Copil...
Maximize Azure Cosmos DB Performance with Azure Advisor Recommendations
In the first post of this series, we introduced how Azure Advisor helps Azure Cosmos DB users uncover opportunities to optimize efficiency and...
February Patches for Azure DevOps Server
We are releasing patches for our self‑hosted product, Azure DevOps Server. We strongly recommend that all customers stay on the latest, most s...
Building AI-Powered Apps with Azure Cosmos DB and the Vercel AI SDK
The Vercel AI SDK is an open-source TypeScript toolkit that provides the core building blocks for integrating AI into any JavaScript applicati...
Time Travel in Azure SQL with Temporal Tables
Applications often need to know what data looked like before. Who changed it, when it changed, and what the previous values were. Rebuilding t...


