CI-CD for Synapse Dedicated SQL Pool using YAML templates

Purpose of this blog:
1.Defined end-end process of SQL Pool Deployment from Visual studio SSDT code check-in to continuous integration(Build pipeline) and continuous deployment(Release pipeline) from project perspective.
2. Reusable YAML CI and CD templates which can be implemented in any project because these templates was successfully implemented in projects
Developer Workflow
Continuous integration:
- Develop code in Visual Studio using SSDT on your local machine.(Follow the steps below)
a. Make sure to have SSDT installed on Visual Studio. Follow these steps to get SSDT properly configured:
Install Visual Studio 2019 - Azure Synapse Analytics | Microsoft Docs
b. Connect to git repository and database using Visual Studio and make changes.
Follow the steps detailed in the Microsoft Documentation here: Source Control Integration - Azure Synapse Analytics | Microsoft Docs
c. Use the Schema Compare tool to download the latest changes from the source Synapse Dedicated SQL
pool to your local SQL project in Visual Studio. You can individually select each change you want to
include.
Note: Click the video below to see how to do a schema compare with a SQL server to your local SQL project.
https://www.youtube.com/watch?v=fKM3OGaS5pQ
d. IMPORTANT:
Make sure to do a local build to see if the project builds successfully before committing and merging with
the main branch.
e. Commit and push code to a git branch.
Release Engineer Workflow
Continuous integration:
Build
a. Run build pipeline on your new code that is in the repository. This will use the project solution file to
build a dacpac artifact. Then it will publish this as a release artifact.
Continuous delivery:
Deployment to target environment
a. Run the release pipeline for the specified target environment.
- This will download the previously generated build artifact and dacpac file. It will also download secure
connection strings from Azure KeyVault. Then it will deploy to your Synapse Dedicated SQL Pool using
dacpac deployment.
CI/CD Pipeline Setup
Assumptions:
- Have SQL Server Code in your repository
- Have deployed a dedicated SQL pool to Azure with its accompanying resources
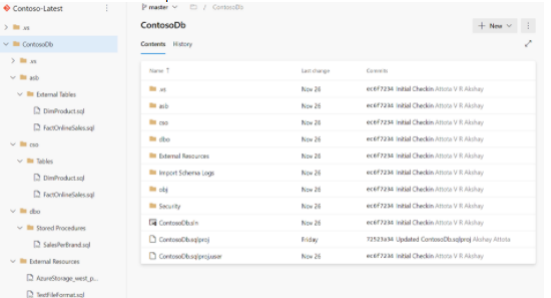
- Folder Structure for example Contoso DB(Below screenshot)
Build Pipeline
Requirements:
- Make sure the pipeline runs on a Windows Agent
- Reason for windows agent : This is because the Visual Studio Build task will only work on windows
Steps:
- Build Task:
- Use the Visual Studio build solution task
- Direct the task to the database solution file ('ContosoDb/ContosoDb.sln' in our POC)
- Set the configuration to release, if not set this will configure as debug
- Example:
- Copy Files Task:
- Copy the files from the build directory to the $(build.artifactstagingdirectory)
- Example:
- Publish Build Artifact Task
- Publish the build artifact with a specified name
- Example:
Full CI YAML Pipeline Example
Release Pipeline
Requirements:
- Make sure the pipeline runs on a Windows Agent
Steps:
- Deployment Job
- Create a deployment job that uses the windows agent
- Example:
-Azure Key Vault Task
- Use the an Azure Key Vault to take store the connection string to the Dedicated SQL Pool
- Grab this connection string from the key vault and input it as an Azure Pipelines Variable
- Example:
- SQL Dacpac Deployment Task
-Specify the location of the .dacpac file in the build artifact from the build pipeline
-Specify the connection string that was taken from the Azure Key Vault task
-Example:
Full Example CD YAML Pipeline
Published on:
Learn more


