Opening Paginated Reports from Model-Driven Power Apps / Dynamics 365 Customer Engagement

For a long time, Paginated Reports have remained one of those mystical and hard-to-obtain features as part of Power BI Online, designed to address complex scenarios or migrations involving SQL Server Reporting Services (SSRS). So really, from a Power Platform / Dynamics 365 Customer Engagement standpoint, not something we needed to worry about. However, there have been two important milestones that have changed the landscape considerably:
- First, we had the introduction of the Power BI Premium Per User license. This introduction significantly lowers the pricing entry point for this capability, thereby making it available “to the masses.”
- Secondly, with the introduction of the Structured Query Language (SQL) endpoint for Microsoft Dataverse, it now becomes possible to execute more complex query types and unlock support for things like Direct Query. Paginated Reports support this endpoint natively, meaning it’s incredibly straightforward for us to start authoring reports using SQL.
With these crucial changes, it now becomes vital for us to consider leveraging Paginated Reports as part of the solutions we build in the Power Platform. But there is one major challenge - how can we easily let users execute Paginated Reports from our model-driven / Dynamics 365 Customer Engagement apps? And how can we straightforwardly pass through data to filter our reports accordingly? Well, as the title of this post would suggest, let me show you how you can achieve this on the Account table using a mixture of customisation and technical wizardry involving JavaScript:
- First, we need to prepare our premium capacity workspace. This is as straightforward as enabling one of the following options below, either on workspace creation or for one you have already:
Note that these options will be blurred out unless you have the appropriate license(s). Once you have your workspace ready, take a note of the workspace ID, which is present in the URL - we will need this later on.
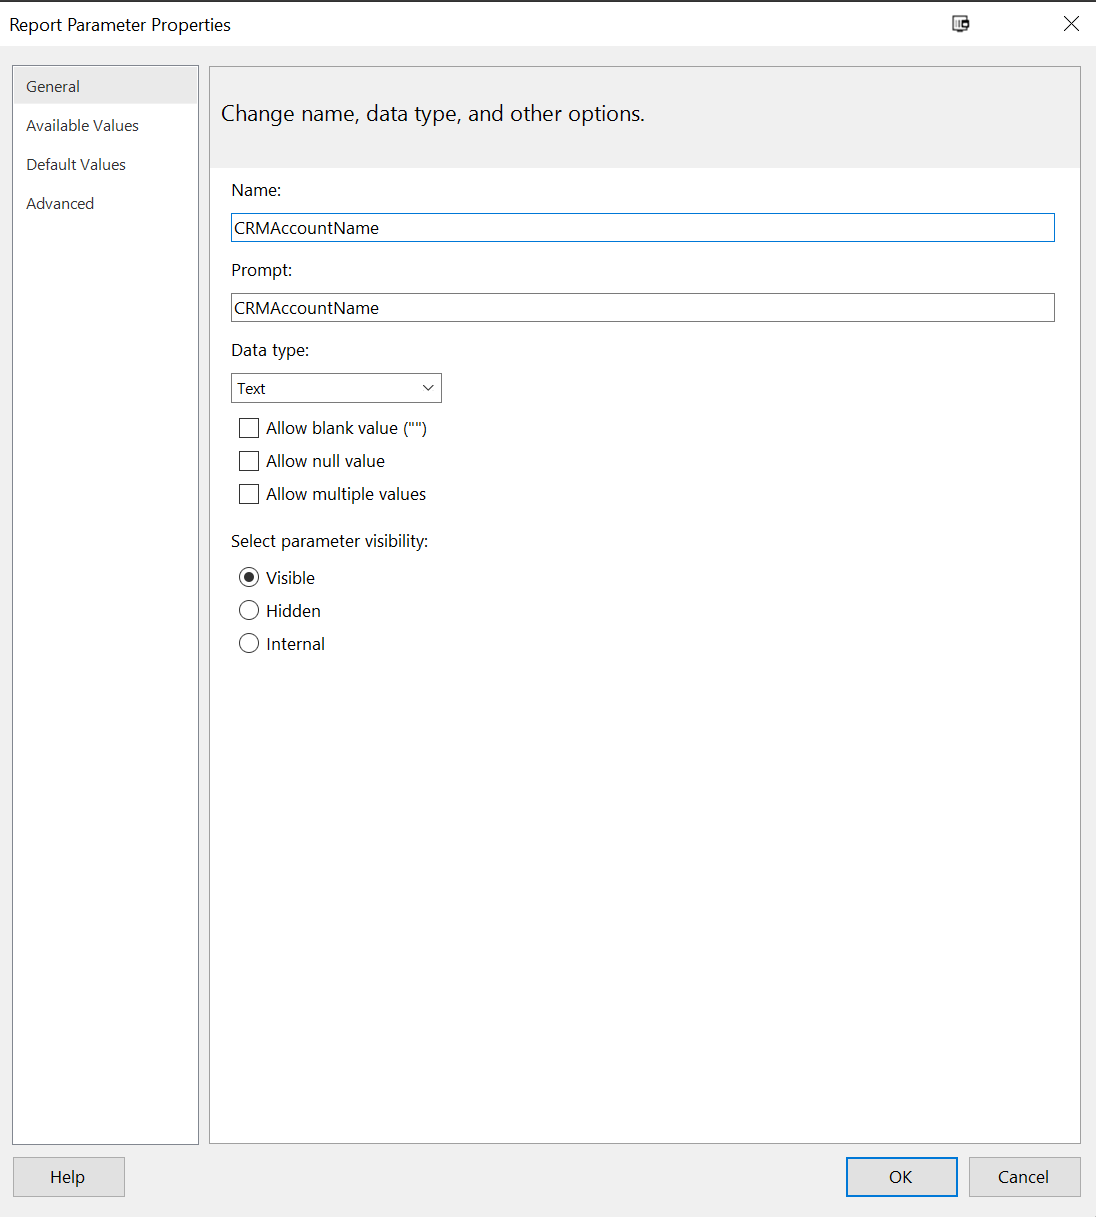
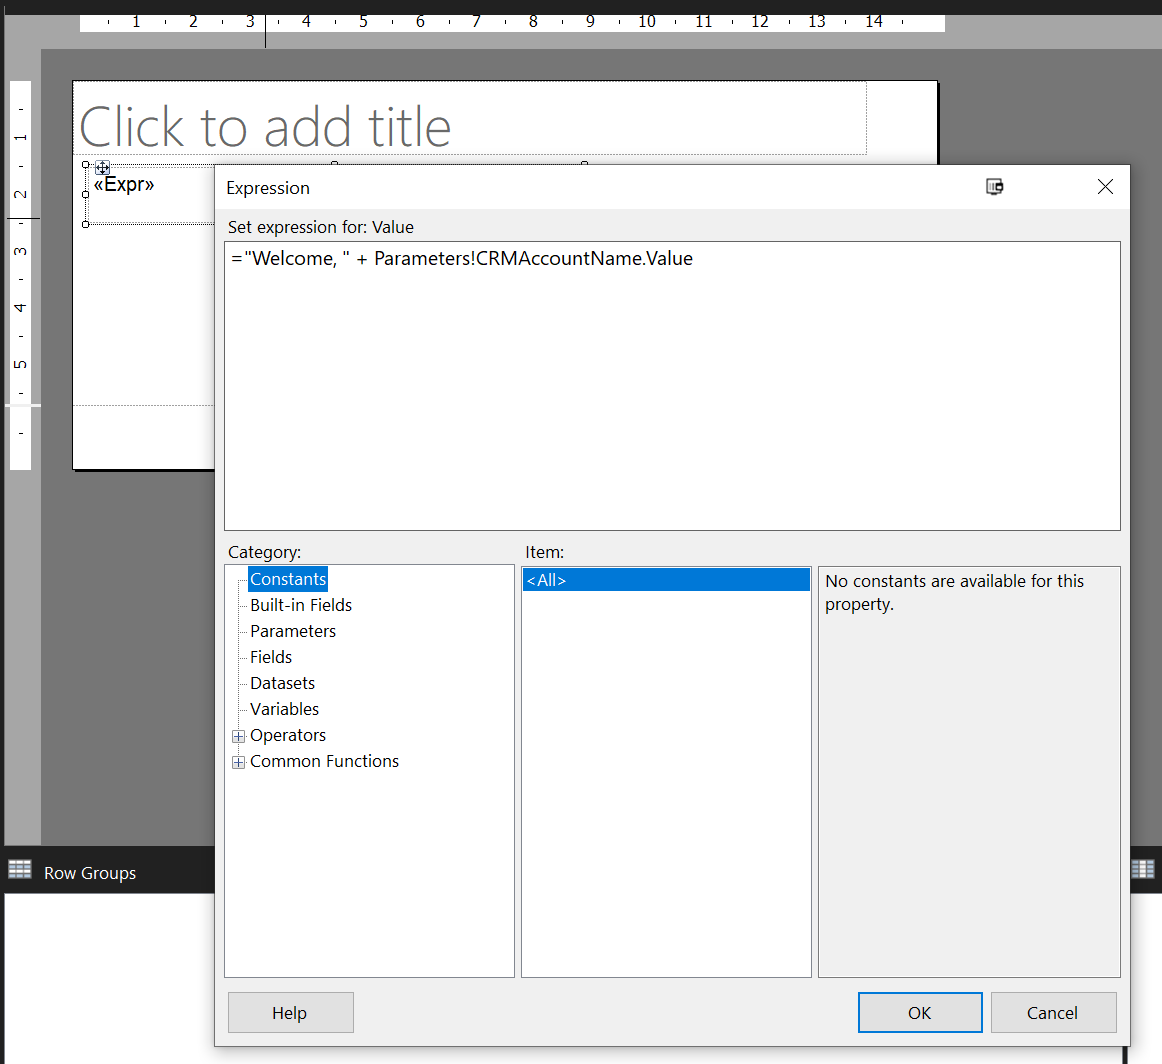
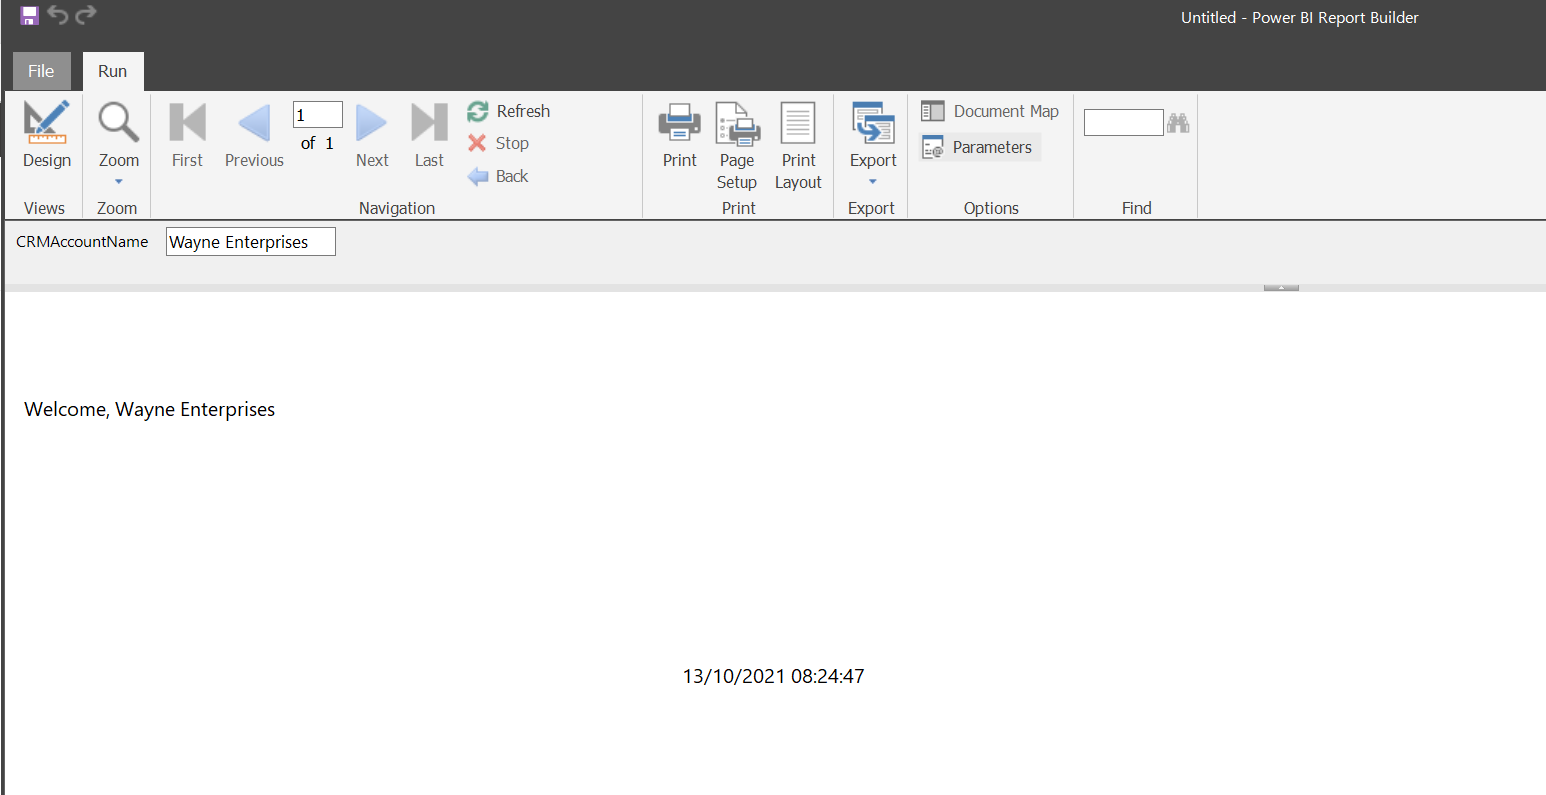
- Ensure that you have pushed out a Paginated Report with the appropriate parameter values defined into the workspace above. In this example, I’m just using a simple report with a single parameter that is then written out onto the report body:
Push out the report to your premium capacity workspace and navigate into it as, once again, we’ll need to take a note of the report ID:
- To allow us to open the reports from a model-driven app, we must use a JavaScript function that calls the Xrm.Navigation.openUrl function, alongside some Retrieve/RetrieveMultiple requests that regular followers of the blog may be familiar with:
if (typeof (JJG) === "undefined")
{var JJG = {__namespace: true};}

JJG.Ribbon = {

    paginatedReportEnabledRule: function(primaryControl) {
        var formContext = primaryControl.getFormContext();
        //Only display the ribbon button if the parameter value is present on the form.
        var accountName = formContext.getAttribute('name').getValue();
        if (accountName === null) {
            return false;
        }
        else {
            return true;
        }
    },
    openPaginatedReport: async function(formContext, evName) {
        'use strict';
        //Only proceed if we have the parameter value present
        var accountName = formContext.getAttribute('name').getValue();
        if (accountName !== null) {
            var workspaceID = null;
            var reportID = null;
            //Get the Workspace ID
            await Xrm.WebApi.retrieveMultipleRecords('environmentvariablevalue', "?$select=value&$expand=EnvironmentVariableDefinitionId&$filter=(EnvironmentVariableDefinitionId/schemaname eq 'jjg_powerbi_workspaceid')").then(
                function success(result) {
                    workspaceID = result.entities[0].value;
                },
                function (error) {
                    Xrm.Navigation.openErrorDialog({ details: error.message, message: 'A problem occurred while retrieving an Environment Variable value. Please contact support.'});
                }
            );
            //Get the Report ID
            await Xrm.WebApi.retrieveMultipleRecords('environmentvariablevalue', "?$select=value&$expand=EnvironmentVariableDefinitionId&$filter=(EnvironmentVariableDefinitionId/schemaname eq '" + evName + "')").then(
                function success(result) {
                    reportID = result.entities[0].value;
                },
                function (error) {
                    Xrm.Navigation.openErrorDialog({ details: error.message, message: 'A problem occurred while retrieving an Environment Variable value. Please contact support.'});
                }
            );

            //Provided Workspace and Report ID are present, open the report in a new browser tab.
            if (reportID !== null && workspaceID !== null) {
                var url = "https://app.powerbi.com/groups/" + workspaceID + "/rdlreports/" + reportID + "?rp:CRMAccountName=" + accountName;
                Xrm.Navigation.openUrl(url);
            }
            else {
                Xrm.Navigation.openErrorDialog({ details: 'Unable to open report as the workspace/report ID cannot be determined. Please contact support'});
            }
        }
        else {
            Xrm.Navigation.openErrorDialog({ details: 'Unable to open report as the Account has no account number. Please provide a value and try again.'});
        }
    },
    openPaginatedReportFromView: async function(selectedRows, evName) {
        'use strict';
        //Get the Account ID from the currently selected row
        var accountUID = selectedRows[0];
        var accountName = null;
        //Retrieve the Account Name using the above ID
        await Xrm.WebApi.retrieveRecord("account", accountUID, "?$select=name").then(
            function success(result) {
                accountName = result.name;
            },
            function (error) {
                Xrm.Navigation.openErrorDialog({ details: 'A problem occurred while retrieving the Account row. Please contact support.'});
            }
        );
        //Provided we have a value, we can continue
        if (accountName !== null) {
            var workspaceID = null;
            var reportID = null;
            //Get the Workspace ID
            await Xrm.WebApi.retrieveMultipleRecords('environmentvariablevalue', "?$select=value&$expand=EnvironmentVariableDefinitionId&$filter=(EnvironmentVariableDefinitionId/schemaname eq 'jjg_powerbi_workspaceid')").then(
                function success(result) {
                    workspaceID = result.entities[0].value;
                },
                function (error) {
                    Xrm.Navigation.openErrorDialog({ details: error.message, message: 'A problem occurred while retrieving an Environment Variable value. Please contact support.'});
                }
            );
            //Get the Report ID
            await Xrm.WebApi.retrieveMultipleRecords('environmentvariablevalue', "?$select=value&$expand=EnvironmentVariableDefinitionId&$filter=(EnvironmentVariableDefinitionId/schemaname eq '" + evName + "')").then(
                function success(result) {
                    reportID = result.entities[0].value;
                },
                function (error) {
                    Xrm.Navigation.openErrorDialog({ details: error.message, message: 'A problem occurred while retrieving an Environment Variable value. Please contact support.'});
                }
            );
            //Provided Workspace and Report ID are present, open the report in a new browser tab.
            if (reportID !== null && workspaceID !== null) {
                var url = "https://app.powerbi.com/groups/" + workspaceID + "/rdlreports/" + reportID + "?rp:CRMAccountName=" + accountName;
                Xrm.Navigation.openUrl(url);
            }
            else {
                Xrm.Navigation.openErrorDialog({ details: 'Unable to open report as the workspace/report ID cannot be determined. Please contact support'});
            }
        }
        else {
            Xrm.Navigation.openErrorDialog({ details: 'Unable to open report as the Account has no account number. Please provide a value and try again.'});
        }
    },

     __namespace: true
}
The result is three functions:
- paginatedReportEnabledRule: This will be used to enable the button if the required parameter value (the Account Name) is present on the Account form.
- openPaginatedReport: This will allow the user to open the Paginated Report from an Account form.
- openPaginatedReportFromView: This will enable the user to open the Paginated Report when selecting an Account row from a view.
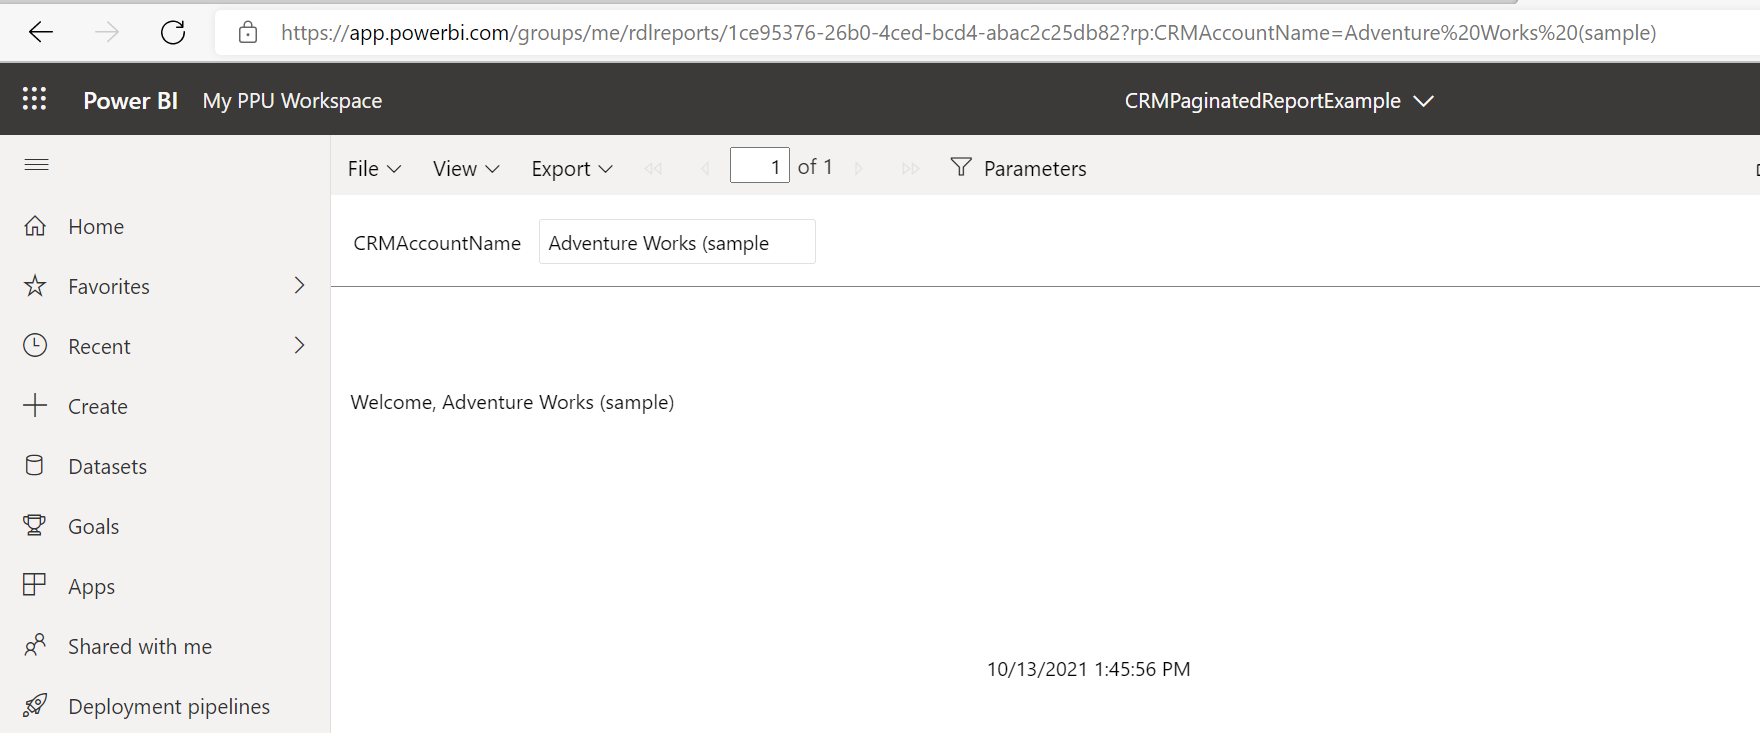
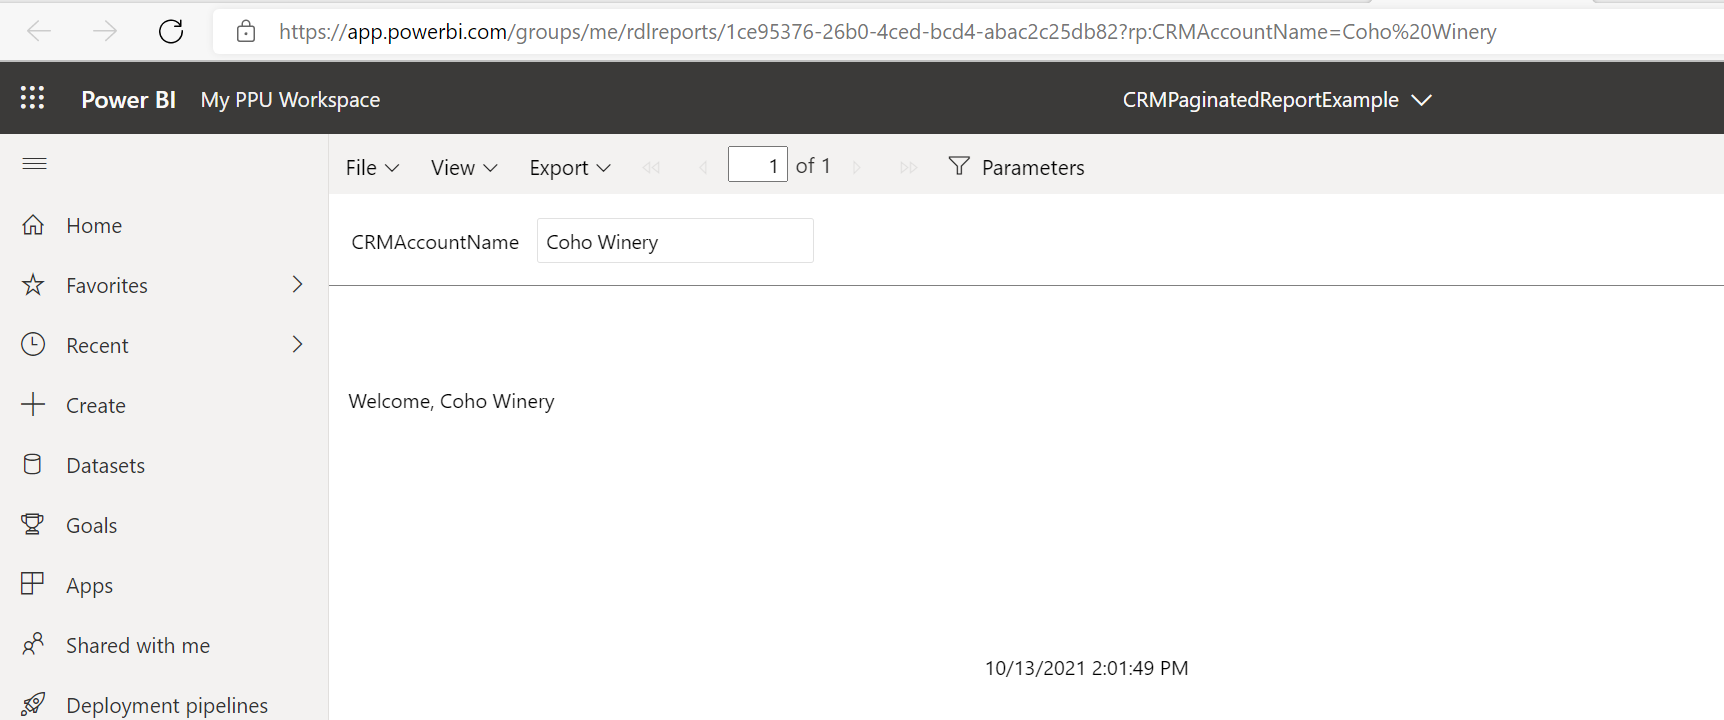
Create these functions as part of a new or existing JavaScript Web Resource within your solution. Note as well with the above script how we are constructing the URL to open our report. We should end up with something like this as a result:
You can consult this handy Microsoft Docs article for additional guidance on this subject.
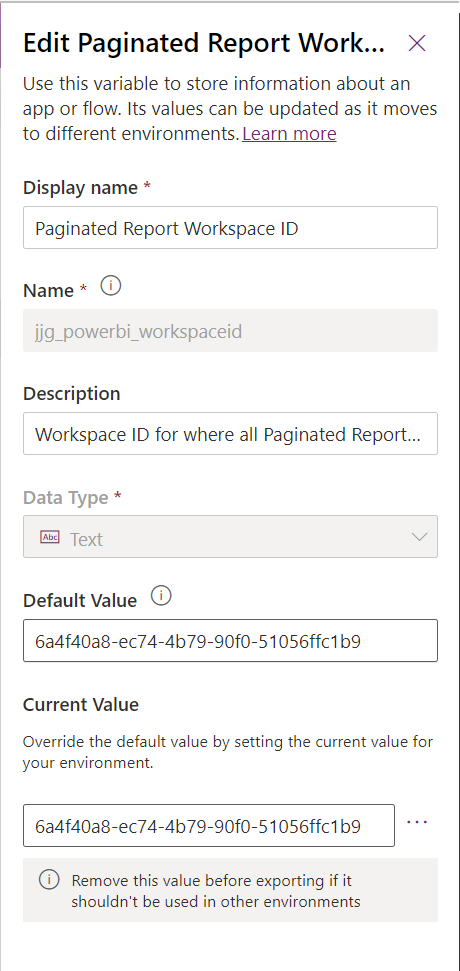
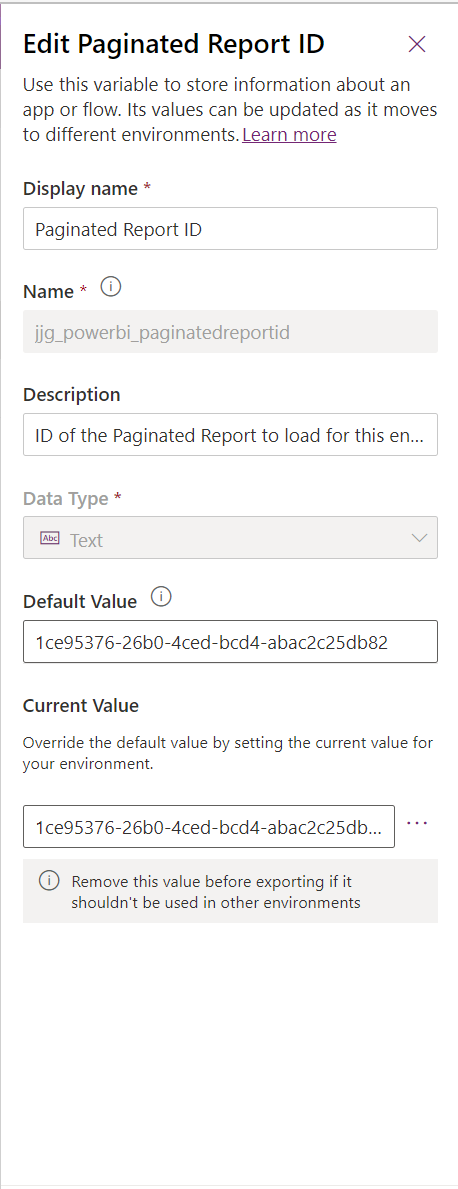
- The above script leverages two Environment Variables. Therefore, we also need to set these up within our environment, as indicated below:
- With all pre-requisites setup, we can now create the buttons on the Account table. As always, we turn to the good ol' Ribbon Workbench to assist us with this. The first thing we need to do is ensure we’ve got a temporary solution setup containing just our Account table (just the skeleton; no sub-components required):
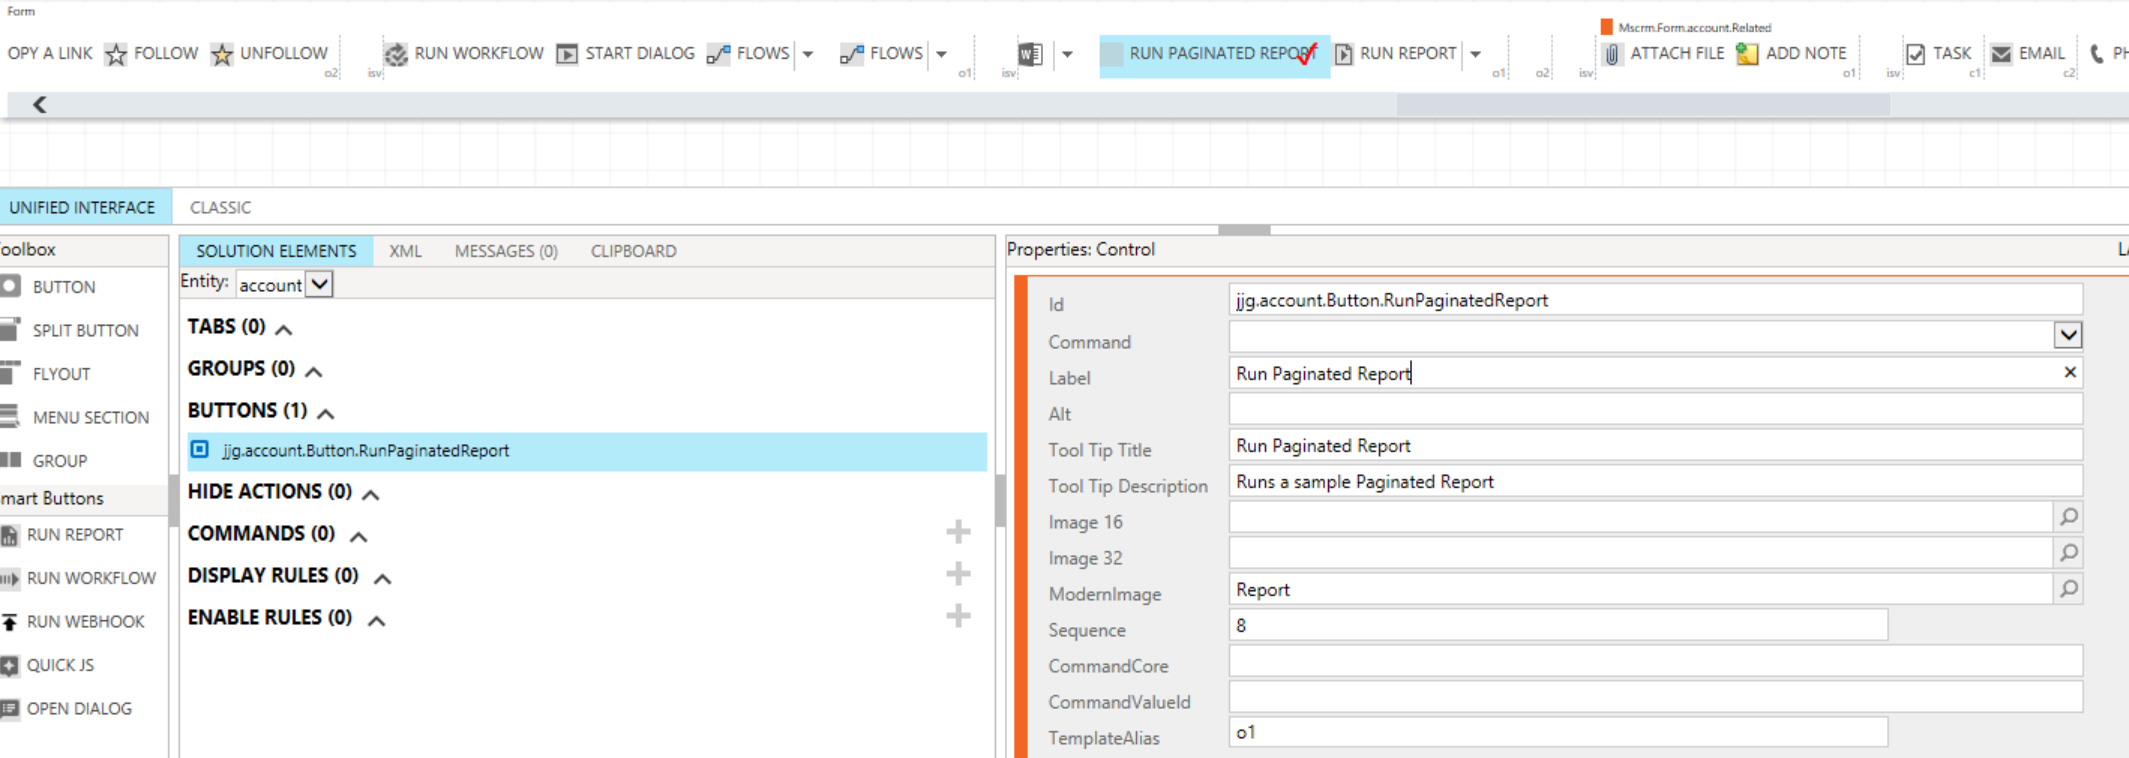
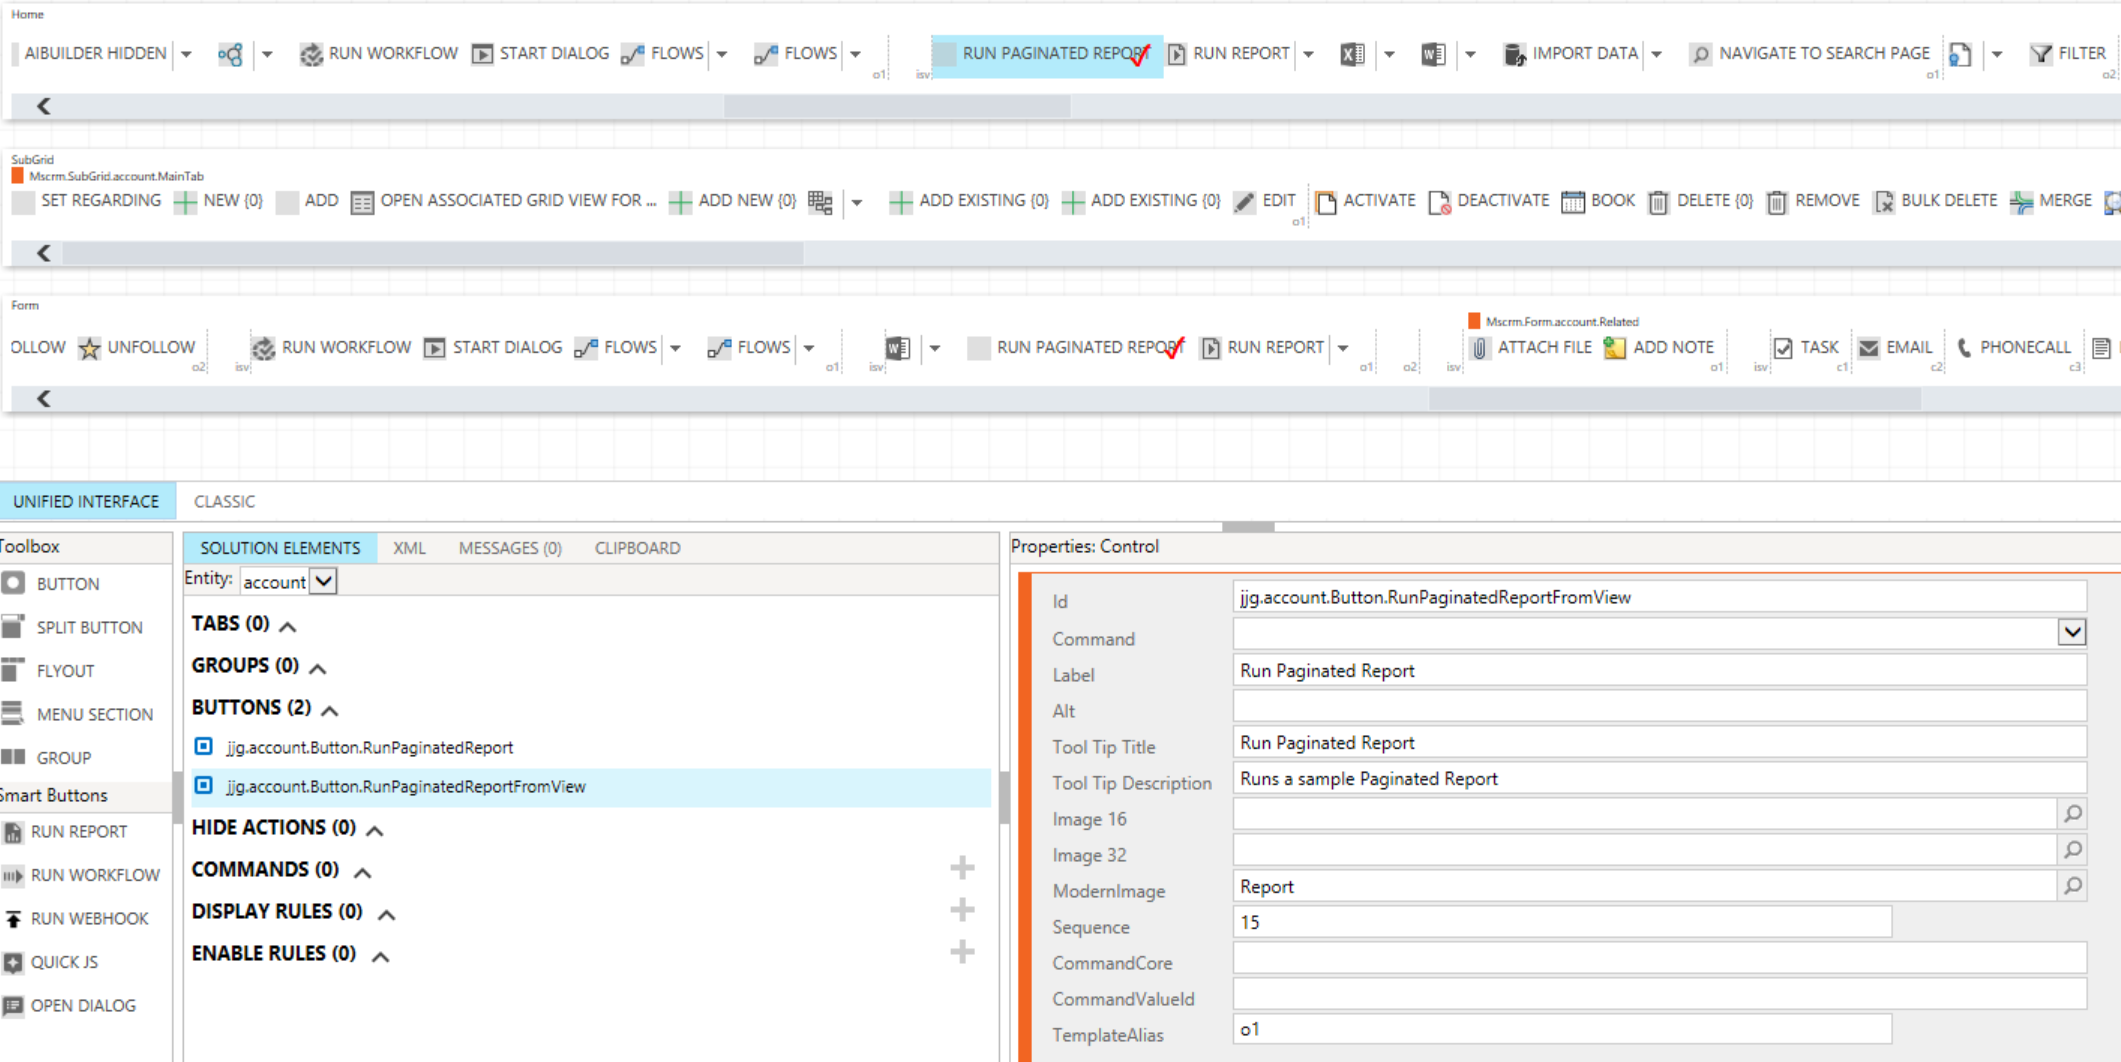
From there, open this in the Workbench and add on two Buttons - one for the form itself and another for the Account views:
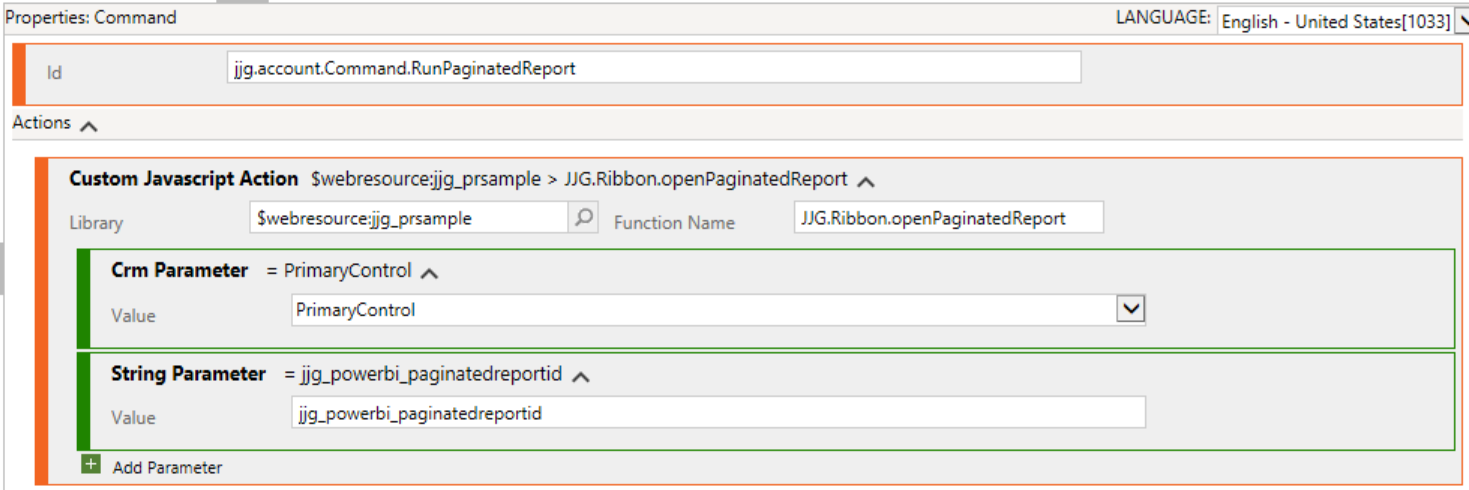
Next, add on two new commands like so - each one should then be tagged back to the previous buttons setup and the Library / Function Name values updated accordingly for your environment:
Note as well the Enable Rules that need to be added for both commands too:
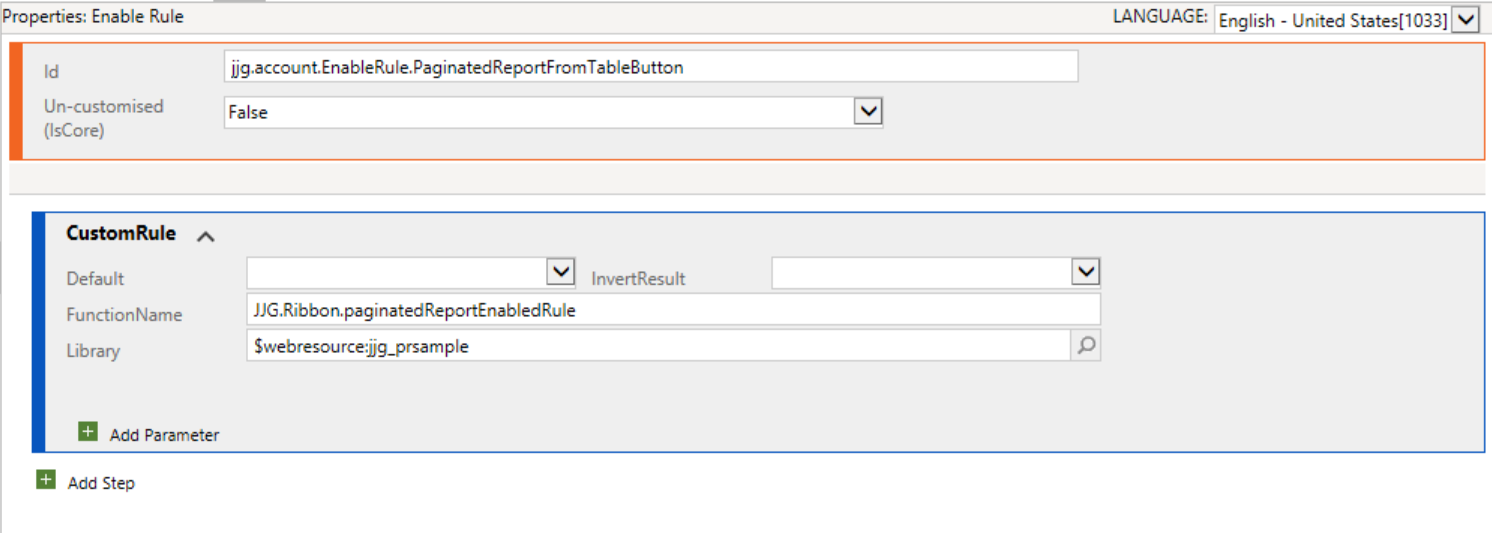
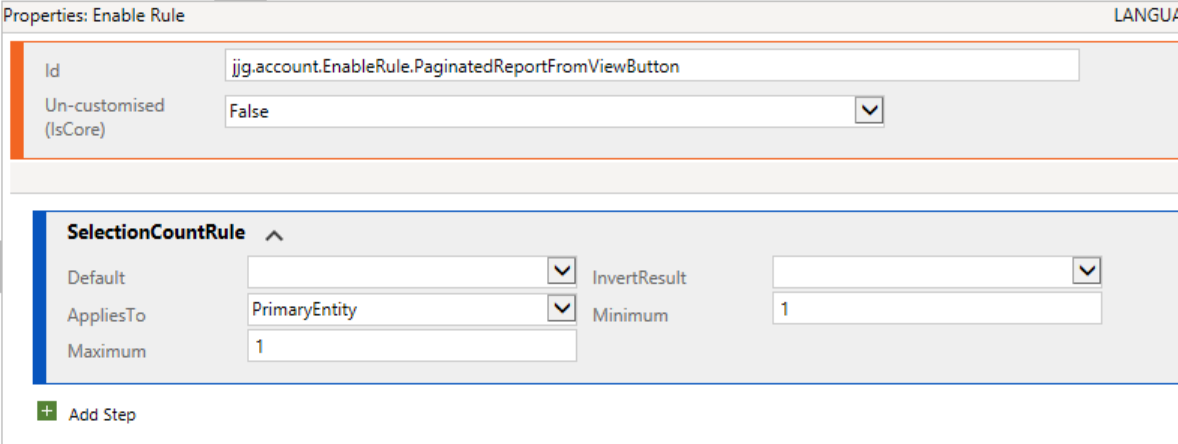
Publish your changes once you’ve configured everything.
Now it’s time to test. 😉 If we navigate onto the Account form, we should be able to see and test our new button accordingly:
Likewise, for our Account view:
Before wrapping things up, there are a couple of other things to keep in mind with all this:
- Given the differing access models for Power Apps / the Dynamics 365 CE applications, you will need to make sure users are given access to the premium-capacity workspace for all of this to work.
- Users working within Power Apps will need Read privileges granted for the Environment Variable Definition table to ensure the JavaScript works when retrieving the Environment Variable values.
- This solution should support passing through multiple parameter values if required. So as an example, to provide a second parameter value called MySecondParameter with a static value, you would do something like this instead:
var url = "https://app.powerbi.com/groups/" + workspaceID + "/rdlreports/" + reportID + "?rp:CRMAccountName=" + accountName + "&rp:MySecondParameter=MyValue";
Xrm.Navigation.openUrl(url);
Thanks to the new Premium Per User SKU, it’s fantastic that paginated reports are more accessible and affordable than ever before. And, with equal, if not better, performance compared to your standard CRM-based reports, they are worth considering as part of your Power Apps / Dynamics 365 Customer Engagement. I would emphasise this even further if you find yourself needing to write a particularly complex report that you can only author using a complex query or which targets an external system. Hopefully, with the steps outlined in this post, you can very quickly start to get them included as part of your existing model-driven apps. Let me know in the comments below if you have any questions or get stuck setting this up yourself. 😀
Published on:
Learn moreRelated posts
Power Apps | Use ‘Monitor’ to get insights
Monitor in Power Apps offers insights and recommendations to enhance app performance. It provides makers with detailed information on their ap...
Power Apps – Deprecation of Maker Copilot in canvas apps
We are announcing the deprecation of the Edit your app with Copilot in Power Apps Studio (preview) in canvas apps. The deprecation will begin ...
Create custom error messages in Power Apps
We've all seen those error messages that don't make any sense. Have you ever wanted to replace an error messages with your own custom error me...
How to Use “Describe a Page” in Power Apps: Create Model-Driven Pages with AI
Microsoft Power Apps continues to evolve with features that simplify the app-building experience for both developers and citizen makers. One o...
Avoiding Currency Mismatch Errors in Dynamics 365 CE
When working with Dynamics 365 Sales, it’s important to understand how currency behaves across related entities like Opportunity, Quote, Order...
7 Patterns for Offline Apps in Power Apps
For apps it can be important to handle situations where you don't have a connection. These Offline Apps need to work, without losing any funct...
Power Apps – Process maps as a part of your plan
We are announcing the ability to use process maps as a part of your plan in Power Apps. This feature will reach general availability on Novemb...
Set Combo Box Value Dynamically by other Combo Box Value in Canvas APP
In this post You will come to know how to Set Default Selected Items of a Combo Box as per value selected in another Combo BOX. Problem Statem...


