How to implement a Power Automate progress indicator in Power Apps

tl;dr: An indicator to show the progress of a Power Automate flow
Especially when users need to perform several tasks to complete a workload, they like to know, if the thing worked. Simple notifications like “your request has been submitted” still leave them in some uncertainty in regards of the progress of said process. Learn here how a simple SharePoint list can help you to achieve exactly that.
First idea: Respond to Power Apps
In Power Apps, we can start Power Automate flows and even get a response back, Lewis Baybutt recently blogged about how to Notify users if the flow ran successfully. But what if the flow has several big steps and we want to inform users along the way in Power Apps? Unfortunately, we can’t use the Respond to PowerApps action more than one time in a flow, which means that this is already out of the game.
Second idea: External datasource to the rescue
But what if we logged steps/status of our flow into an external table and update our app from there? This could be a Dataverse table, a SharePoint list or whatever makes you happy.
In total we will need
SharePoint list setup
I used a SharePoint list called LogList in which I need 3 columns:
- Title (comes already out of the box)
- GUID (single line of text, to hold a GUID that we get from Power Apps as we want to use
LookUpto get the right flow run) - Status (number, to hold the status/step of the flow progress)
Power Apps setup
In our Power App, we need
- a button which will start the flow
- a timer which will take care of refreshing
- a gallery to indicate progress
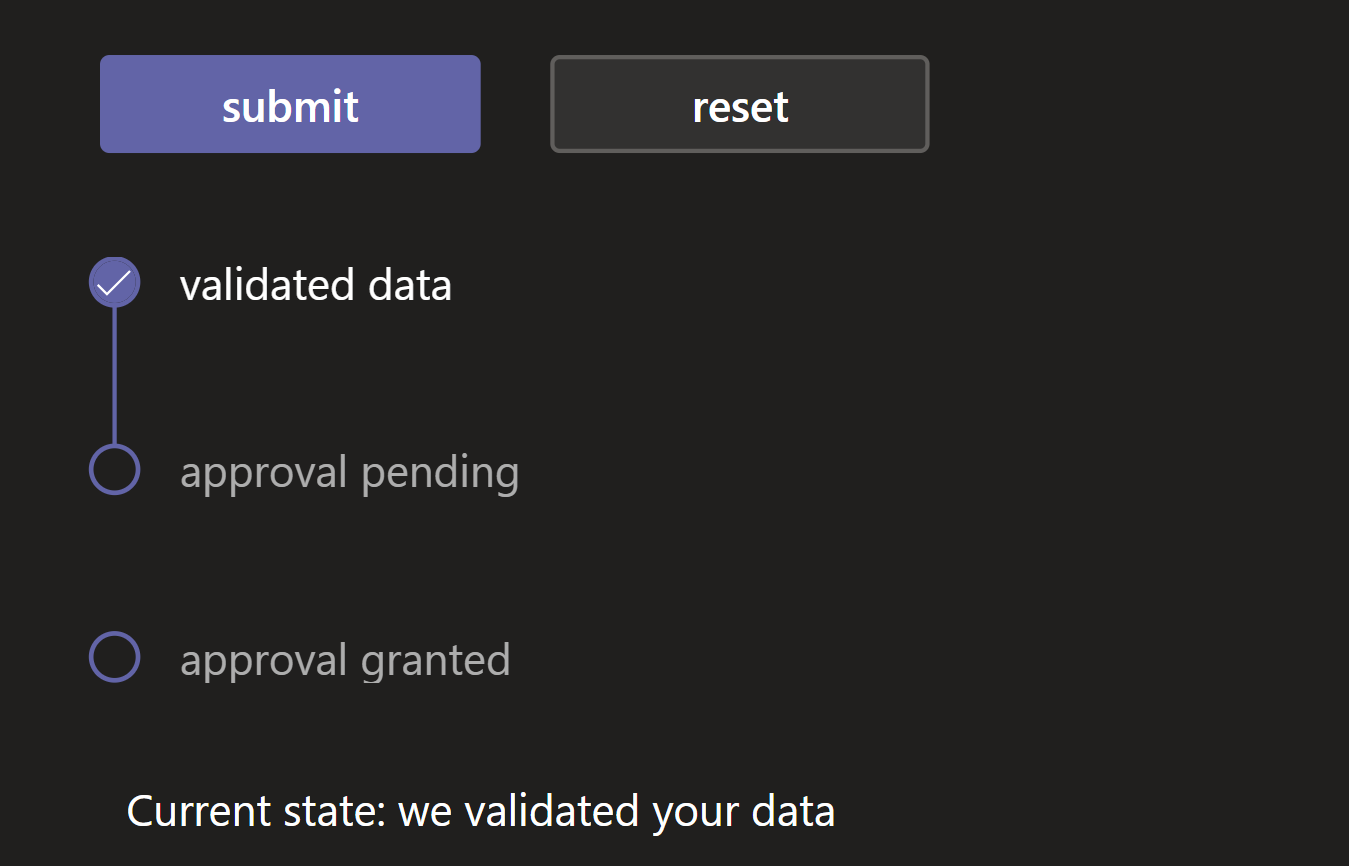
Gallery
For everything, that needs to be repeated, I use a gallery in Power Apps. The effect on time to build, design consistency and performance is really amazing.
- Set the Items property to
Table(
{
Id: 1,
Value: "validated data",
Icon: Icon.Check
},
{
Id: 2,
Value: "approval pending",
Icon: Icon.Check
},
{
Id: 3,
Value: "approval granted",
Icon: Icon.Check
}
)
- Add a Label, a Rectangle, an Icon, a Circle to the Gallery
- Set the Text property of the Label to
ThisItem.Value - Set the Visible property of the Rectangle to
If(loc_currentStatus.Status>=ThisItem.Id, true, false) - Set the Fill property of the Circle to
If(loc_currentStatus.Status>=ThisItem.Id, Self.BorderColor, Transparent) - Set the Visible property of the Icon to
loc_currentStatus.Status>=ThisItem.Id - Set the Icon property of the Icon to
Icon.Check
Button
Our Button shall kick of the flow and pass in a unique ID
- Set the
OnSelectproperty of the button to
//create GUID
Set(gbl_stateGUID,GUID());
//start Power Automate Flow
flowStatus.Run(gbl_stateGUID)
Timer
We could of course build a refresh button as well for all impatient users, but a hidden timer is way more elegant.
- Set the OnTimerEnd property to
Refresh(LogList);
UpdateContext({loc_currentStatus: LookUp(LogList,GUID=Text(gbl_stateGUID))})
- Set the AutoStart property to
!IsBlank(gbl_stateGUID) - Set the Duration property to
500(ms) - Set the Repeat property to
loc_currentStatus.Status<>3
Reset button
For testing purposes its really nice as well to have a Reset button
- Set its OnSelect button to
UpdateContext(
{
loc_currentStatus: Patch(loc_currentStatus,
{
Status: 0,
Title: "you submitted"
}
)
}
);
Set(gbl_stateGUID,"");
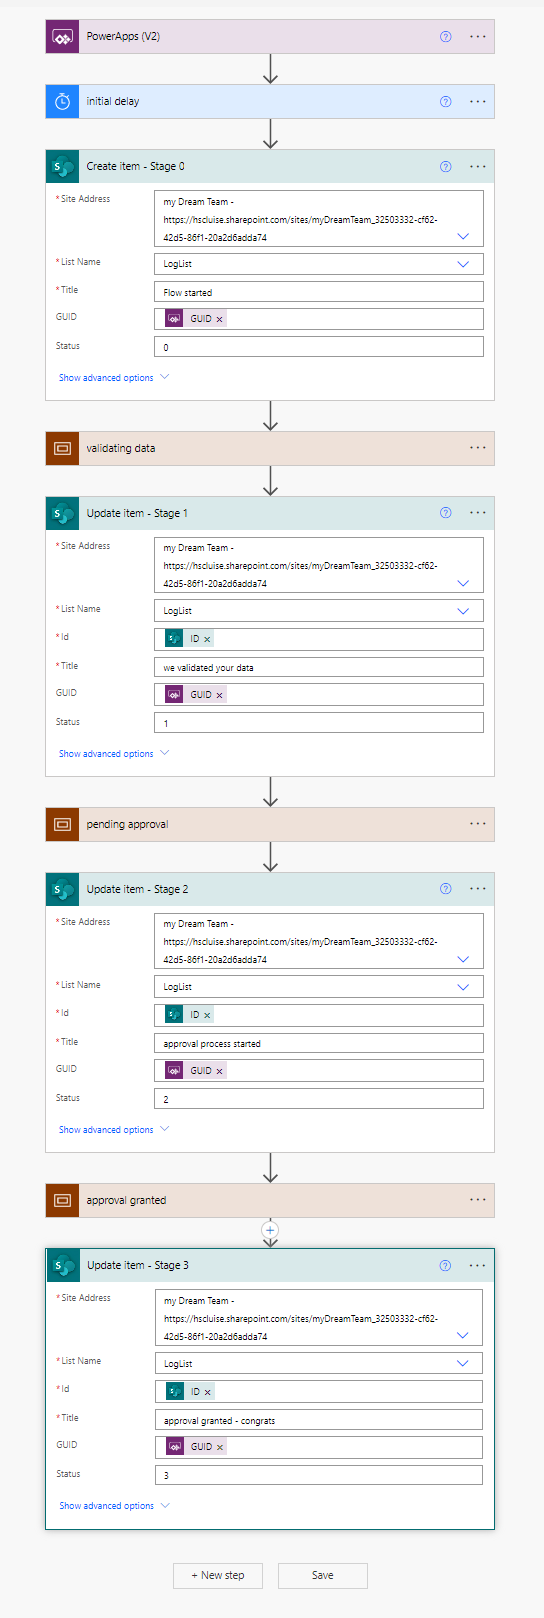
Power Automate flow setup
- Create a new flow from within Power Apps Studio, which automatically gives it the right trigger
- Create an item in your SharePoint list, pass in the GUID from Power Apps in the GUID column and set the status to
0 - Now add a scope and perform the actions you want to perform in this scope. To mock this, I added a delay
- After this first scope, update the list item with a status message in the Title and set the Status to
1 - Add another scope and perform the actions you want to perform in this scope. To mock this, I added another delay
- After this second scope, update the list item with a status message in the Title ands et the Status to
2 - Add another scope and perform the actions you want to perform in this scope. To mock this, I added another delay
- After this third scope, update the list item with a status message in the Title and set the Status to
3
Conclusion and What’s next
This is how you pass values between Power Apps and Power Automate and hook them into a nice looking UI. For flows that run for quite a while, its a nice way to inform users in-app and not to rely on sending Adaptive Cards or other notifications. I am curious: Which scenarios do you see? Let me know on twitter
If you found this blog post useful, please also subscribe to my newsletter - news coming about every 2 months, I promise to not spam you!
Published on:
Learn moreRelated posts
How to Build AI-Powered Business Applications Using Power Apps and Copilot
Introuction Artificial Intelligence is no longer just a buzzword—it has become an essential part of modern business applications. Organisation...
Power Automate: Add to Time Action
Shifts a timestamp by a whole number of time units. Negative values subtract; the result is text.
Power Apps vs Traditional App Development: Is Low-Code Winning in 2026?
Introduction For decades, businesses relied on traditional software development to build custom applications. Every feature required months of...
Top 10 New Features in Microsoft Power Apps You Can’t Ignore in 2026
The low-code revolution is evolving faster than ever, and Microsoft Power Apps continues to lead the way. With artificial intelligence becomin...
The Best Way to Learn Power Apps, Power Automate & Microsoft Copilot in 2026
Looking for the best live training to master the Microsoft Power Platform? PowerApps911's live, Microsoft MVP-led courses are designed to help...
Power Automate: convertToUtc function
Converts a timestamp from a source time zone to UTC using Windows time zone names.
Batch Operations and Throttling Mitigation in Power Automate
Bundle hundreds of SharePoint writes into a single $batch request to stop hitting throttling limits.
How AI Agents Are Transforming Microsoft Power Apps in 2026: The Future of Intelligent Business Applications
The world of business application development is undergoing a revolutionary transformation. What once required teams of software developers, m...
Extending Power Automate Run History Beyond 28 Days Using Cloud Flow Run Metadata
Power Automate has become the backbone for many business processes, integrations, and automation scenarios across the Power Platform ecosystem...
Power Automate – Restore accidentally deleted flows
We are announcing the ability to restore accidentally deleted flows in Power Automate. This feature will reach general availability on July 30...