How to use Azure OpenAI with data in your SharePoint libraries

tl;dr
We can index documents from a SharePoint library with Azure Cognitive Search and then use an Azure OpenAI model to query the data. Using a custom connector, we can bring this power into Power Apps.
![]()
Prerequisites
- Have documents (*.docx, *.pdf) in a SharePoint library
- Azure Cognitive Search service (Basic or Standard tier)
Preparations
- Note down the URL of the Site your library lives in
- Note down the URL and the Admin Key of your Azure Cognitive Search Service
- Turn on System-Assigned Managed Identity in your Azure Cognitive Search Service
- Create an Entra Id app registration with the following parameters:
- single tenant
- Microsoft Graph API delegated permissions (don’t forget to grant admin consent) for
- Files.Read.All
- Sites.Read.All
- Mobile and desktop applications
- enable
https://login.microsoftonline.com/common/oauth2/nativeclient💡Note down the App Id.
- enable
Connect your SharePoint library with Azure Cognitive Search
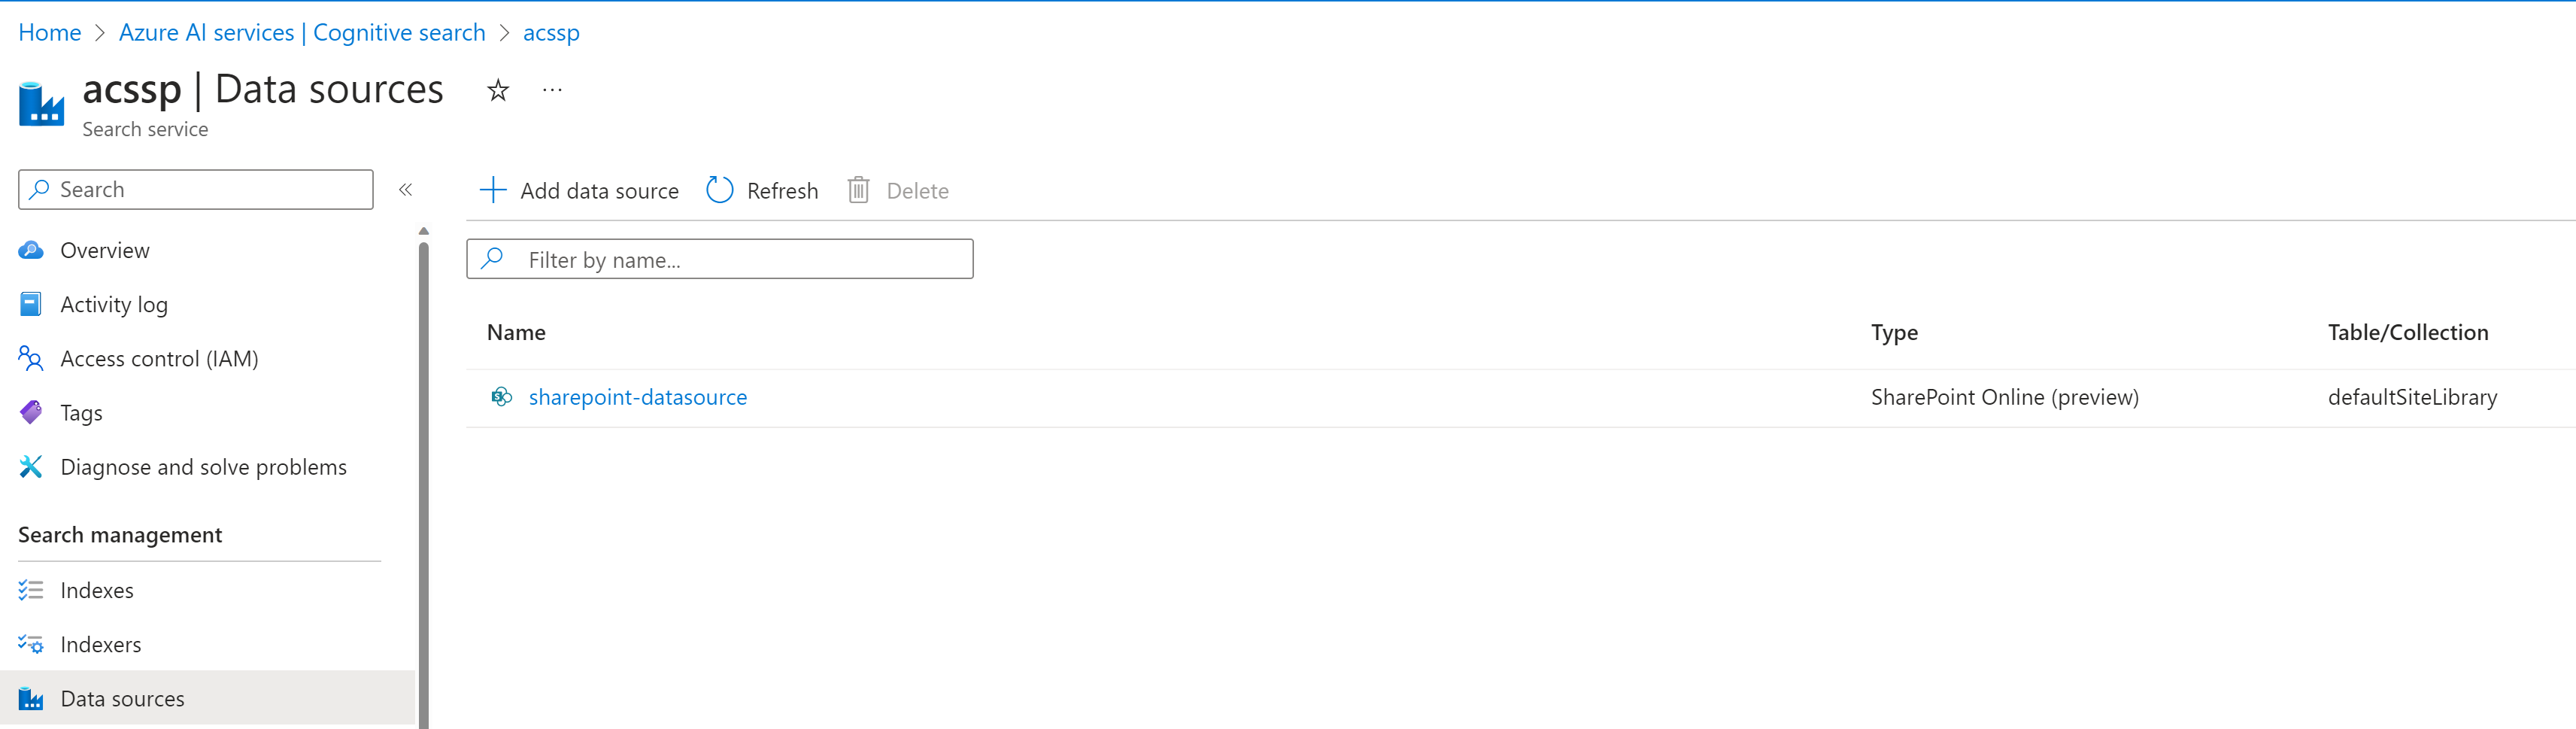
Create a Data Source with the Azure Cognitive Search Preview REST API
We will hop over to Postman to create a new data source for Azure Cognitive search using the REST API (it is still in preview.)
- POST to
https://<name-of-your Azure Cognitive Search service>.search.windows.net/datasources?api-version=2023-07-01-Preview - Params:
- api-version:
2023-07-01-Preview
- api-version:
- Headers:
- Content-Type:
application/json - api-key:
<the Admin key of your Azure Cognitive Search Service>
- Content-Type:
- Body (Json):
{
"name": "sharepoint-datasource",
"type": "sharepoint",
"credentials": {
"connectionString": "SharePointOnlineEndpoint=<your SharePoint Site URL>;ApplicationId=<your App Id>"
},
"container": {
"name": "defaultSiteLibrary",
"query": null
}
}
This will return a 201 response, indicating that your datasource was created. You can check this in the Azure portal
Create your Index
Let’s now leverage metadata of your document to enhance your search experience. This as well is done by using the REST API. We will again do this in Postman:
- POST to
https://<name-of-your Azure Cognitive Search service>.search.windows.net/indexes?api-version=2023-07-01-Preview - Params:
- api-version:
2023-07-01-Preview
- api-version:
- Headers:
- Content-Type:
application/json - api-key:
<the Admin key of your Azure Cognitive Search Service>
- Content-Type:
- Body (Json):
{
"name" : "sharepoint-index",
"fields": [
{ "name": "id", "type": "Edm.String", "key": true, "searchable": false },
{ "name": "metadata_spo_item_name", "type": "Edm.String", "key": false, "searchable": true, "filterable": false, "sortable": false, "facetable": false },
{ "name": "metadata_spo_item_path", "type": "Edm.String", "key": false, "searchable": false, "filterable": false, "sortable": false, "facetable": false },
{ "name": "metadata_spo_item_content_type", "type": "Edm.String", "key": false, "searchable": false, "filterable": true, "sortable": false, "facetable": true },
{ "name": "metadata_spo_item_last_modified", "type": "Edm.DateTimeOffset", "key": false, "searchable": false, "filterable": false, "sortable": true, "facetable": false },
{ "name": "metadata_spo_item_size", "type": "Edm.Int64", "key": false, "searchable": false, "filterable": false, "sortable": false, "facetable": false },
{ "name": "content", "type": "Edm.String", "searchable": true, "filterable": false, "sortable": false, "facetable": false }
]
}
Also this will return a 201.
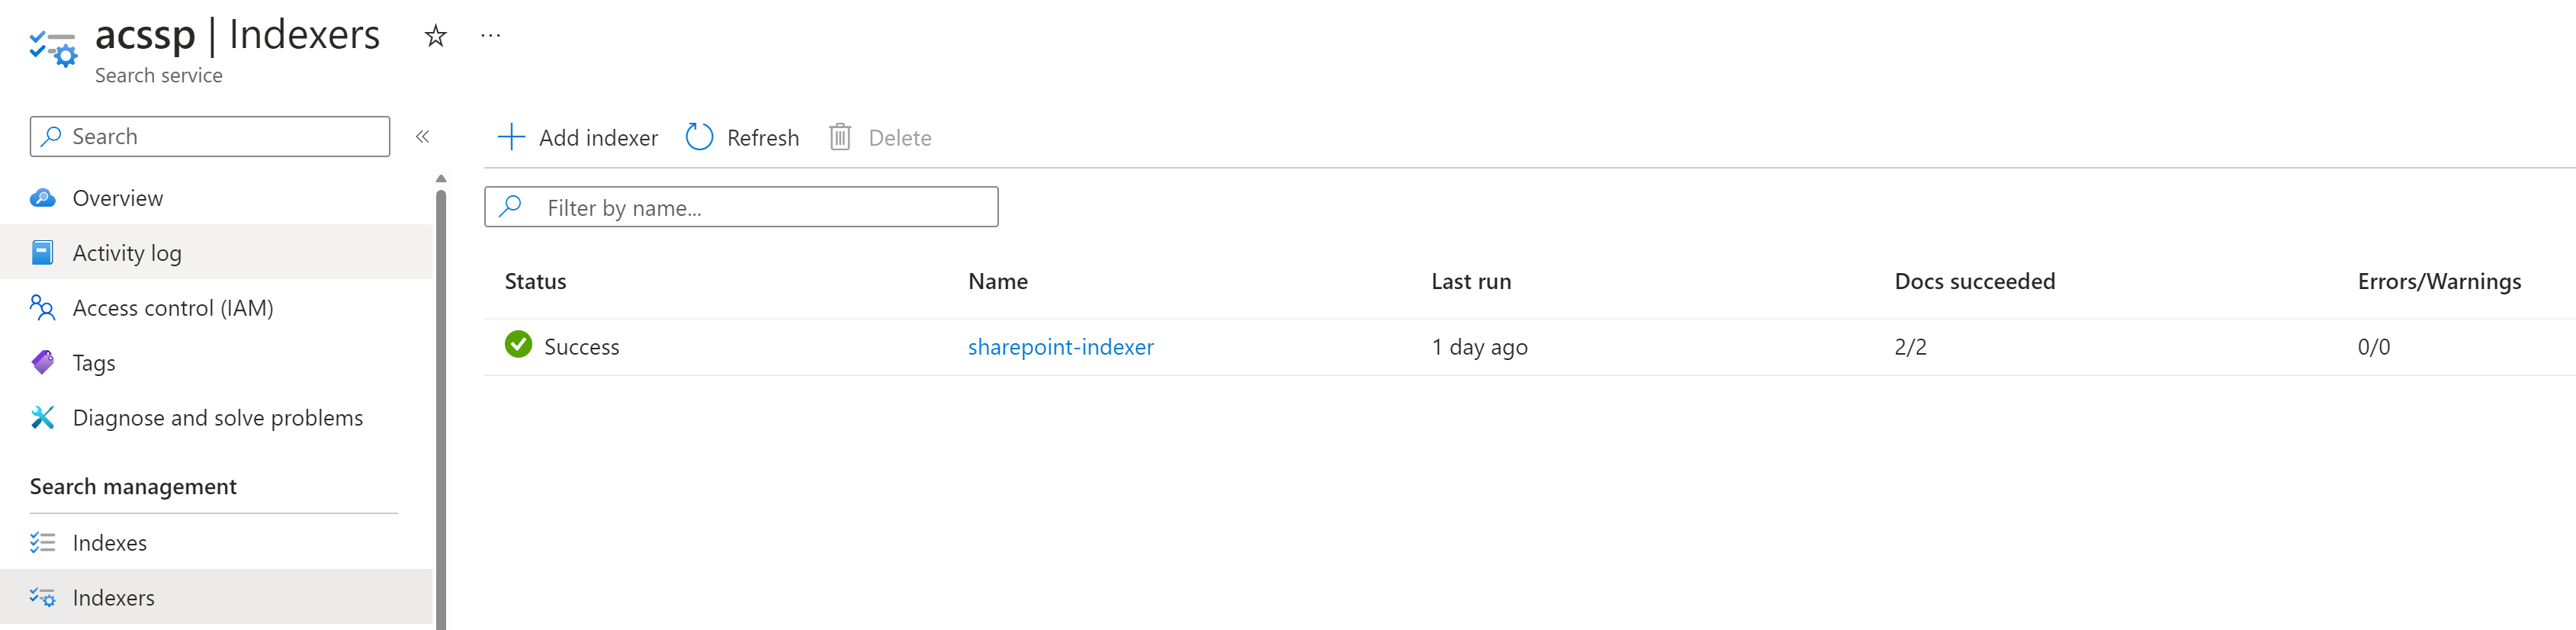
Create your indexer
Additionally to that index, we want to create an indexer. It will later automate the indexing process from your SharePoint library to the Azure Cognitive Search service.
Once again, we do this in Postman. This is a two-step process as we first need to POST a Create an indexer request - which will run and run and run as it is waiting for us to log in. So we will run a second call, which to GET the indexer status. This will return a devicecode with which we can can sign in - Once we did that we can see that the call returns a 200. After that, the POST will succeed and return a 201 as well.
So let’s do this together:
Create an indexer request
- POST to
https://<name-of-your Azure Cognitive Search service>.search.windows.net/indexers?api-version=2023-07-01-Preview - Params:
- api-version:
2023-07-01-Preview
- api-version:
- Headers:
- Content-Type:
application/json - api-key:
<the Admin key of your Azure Cognitive Search Service>
- Content-Type:
- Body (Json):
{
"name" : "sharepoint-indexer",
"dataSourceName" : "sharepoint-datasource",
"targetIndexName" : "sharepoint-index",
"parameters": {
"batchSize": null,
"maxFailedItems": null,
"maxFailedItemsPerBatch": null,
"base64EncodeKeys": null,
"configuration": {
"indexedFileNameExtensions" : ".pdf, .docx",
"excludedFileNameExtensions" : ".png, .jpg",
"dataToExtract": "contentAndMetadata"
}
},
"schedule" : { },
"fieldMappings" : [
{
"sourceFieldName" : "metadata_spo_site_library_item_id",
"targetFieldName" : "id",
"mappingFunction" : {
"name" : "base64Encode"
}
}
]
}
Once you post this, it will - as explained, wait for you to log in.
Get indexer status
- GET to
https://<name-of-your Azure Cognitive Search service>.search.windows.net/indexers/sharepoint-indexer/status?api-version=2023-07-01-Preview - Params:
- api-version:
2023-07-01-Preview
- api-version:
- Headers:
- Content-Type:
application/json - api-key:
<the Admin key of your Azure Cognitive Search Service>
- Content-Type:
No body needed :-)
This will return a response that contains an errormessage:
{
"errorMessage": "To sign in, use a web browser to open the page https://microsoft.com/devicelogin and enter the code LFXXXXXP to authenticate.\r\nTo sign in, use a web browser to open the page https://microsoft.com/devicelogin and enter the code LFXXXXXP to authenticate.",
}
Copy the code and open the link, then paste the code into the devicelogin popup. Once you are logged in, you can close that browser tab again.
Check now in the Azure portal that you do not only have an index, but also an indexer and documents indexed.
Test your app in the Playground
The Azure OpenAI playground is a fabulous way to test and try out - so let’s do this
- In the Playground, create a new deployment
- Select Add your data and then Add a data source
- Select the Azure Cognitive Search service, your Subscription its running in, and the index we just created. All of these will automagically 🪄 appear in the respective dropdown fields.
- Now proceed with the index data field mapping - where you select all fields to be content
- Save and close
You can now chat against your documents and ask the bot questions about it. By check/uncheck of the Limit responses to your data content you can determin whether you want the bot only to consider content from your documents or not.
You can now deploy this as a web app - Or you can walk with me some more steps and have that power in Power Apps or Power Automate
Make the magic happen in Power Apps
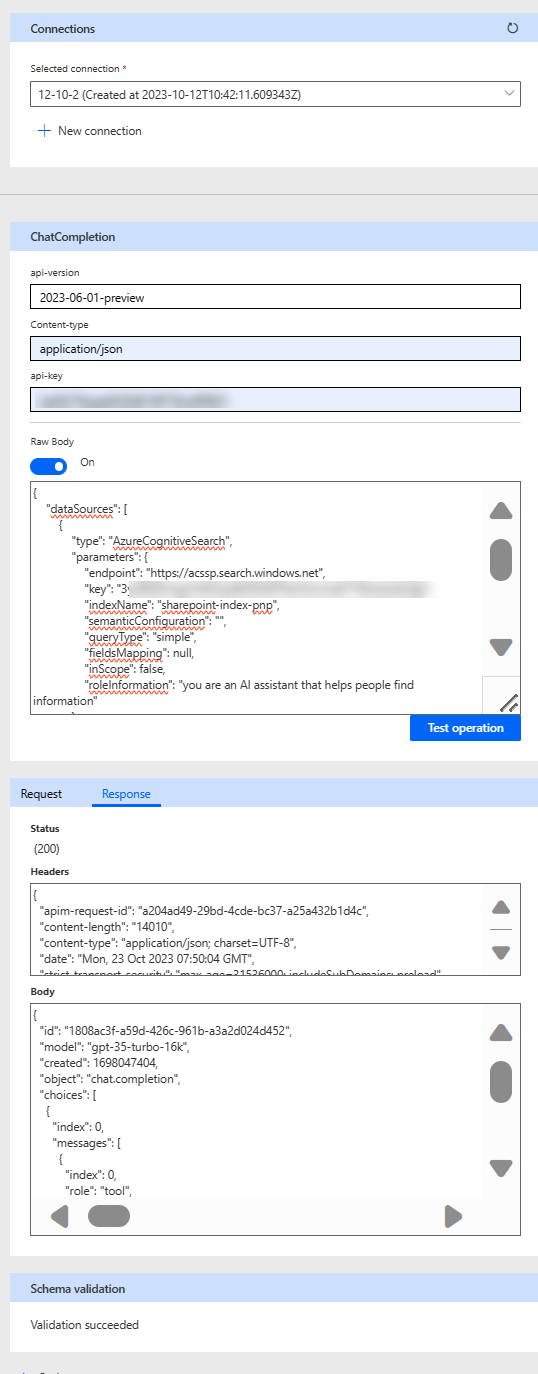
To connect to this API from a Power Apps, we will need to create a custom connector.
Following the Custom Connector wizard at make.powerapps.com:
- General
- Host:
<name-of-your-openai-service>.openai.azure.com - Base URL:
/openai/deployments/<name-of-your-deployment>
- Host:

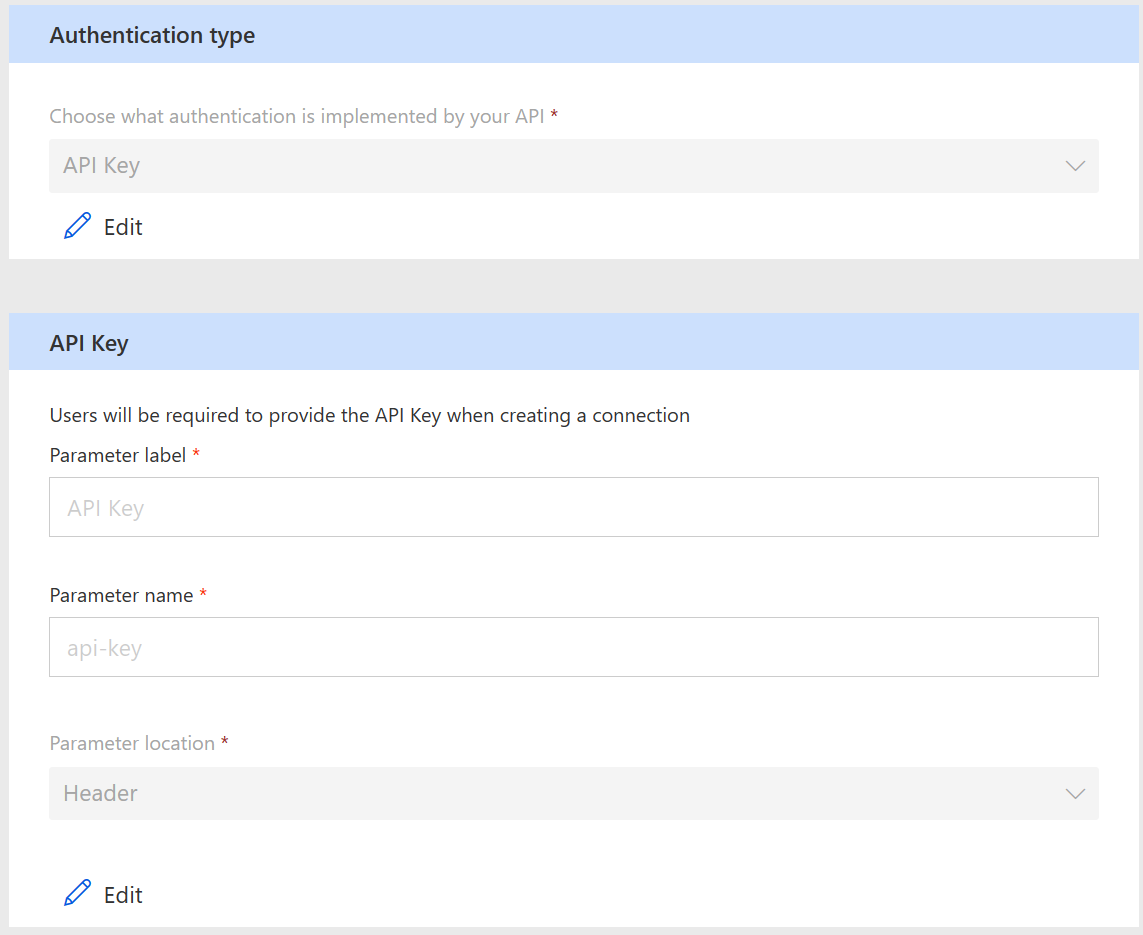
- Security:
- Authentication type:
API Key - Parameter-label:
api-key - Parameter name:
api-key - Parameter location:
Header
- Authentication type:
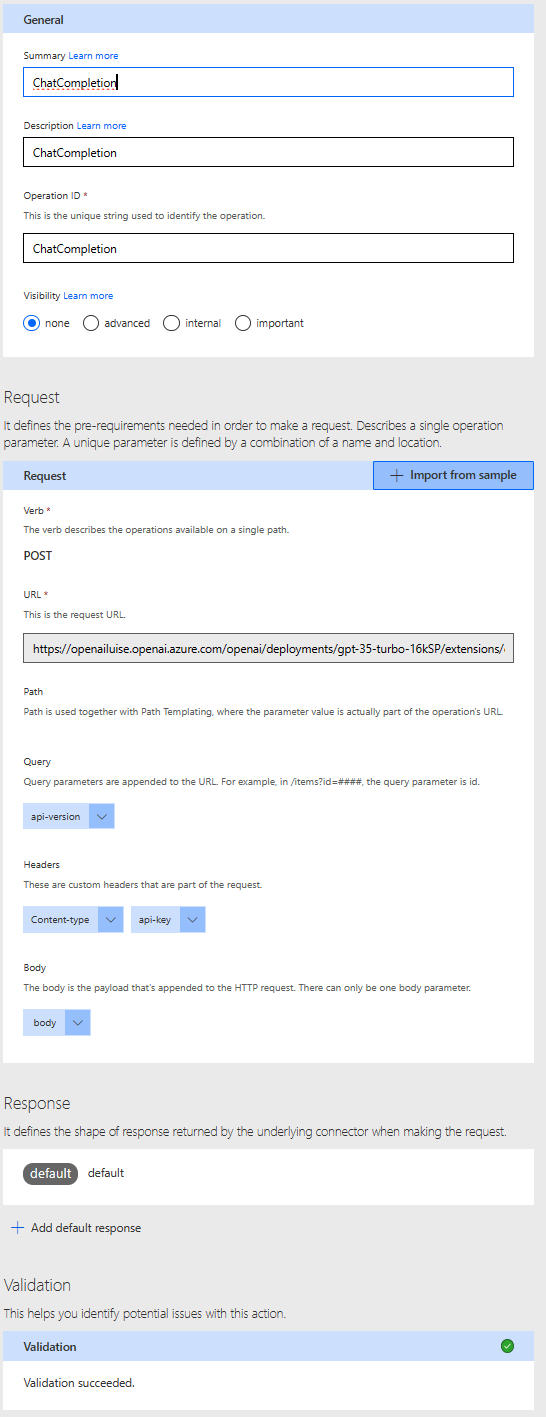
- Definition
-
General:
- Summary:
ChatCompletion - Description:
ChatCompletion - Operation ID:
ChatCompletion
- Summary:
-
Request URL:
https://<name-of-your-openai-service>.openai.azure.com/openai/deployments/<name-of-your-deployment>/chat/completions -
Body:
-
 {
"dataSources": [
{
"type": "AzureCognitiveSearch",
"parameters": {
"endpoint": "https://<name-of-your-Azure-Cognitive-Search-service>.search.windows.net",
"key": "<your Azure Cognitive Search service Admin key>",
"indexName": "sharepoint-index",
"semanticConfiguration": "",
"queryType": "simple",
"fieldsMapping": null,
"inScope": true,
"roleInformation": "you are an AI assistant that helps people find information"
}
}
],
"messages": [
{
"role": "user",
"content": "What is the answer to life, universe, and everything?"
}
],
"deployment": "<name-of-your-deployment>",
"temperature": 0,
"top_p": 1,
"max_tokens": 800,
"stop": null,
"stream": false
}
- Test
- Connection:
- Create a new Connection, provide the API for your Azure Open Ai service as api-key.
- Run your action, it should return a
200response code and show a response to your question. Please note that with the inScope property you can limit the responses to just your documents.
- Connection:
You can now use this connector in either Power Apps or Power Automate.
What will you build with it?
Published on:
Learn moreRelated posts
Streamlining SharePoint File Analysis with Microsoft Copilot Studio Code Interpreter
Organizations today store massive volumes of structured data sales figures, inventory records, and financial reports in Excel and CSV files ac...
Introducing Azure HorizonDB - PostgreSQL
Run enterprise Postgres workloads on Azure HorizonDB with around 3x the throughput of self-managed deployments — zone-resilient by default, no...
Real-Time Dynamics 365 Sales Alerts for Manufacturing Teams: Close Deals Faster
In the manufacturing industry, timing often determines whether a deal moves forward or ends up with a competitor. Sales representatives manage...
Azure DevOps and GitHub: Journeying into the AI Era
AI is changing how software gets planned, built, and reviewed. As teams adopt agentic development, the platform underneath those workflows mat...
Introducing azure-functions-skills: An AI-Era Workspace for Azure Functions (Preview)
azure-functions-skills gives GitHub Copilot CLI, Claude Code, Codex CLI, and VS Code the skills, MCP configuration, hooks, and instructions ne...
Announcing the Public Preview of Integrated Embeddings in Azure Cosmos DB: Build AI Apps With Embeddings That Stay in Sync
AI applications built on Azure Cosmos DB depend on embeddings for grounded results. Keeping them in sync with your data is the hard part: it m...
Introducing OmniVec: An Open-Source Embedding Platform for AI Apps on Azure
Today we are open-sourcing OmniVec, a platform for building and operating the embedding pipelines that keep the vector representation of your ...
Azure Cosmos DB All Versions and Deletes Change Feed Mode is Now Generally Available
Modern applications don’t just write data and move on. They react to it. A new order triggers an inventory update. A profile change sync...
Change Partition Keys in Azure Cosmos DB is Now Generally Available
We’re excited to announce the general availability of Change Partition Key in Azure Cosmos DB for NoSQL, now with online copy support. Y...
Announcing the General Availability of Per Partition Automatic Failover for Azure Cosmos DB NoSQL
Today, we are excited to announce the General Availability of Per Partition Automatic Failover (PPAF) for Azure Cosmos DB NoSQL API. PPAF is a...