How to build a deskbooking tool with Microsoft Planner and Power Automate

Use Case
Recently, a customer asked if it was possible to low code build a desk booking tool without using Power Apps.
Tl;dr: yes, it is! We will leverage the UI of Microsoft Planner and use Power Automate to do the heavy lifting. Each bucket in Planner represents a day where desks are bookable, each task in Planner represents a room in which desks are present.
Features
- Planner Rooms starts with 21 buckets for each day in the next three weeks
- Each bucket is initially filled from a template bucket in a Rooms Template plan. It consists of all tasks which represent the rooms
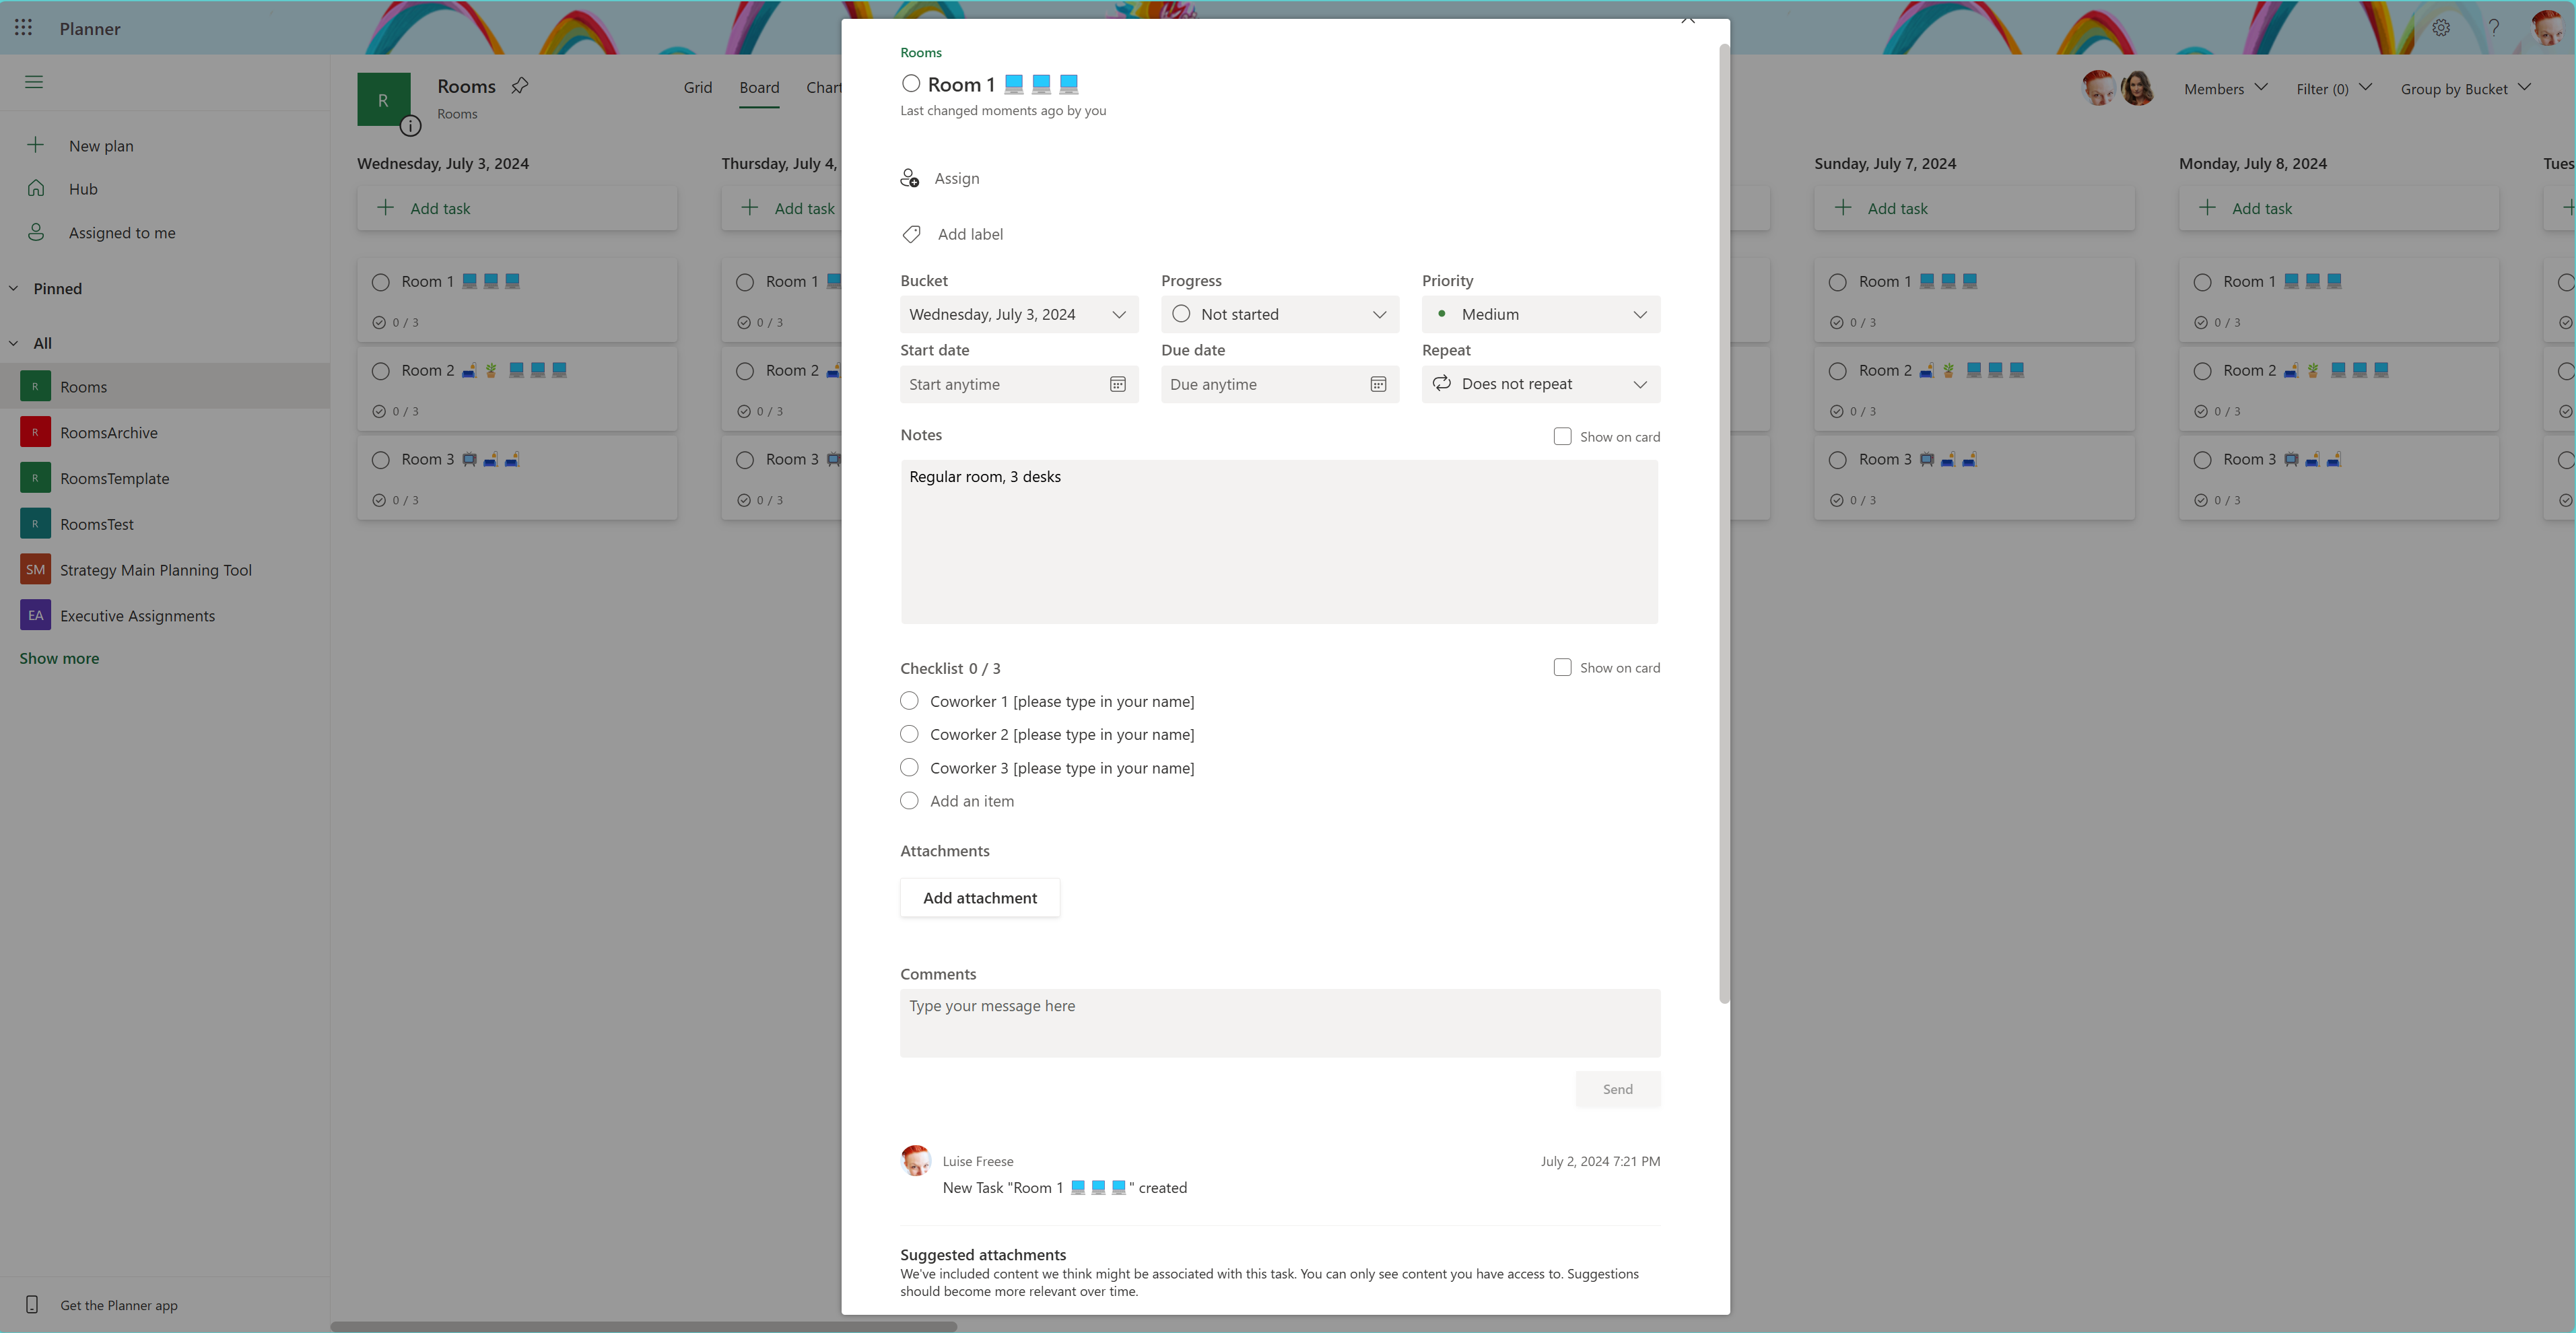
- the description shows information about the room
- the checklist shows who already booked a desk on this day in the room
- A new bucket gets created each day
- The oldest bucket (which now represents the day before the current day) is archived to an Rooms Archive plan.
How to build this
Planner
We need to create three plans:
- Rooms Template
- Rooms
- Rooms Archive
Rooms Template
- Create a bucket
- Create a task for every room with a description
- For each desk, create a checklist item and put a placeholder in like “Type in your name here”
Rooms
For now, leave empty, we will deal with this a bit later.
Rooms Archive
For now, leave empty.
Power Automate flow to initially fill the Rooms plan
To initially fill the Rooms with 21 buckets (which represent the next 21 days) we will employ a Power Automate flow.
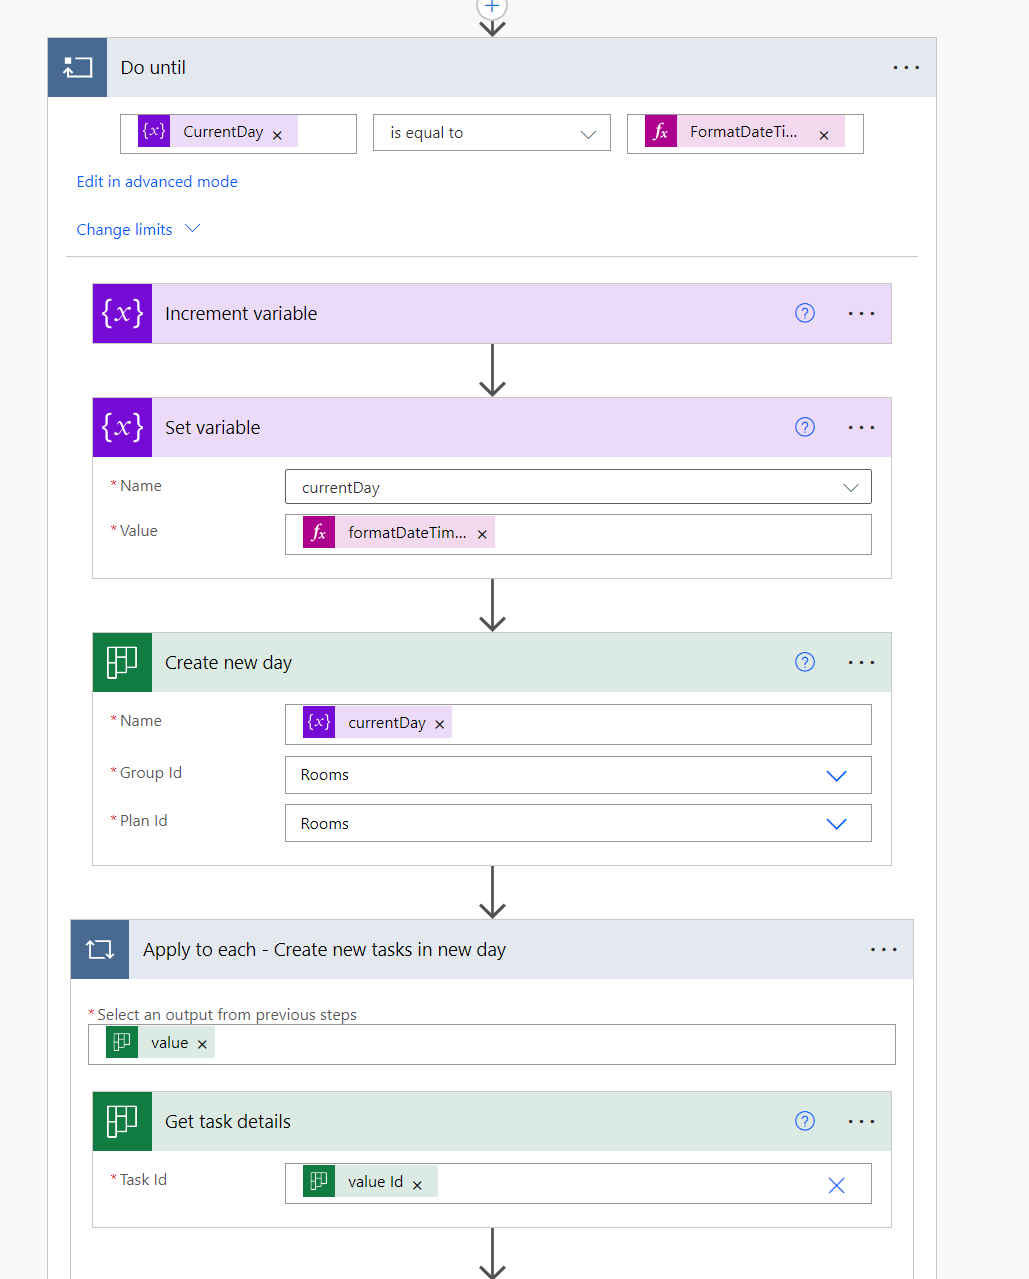
- Trigger: Manual trigger (it only needs to run once)
- Planner: List tasks from the Room Template plan
- Initialize a variable currentDay (string)
- in a Do Until (Currentday eq FormatDateTime(addDays(utcNow(), 21), ‘D’))
- Set the currentDay variable to
FormatDateTime(addDays(utcNow(), 21), 'D') - Planner: Create a new task with the Name of the currentDay variable
- Add an Apply to each
- Planner: Get task details from the Rooms template
- Planner: Create a task in the Rooms plan with the title bucket id we already obtained
- Planner: Update task details - for the description
- Set the currentDay variable to
Now run the flow and see that your Rooms plan automagically gets populated with 21 buckets containing all the tasks that represent the rooms. You can turn off the flow now, as we don’t need to run it anymore.
Power Automate flow to take care of a new bucket to be created every single day
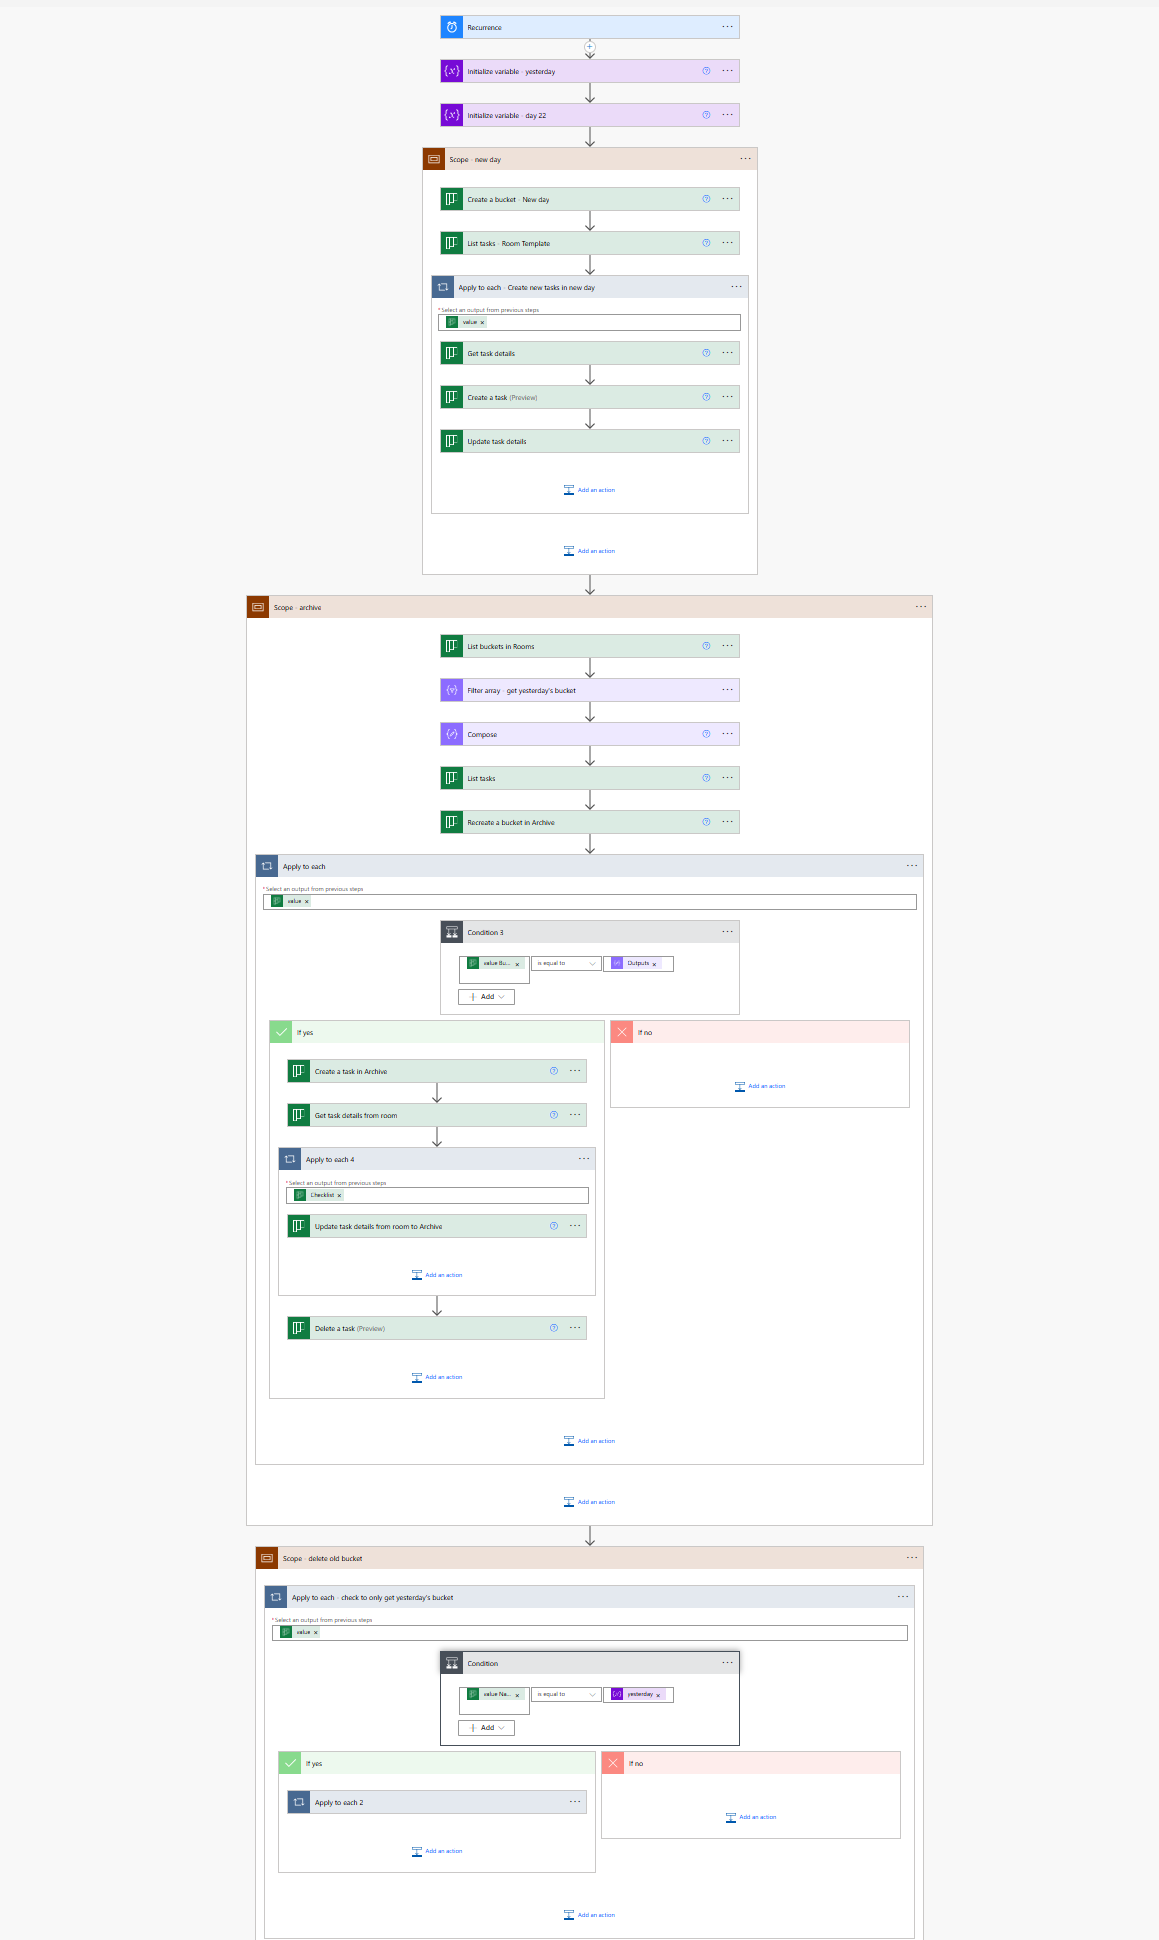
First, some visual representation of our flow:
-
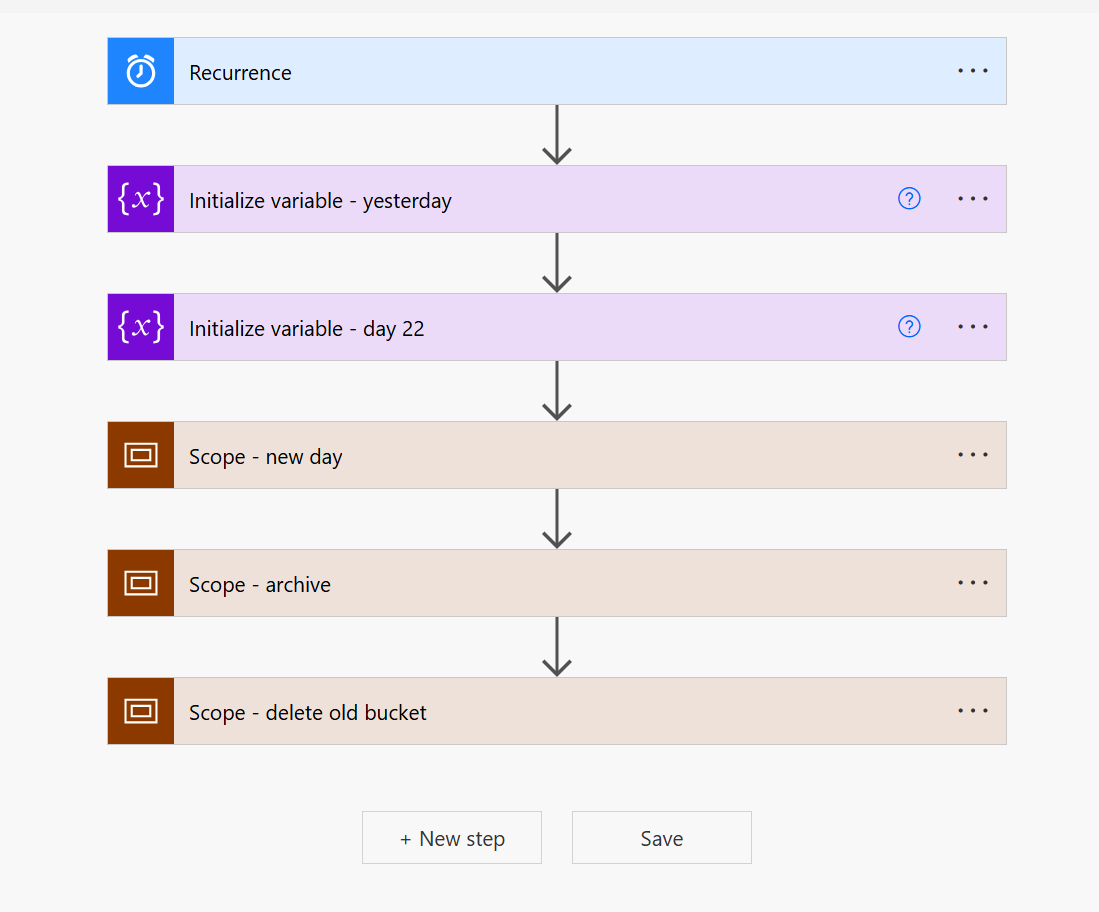
As we want this to run every day, we will start with a Recurrence and let it run for example at 6am.
-
We will now initialize two variables:
yesterdayof type string with a Value:formatDateTime(addDays(utcNow(), -1), 'D')day 22of type string with Value:formatDateTime(addDays(utcNow(), 22), 'D')
-
In a Scope (makes it look neat and tidy):
- Planner - Create a bucket for the new day. Name: our
day 22variable, Group Id and Plan Id need to be the Rooms plan. - Planner - List tasks. Group Id and PlanId need to be the RoomsTemplate plan
- Apply to each
- Planner: Get task details
- Planner: Create a task (Preview)
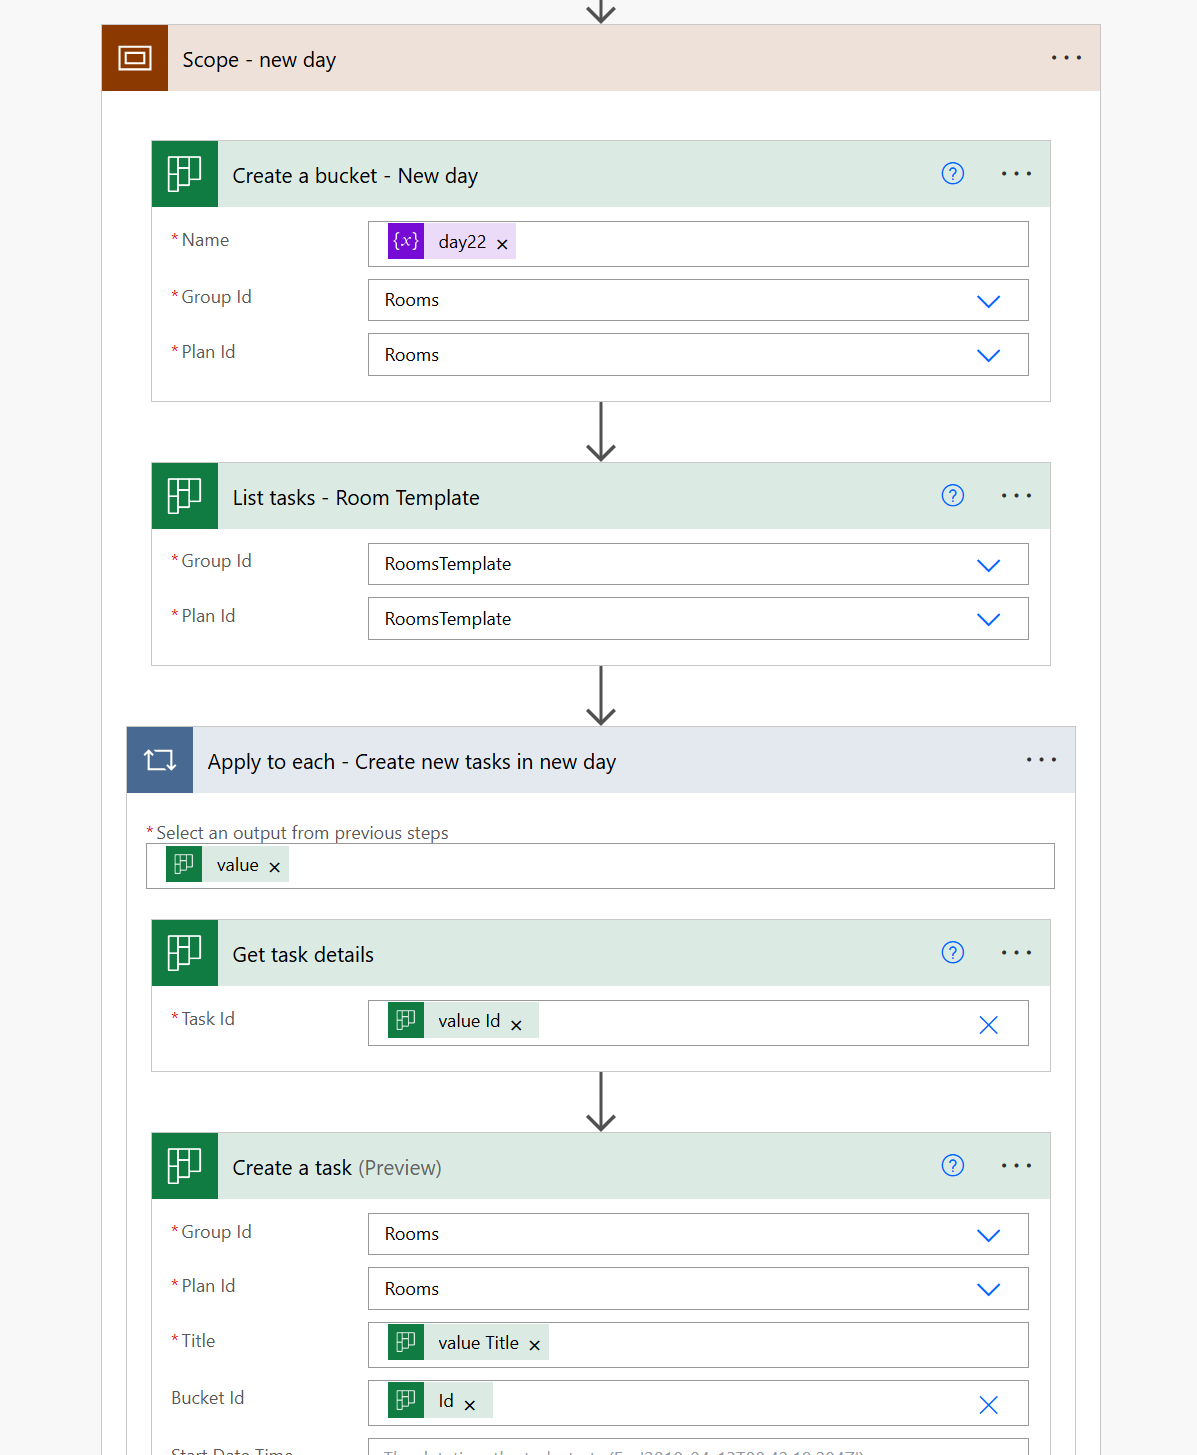
- Planner: Update task details
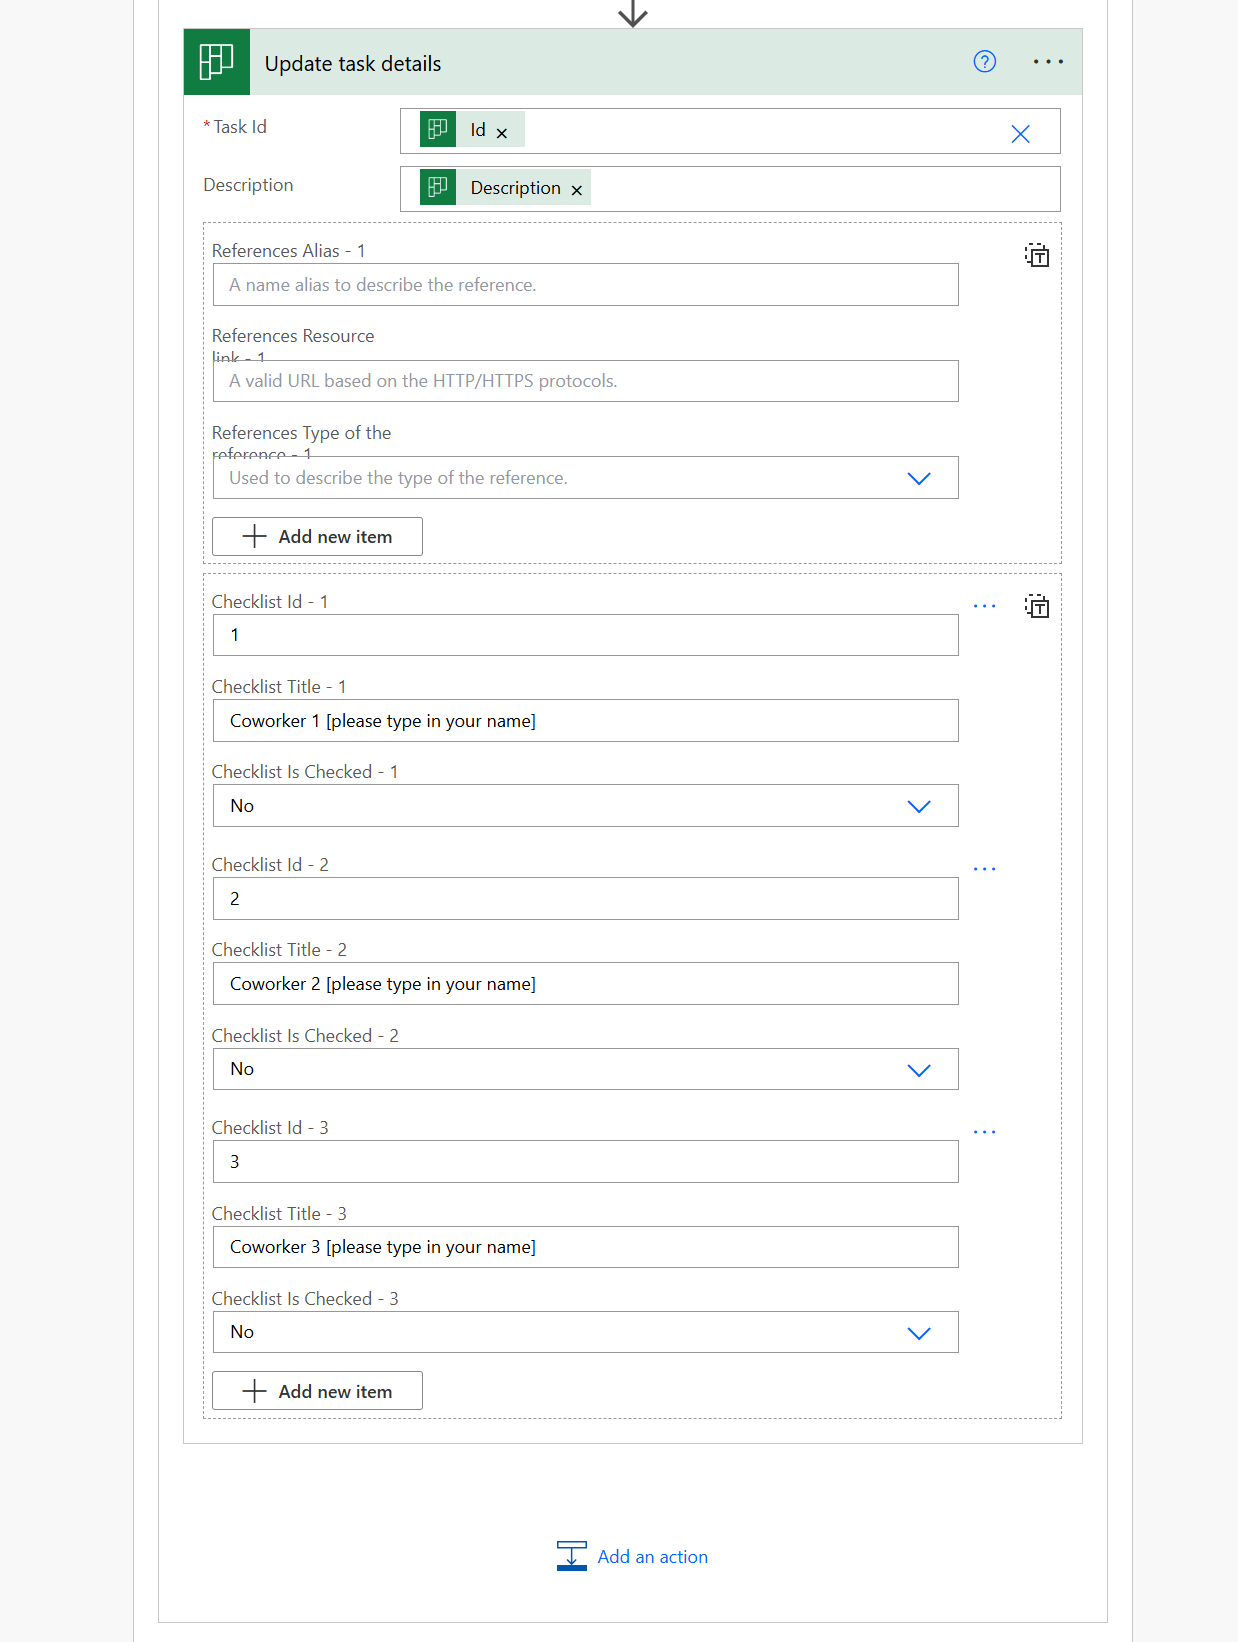 This will create a new bucket for the new day and get the task from our template. We will then loop through all of the tasks of the template and re-create them in the new bucket including description and checklist
- Planner - Create a bucket for the new day. Name: our
-
Let’s create the next Scope for archiving the oldest bucket (yesterday)
- Planner - List buckets in Rooms
- Filter array - to get yesterday’s bucket
value Nameneeds to equal ouryesterdayvariable - Use a Compose action to select the id
- Planner: List tasks Rooms
- Planner: Create bucket with Name of the
yesterdayvariable in RoomsArchive plan - Apply to each
- condition if
items('Apply_to_Each)?['bucketid']equals the id we have in our Compose action- yes:
- Planner: Create a task in Archive
- Planner: Get task details from room
- Apply to each
- Planner: Checklist: Update task details from Rooms to Archive
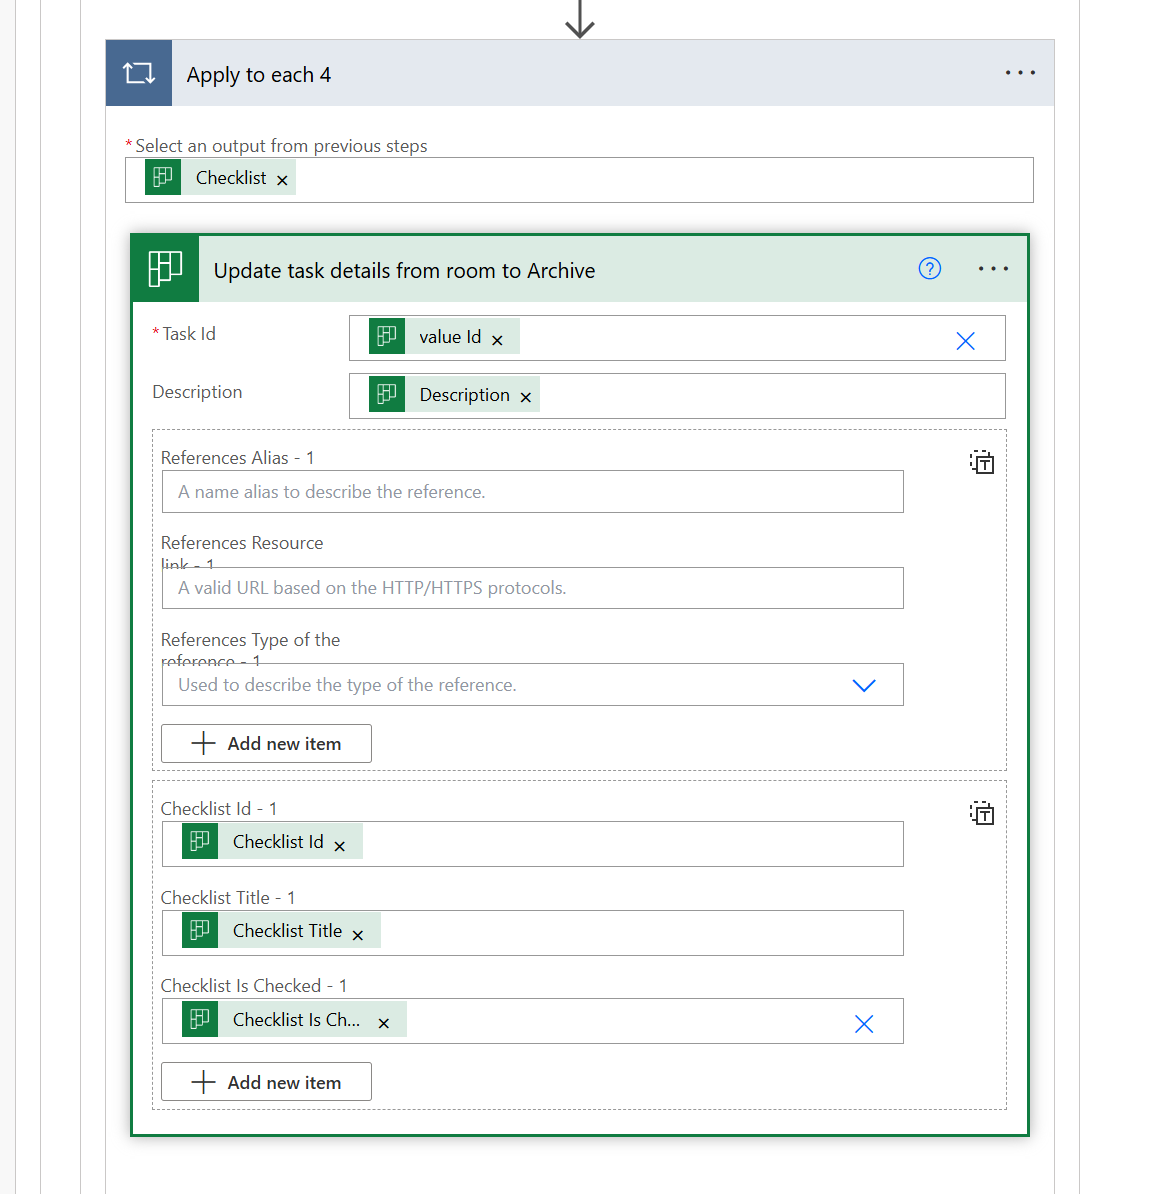
- Planner: Checklist: Update task details from Rooms to Archive
- yes:
- no: leave empty
- condition if
- outside (!) of the 2nd (!) but inside of the first loop in this scope: Planner: Delete a task
This scope takes care of first recreating all the tasks in the RoomsArchive plan and then deletes the tasks in yesterday’s bucket in the Rooms plan.
We will now create the last scope - which deletes yesterday’s bucket. Unfortunately, there is no action in the Planner connector that would allow us to delete a bucket - so we need to handle this ourselves. We will leverage an HTTP request against the Microsoft Graph API. Following the docs, we need to hit DELETE /planner/tasks/{id}. To authenticate against Graph API, we need to perform an app registration in Entra ID. If you don’t know how this works, you can look this up here if you prefer a terminal experience or here if you like GUIs more.
So please first go ahead and register your app in Entra ID, note your tenant id, app id and app secret. For permissions, we will use Tasks.ReadWrite.All
In this scope
- Apply to each
- condition if the bucket name equals our
yesterdayvariable- yes:
- Apply to each - Body of our Filter array
- HTTP request to
https://graph.microsoft.com/v1.0/planner/buckets/@{items('Apply_to_each_-_check_to_only_get_yesterday''s_bucket')?['id']} - Headers: If-Match:
"@items('Apply_to_each_2')['@odata.etag']" - Fill in the values for tenant id, app id and app secret, audience is
https://graph.microsoft.com.
- yes:
This will delete the empty bucket.
Here is the full flow:
Conclusion
We now built with 2 quite simple flows a desk booking tool - without the need to build our own UI and in a real low-code manner :-)
The past booked rooms get archived for traceability reasons (and of course we could set up another flow that would delete those after after a while as well, every day a new set of rooms gets automatically created and everyone can book their rooms up to 3 weeks in advance. Pretty neat, right? Let me know what you think!
Published on:
Learn moreRelated posts
Why you need the question mark operator in Power Automate expressions
Learn why the question mark operator in Power Automate prevents runtime errors when accessing properties that might not exist, and how to use ...
Power Automate – Analyze processes using object-centric process mining
We are announcing the ability to analyze processes using object-centric process mining in Power Automate. This feature will reach general avai...
Use customized Business Events of Microsoft Dynamics Business Central on Power Automate.
Overview Microsoft Dynamics 365 Business Central allows developers to define custom Business Events using the AL programming language. These e...
Power Automate – Share Process license capacity across workflows
We are announcing the ability to share Process license capacity across workflows in Power Automate. This feature will reach general availabili...
How to Use Static Results to Test Power Automate Flows Without Creating Duplicate Records
When you work with Power Automate, you’ll eventually run into situations where testing your flow repeatedly starts causing real problems in yo...
Power Platform – Alerts for Microsoft Power Automate work queues is now available for public preview
We are announcing the ability to configure alerts for Microsoft Power Automate work queues from the Monitor section of the Power Platform admi...