The Usage of Managed Identity in the Azure Batch Account and Azure Batch Pool

Overview:
The managed identities can be used both in the Azure Batch Account and Azure Batch Pool, which may cause confusion in some situations. This blog is aimed to help you understand the differences between the usage of the managed identity in the Azure Batch Account and in the Azure Batch Pool. The managed identity configured on the Batch account only grants permission for the Azure Batch Account to authenticate to other services but not for Azure Batch nodes (or Pool VMs). If the purpose is to grant the Azure Batch nodes access to other Azure resources, then you are looking for the managed identity configured in the Azure Batch Pool.
Outline:
- Overall Pre-requirement
- Managed Identity in the Azure Batch Account
- Managed Identity in the Azure Batch Pool
- Where to associate managed identity to the node for accessing auto-storage account
- Different actions that a node could do with a managed identity
- Different behaviors when a node is trying to get application package or resource file from auto-storage using managed identity
- Self-troubleshooting
Overall Pre-requirement:
- Have an existing Azure Batch account.
- Have an existing Azure Storage account.
- Associate the Azure Storage account with your Azure Batch account. Note that this linked Storage account is considered to be the auto-storage account which is used to store the application packages and task resource files.
- Turn the authentication mode of auto-storage account to "Batch Account Managed Identity".
Managed Identity in the Azure Batch Account:
Users can either enable the system-assigned managed identity, or create a separate user-assigned managed identity for the Azure Batch Account in 'Identity' section.
After you configure managed identity for the Azure Batch Account, you can click the 'JSON View' button at the top right of the Overview of Azure Batch Account to confirm the setting as shown below:
System-assigned managed identity
User-assigned managed identity
One of the examples to use managed identity of Batch Account is to upload the application package to the Azure Batch Account.
The application package will be stored in the auto-storage account that is associated with Azure Batch Account. If the authentication mode of the storage account information is chosen as 'Batch Account Managed Identity', then the system will retrieve the credential from system-assigned/user-assigned managed identity of Azure Batch Account for accessing to the auto-storage account.
You may need to check if the system-assigned/user-assigned managed identity has enough permission on the auto-storage account via following steps: Storage Account -> Access Control (IAM) -> Check access -> Select the Managed Identity.
If the permission is not granted or the permission is not enough, you will find below error popped up from top right of the Notification when you are uploading the application package to the Azure Batch Account.
Capturing the HAR file of the request, there will be a POST request whose name starts with 'batch' and result is 200. From the payload, you will see the actual PUT request sending to Azure Batch Account. From the response of this actual request, this request resulted as 409 with error message displayed as "The managed identity does not have permission to access auto storage account. Please use Azure RBAC to assign the managed identity access to auto storage". This means that your system-assigned/user-assigned managed identity of Azure Batch Account does not have enough permission to perform actions on the auto-storage account.
The other example for accessing the Azure Key Vault is documented here: Configure Customer-managed Keys for Azure Batch Account with Azure Key Vault and Managed Identity.
**Note that the interaction we are talking about here is between Azure Batch Account and Azure Storage/Key Vault, and if the interaction is between Azure Batch Nodes and other Azure Resources, you will need to configure the managed identity in the Azure Batch Pool.
Managed Identity in the Azure Batch Pool:
When the authentication mode of the linked Azure Storage account (or called auto-storage account) is set as "Batch Account Managed Identity", the Azure Batch nodes get the managed identity tokens and use them to authenticate through Azure AD authentication via the Azure Instance Metadata Service.
The Azure Batch Pool only supports user-assigned managed identity so users need to create a user-assigned managed identity in the same tenant as your Azure Batch account: Create a User-assigned Managed Identity. Also, users need to grant the Storage data plane permission (e.g. Storage Blob Data Owner) to the user-assigned managed identity.
Where to associate managed identity to the node for accessing auto-storage account:
There is an explanation in document update Batch Account REST API: the reference to the user-assigned identity which compute nodes will use to access auto-storage and the identity referenced here must be assigned to pools which have compute nodes that need access to auto-storage. Thus, there are two places that need to be configured as shown below:
1.The Node Identity Reference
2.The Pool Identity
**Important: you can define multiple user-assigned managed identities in the Pool Identity, but the one defined in the Node Identity Reference must be defined in the Pool Identity.
Different actions that a node could do with a managed identity:
- Application Package
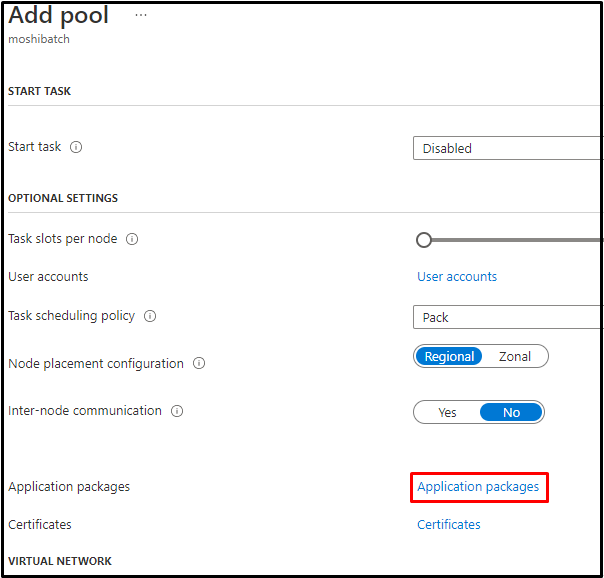
When creating a pool, users can specify application packages at the pool level. The application packages will be downloaded from the auto-storage account and installed in all nodes in this pool. Reference: Azure Batch Upload and Manage Applications. The application packages should be uploaded to the Azure Batch Account before referring it during the pool creation.
2.Task Resource File
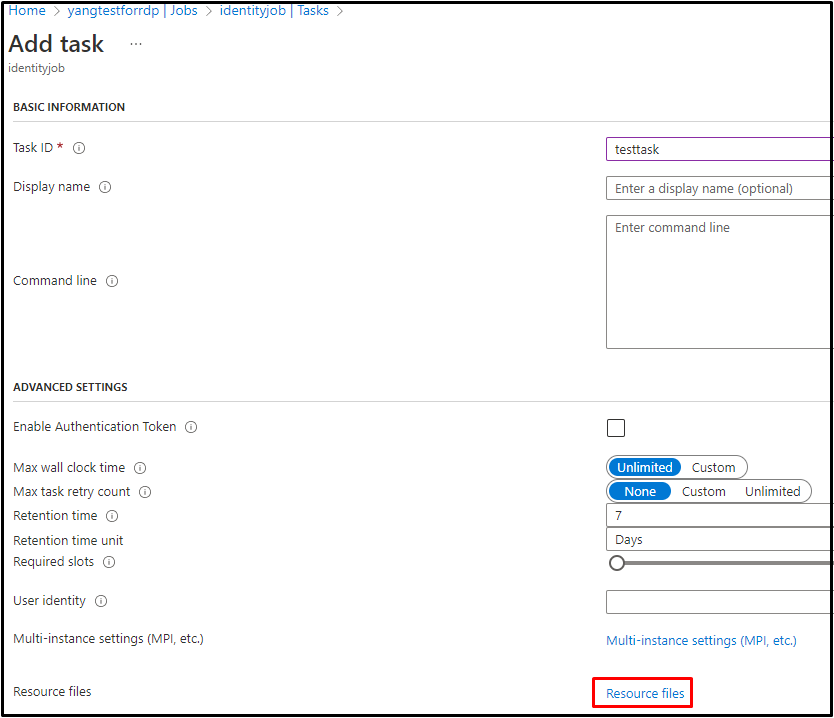
While creating a task, users can specify the resource files. These files are automatically downloaded to the node from the Storage before the task command is executed. Reference document: Concept of Azure Batch Tasks.
Note that you can specify the resource files in three ways: auto-storage container, container URL, and http URL.
- For auto-storage container, the identity reference displays as none here and cannot be modified. It means that the node will access to the auto-storage to retrieve resource files.
- For container URL and http URL, users can define other Storage account's URL as long as there are enough permissions configured in the defined Storage account for the identity reference and the identity is added in the Batch pool.
- The identity must be defined in both Node Identity Reference and Pool Identity when you need access to the auto-storage account.
The parameter "Blob Prefix" and "File Path" are optional (blob prefix is used to filter specific blob, and the file path is used to create a sub-folder in the node for storing the blob files. If it is not defined, the files should be stored under each task's path: root/wd).
Different behaviors when a node is trying to get application package or resource file from auto-storage using managed identity:
There are some scenarios showing different behaviors when a node is trying to get application package or resource file from auto-storage by using managed identity:
For Pool Application Package:
Scenario 1:
If the managed identity is given in the Node Identity Reference, and this managed identity has enough permission in the auto-storage account, when creating a pool with the same managed identity, the node will start successfully and the package will be downloaded to the node.
Scenario 2:
If the managed identity is given in the Node Identity Reference, and this managed identity does not have enough permission in the auto-storage account, when creating a pool with the same managed identity, the node will start successfully (in idle state) but the package will not be downloaded to the node.
Scenario 3:
If the managed identity is not given in the Node Identity Reference, no matter whether the managed identity has enough permission, and no matter whether creating a pool with or without the same managed identity, you will see the node gets stuck in the starting state forever. When the Azure Batch System is trying to start the node, the node identity reference becomes null in this scenario, which cause the node stuck in starting.
Users can double confirm it by checking the Batch agent logs. Here are the steps:
1. Click the Upload batch logs button inside a Batch node to upload the logs to a valid Storage container.
2. Access to the Storage container and download the agent-debug.log file.
3. From the log, the health status keeps reporting pool not fully joined yet and the node gets stuck in the JoinPool progress.
Scenario 4:
If the managed identity is given in the Node Identity Reference, no matter whether the managed identity has enough permission, when creating a pool without the same managed identity, you will see the node becomes unusable. Note that you can define multiple managed identities when creating the pool. However, if the identity that is defined in the Node Identity Reference is not added in the pool identity, Azure Batch system cannot find a correct identity that matches with the one defined in the node reference and finally throw the exception.
Further click the node from the pool and you will see the node error with code "ApplicaitonPackageError".
For Task Resource File:
Scenario 1:
If the managed identity is given in the Node Identity Reference, and this managed identity has enough permission in the auto-storage account, after creating a pool with the same managed identity, and then create a task with resource file from auto-storage's container, users will see the blob file is downloaded under task's path: root/wd/1 (here I named file path as 1).
Scenario 2:
If the managed identity is given in the Node Identity Reference, and this managed identity does not have enough permission in the auto-storage account, after creating a pool with the same managed identity, and then create a task with resource file to retrieve blobs from auto-storage's container, user will see the task reports error "ResourceContainerAccessDenied".
Click the task, and select the "Json view" from the task properties, you will see the message reports as "Access for one of the specified Azure Blob container(s) is denied".
Scenario 3:
If the managed identity is not given in the Node Identity Reference, no matter whether the managed identity has enough permission, no matter whether creating a pool with or without the same managed identity, and then create a task with resource file to retrieve blobs from auto-storage's container, users will see the same behavior as above showing "ResourceContainerAccessDenied" error.
Scenario 4:
If the managed identity is given in the Node Identity Reference, no matter whether the managed identity has enough permission, after creating a pool without the same managed identity, and then create a task with resource file to retrieve blobs from auto-storage's container, users will see the task reports error "ResourceContainerListMiscError".
Click the task, and select the "Json view" from the task properties, users will see the message "Miscellaneous error encountered while listing one of the specified Azure Blob container(s)". The error message indicates that this is a 400 bad request when authenticating the managed identity since the identity defined in the reference does not match any of identity defined in the pool identity configuration.
In summary, the below table shows different behaviors when a node is trying to get application package or resource file from auto-storage using managed identity (MI):
|
Pool Application Package |
Node Identify Ref with enough Permission |
Node Identify Ref without enough Permission |
No Node Identity Ref |
|
MI In the Pool Identity |
Work |
Node Up without App Package |
Node Starting Forever |
|
MI Not In the Pool Identity |
Node Unusable |
Node Unusable |
Node Starting Forever |
|
Task Resource File |
Node Identify Ref with enough Permission |
Node Identify Ref without enough Permission |
No Node Identity Ref |
|
MI In the Pool Identity |
Work |
Failed with 403 |
Failed with access deny |
|
MI Not In the Pool Identity |
Failed with 400 |
Failed with 400 |
Failed with access deny |
Self-troubleshooting:
Additionally, to confirm if the managed identity assigned to the Azure Batch node (in Windows) has enough permission to access to the Azure resource like storage account, users can:
** Note that these steps stimulate the last step to get the token from Azure Instance Metadata Service (IMDS) with valid identity ID and access to the storage account to check if the permission is enough or not. However, if the identity is not defined in the Node Identity Reference, the node is not able to get the identity ID and the entire process has already been blocked before executing the last step. Thus, please double check if the identity is defined in the Node Identity Reference before performing the self-troubleshooting steps.
1. RDP to the node
2. Install Postman and send a GET request with following URL with Header ("Metadata = true"). The IP address 169.254.169.254 is also known as IMDS, which provides information about the virtual machine instance so you can use it to request tokens for managed identity. Reference document: Azure Instance Metadata Service (IMDS).
The highlighted part should be your resource id of user-assigned managed identity defined in the Pool Identity and you can view them from pool properties including resource ID, client ID, and principal ID. If there is only one identity defined in the Pool, you can use following URL http://169.254.169.254/metadata/identity/oauth2/token?api-version=2018-02-01&resource=https://storage.azure.com/.
3. The response body should contain client ID and bearer token (access token). The client ID should be the same as you see from pool properties.
If you defined multiple user-assigned identities in the pool identity and did not specify an identity in the URL, you would get a 400 bad request.
4. You can then copy the full bearer token and further test it by retrieving the blob from the auto-storage. In below example, the managed identity does not have permission to access the storage so the 403 error is returned from the auto-storage account.
Note that the x-ms-version header is required for getting blob, referencing: Azure Storage Get Blob REST API.
Reference:
Create a User-assigned Managed Identity
Azure Batch Upload and Manage Applications
Azure Instance Metadata Service (IMDS)
Azure Storage Get Blob REST API


