Deploying Kubernetes Cluster on Azure VMs using kubeadm, CNI and containerd

Although managed Kubernetes clusters are great, ready for production, and secure, they hide most of the administrative operations. I remember the days I was working with Kubernetes the hard way repository to deploy on Azure Virtual Machines and I was thinking that there should be an easier way to deploy your cluster. One of the well-known methods is kubeadm which is announced at 2018. Since then, it is part of the Kubernetes and has its own GitHub page.
When we were studying for Kubernetes exams with Toros (
We split our workload and investigated some part of the kubeadm tool. To keep each other up to date, we put our findings in a GitHub repo. After we passed the exams, we wanted to tidy up, create some installation scripts and share this with the community. We updated the GitHub repository and added some how-to documents to make it ready to deploy the Kubernetes cluster with kubeadm. Here is the GitHub link for the repository.
Let us dive in. This cluster will be deployed in a VNet and a Subnet using 2 VMs – one Control plane and one worker node and deploying Container Runtime, kubeadm, kubelet, and kubectl to all nodes and will add a basic CNI plugin. We prepared all the scripts, it’s ready to go, to run these scripts, you will need:
- Azure Subscription
- A Linux Shell - bash, zsh etc (it could be Azure Cloud Shell (https://shell.azure.com/))
- Azure CLI
- SSH client – which will be coming with your Linux distro (or Cloud Shell)…
What we will do as step by step;
- Define the variables that we will use when we run the scripts
- Create Resource Group
- Create VNet and Subnet and NSG
- Create VMs
- Prepare the Control plane – install kubeadm, kubelet
- Deploy the CNI plug in
- Prepare the Worker Node – install kubeadm and join the control plane.
Step 1, 2, 3, and 4 is inside the code snippet of the document, which you can find here. This part is straightforward, easy to follow, and mostly Azure CLI related, so we will not detail it here, but I would like to clarify some of the parts.
When creating the VMs, we add our SSH public key on our local to these two VMs to not deal with passwords and access those VMs securely, easily. This is the line of code while creating VMs,
--ssh-key-value @~/.ssh/id_rsa.pub \
The other part that we would like to clarify is, accessing the VMs using SSH, as we mentioned in the doc, we have three options, and we can pick the one that makes more sense. One is manually enabling NSG with our IP address, the second is enabling JIT access, and the last option is using Azure Bastion service. The next step is preparing the Control plane. First, we need the IP of the VM to make an SSH connection. This command will give you the IP address of the Control Plane, export Kcontrolplaneip=$(az vm list-ip-addresses -g $Kname -n kube-controlplane \--query "[].virtualMachine.network.publicIpAddresses[0].ipAddress" --output tsv)
We run a similar command to retrieve the Worker node’s IP export Kworkerip=$(az vm list-ip-addresses -g $Kname -n kube-worker \--query "[].virtualMachine.network.publicIpAddresses[0].ipAddress" --output tsv)
Let us prepare the VMs. This part will be the same with both VMs so I will not repeat again. Since we will be using the kubeadm version 1.24.1 we are setting our variables.
export Kver='1.24.1-00'export Kvers='1.24.1'
The next part is preparing the VMs Networking and setting up containerd.
sudo -- sh -c "echo $(hostname -i) $(hostname) >> /etc/hosts"sudo sed -i "/swap/s/^/#/" /etc/fstabsudo swapoff -a We are setting up sysctl parameters and lastly applying these new configs. cat <<EOF | sudo tee /etc/modules-load.d/k8s.confoverlaybr_netfilterEOF sudo modprobe overlaysudo modprobe br_netfilter cat <<EOF | sudo tee /etc/sysctl.d/k8s.confnet.bridge.bridge-nf-call-iptables = 1net.bridge.bridge-nf-call-ip6tables = 1net.ipv4.ip_forward = 1EOF sudo sysctl --system
After running sysctl you will see some messages about modifying some of the kernel parameters.
We are continuing to update the node and installing some necessary tools with containerd sudo apt updatesudo apt upgrade -ysudo apt -y install ebtables ethtool apt-transport-https ca-certificates curl gnupg containerdsudo mkdir -p /etc/containerdsudo containerd config default | sudo tee /etc/containerd/config.tomlsudo systemctl restart containerdsudo systemctl enable containerdsudo systemctl status containerd
And then we are installing kubeadm, kubelet, kubectl on both of the VMs, again, sudo curl -fsSLo /usr/share/keyrings/kubernetes-archive-keyring.gpg https://packages.cloud.google.com/apt/doc/apt-key.gpgecho "deb [signed-by=/usr/share/keyrings/kubernetes-archive-keyring.gpg] https://apt.kubernetes.io/ kubernetes-xenial main" | sudo tee /etc/apt/sources.list.d/kubernetes.listsudo apt updatesudo apt -y install kubelet=$Kver kubeadm=$Kver kubectl=$Kver sudo apt-mark hold kubelet kubeadm kubectlkubectl version --client && kubeadm version
You should be seeing after the install like this result,
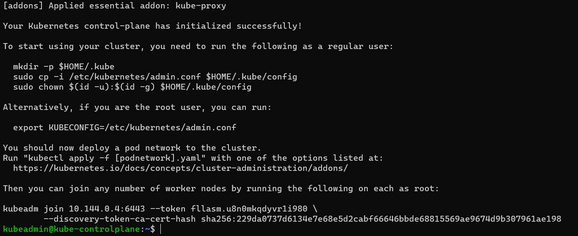
As I mentioned above kubeadm configuration needs to be applied to both VMs, the next section is specifically for Control Plane, which initializes kubeadm as a control plane node. sudo kubeadm init --pod-network-cidr 10.244.0.0/16 --kubernetes-version=v$Kvers If everything goes well, this command will return some information about how to configure your kubeconfig (which we will do a little later), an example in case you want to add another Control Plane node, and an example of adding worker nodes. We save the returned output to a safe place to use later in our worker node setup. sudo kubeadm join 10.144.0.4:6443 --token gmmmmm.bpar12kc0uc66666 --discovery-token-ca-cert-hash sha256:5aaaaaa64898565035065f23be4494825df0afd7abcf2faaaaaaaaaaaaaaaaaa
If we lose or forget to save the above output, then generate a new token with the below command on the control plane node to use on the worker node later. # sudo kubeadm token create --print-join-command
Lastly, we are creating the kubeconfig file so that our kubectl works.
mkdir -p $HOME/.kubesudo cp -i /etc/kubernetes/admin.conf $HOME/.kube/configsudo chown $(id -u):$(id -g) $HOME/.kube/config
This set of commands should make the node as Control Plane, install etcd (the cluster database), and the API Server (with which the kubectl command-line tool communicates). Lastly, on the Control plane, we will install the CNI Plugin, if you remember when we initialize the Control Plane we defined the Pods network IP block with this parameter, --pod-network-cidr 10.244.0.0/16
This parameter is related to the CNI plugin. Every plug-in has it’s own configuration, so if you are planning to use a different CNI, make sure you put related parameters when you build your Control Plane. We will be using WeaveWorks’ plugin
kubectl apply -f "https://cloud.weave.works/k8s/net?k8s-version=$(kubectl version | base64 | tr -d '\n')" We are done with the Control Plane node, now we will get ready for our worker node. All we have to do is execute that kubeadm join command with the correct parameters. As we mentioned earlier, if you have lost that command, you can easily get from the Control Plane node again by running this command: sudo kubeadm token create --print-join-command
If everything goes well, you should be able to run the below kubectl commands: kubectl get nodeskubectl get podskubectl get pods -w
Please let us know if you have any comments or questions.
Published on:
Learn moreRelated posts
Linux on Azure customer montage
June Patches for Azure DevOps Server
Today we are releasing patches that impact the latest version of our self-hosted product, Azure DevOps Server. We strongly encourage and recom...
BYOM: Using Azure AI Foundry models in Copilot Studio
Copilot Studio gives you a fast, secure way to build conversational agents and deploy them into the Microsoft 365 environment without writing ...
Building a Modern Python API with Azure Cosmos DB: A 5-Part Video Series
I’m excited to share our new video series where I walk through building a production-ready inventory management API using Python, FastAP...
Azure Developer CLI (azd) – June 2025
This post announces the June release of the Azure Developer CLI (`azd`). The post Azure Developer CLI (azd) – June 2025 appeared first o...
Restricting PAT Creation in Azure DevOps Is Now in Preview
As organizations continue to strengthen their security posture, restricting usage of personal access tokens (PATs) has become a critical area ...


