Configuring Azure Firewall in Forced Tunneling mode

Written in collaboration with
Introduction:
Azure Firewall is a cloud-native and intelligent network firewall security service that provides the best of breed threat protection for your cloud workloads running in Azure. It's a fully stateful firewall as a service with built-in high availability and unrestricted cloud scalability. It provides both east-west and north-south traffic inspection.
Challenge:
There are some organizations that require outbound network traffic to be inspected by multiple network security appliances, such as firewalls, before it is sent out to an internet destination. A customer in Azure can use Azure Firewall to filter and apply policies to outbound traffic originating from their Azure resources, but their security policy could dictate that all internet bound traffic be sent to and inspected by another Network Virtual Appliance (NVA) Firewall in Azure or to an on-premises firewall before it is sent to the internet.
Additionally, these organizations may face certain scenarios, such as Windows license activation through the Key Management Services (KMS) system, that require Azure based Windows VMs be activated from a public source IP owned by Microsoft and not their on-premises internet gateway IP.
Solution:
To help meet this common requirement for a downstream firewall, customers can deploy Azure Firewall in Forced Tunnelling mode. When Azure Firewall is deployed in Forced Tunnelling mode, the traffic from Azure based resources is inspected/filtered by Azure Firewall and then routed to a downstream firewall (NVA/on-prem) for further processing.
Customers can also configure their Azure Firewall environment to Split Tunnel their forced tunneled traffic. Utilizing Route Tables on the AzureFirewallSubnet, we can split internet-direct dependent connections to egress out of the Azure Firewall while still allowing all other connections to be forced downstream.
In this blog, we will provide step-by-step guidance:
- To deploy and configure Azure Firewall in Forced Tunneling mode
- To deploy an environment to test traffic to Azure Firewall in Forced Tunneling mode using the provided deployment template
- To test forced tunnel traffic being split through additional configurations
I. Deploying Azure Firewall in Forced Tunneling mode
In this section, we will walk you through the steps for deploying Azure Firewall in Forced Tunnelling mode. You'll need to have a Virtual Network with the proper subnets already configured. These subnets are called AzureFirewallSubnet and AzureFirewallManagementSubnet and must be sized at /26 at a minimum.
- Open the Azure Portal and navigate to a virtual network that has the subnets mentioned above pre-configured. In the left column of the Virtual Network blade, select Firewall. If you do not have a virtual network, a simple /24 address space will suffice in allowing you to carve out the mandatory /26 subnets.
- Select Click here to add a new firewall.
- For Resource group, select your resource group, and type azfw-vnet-hub-secured for the name.
- For Region, select the same location of the virtual network and leave Availability zone as None.
- For Firewall tier, select Standard and keep Firewall management on Use a Firewall Policy to manage this firewall.
- For Firewall policy, select Add new.
- Under Create a new Firewall Policy, for Policy name, type pol-azfw-vnet-hub and for Region, select the same location used previously.
- For Policy tier, select Standard and select OK.
- For Choose a virtual network, select Use existing and select your pre-configured virtual network in the virtual network drop-down.
- For Public IP address, select Add new.
- Under Add a public IP, for Name, type pip-azfw-vnet-hub-secured and select OK.
- For Forced tunneling, click the selector to Enabled.
- For Management public IP address, select Add new.
- Under Add a public IP, for Name, type pip-azfw-vnet-hub-secured-manage and select OK.
- Select Review + create
- Select Create.
Note: The minimum size of the AzureFirewallSubnet subnet is /26. For more information about the subnet size, see Azure Firewall FAQ. The same goes for AzureFirewallManagementSubnet subnet where the minimum subnet is /26, see Forced Tunneling Configuration.
Creating Azure Firewall with Availability Zones that use newly created Public IPs is currently not supported. Zonal Public IPs created beforehand may be used without issue or you can use Azure PowerShell, CLI, and ARM Templates for the deployment. For more information about these known issues, see Known Issues.
You've now successfully configured an Azure Firewall in Forced Tunnel mode. If you'd like to test a fully configured environment through a 1-click deployment or Azure PowerShell deployment, move on to the following section.
II. Deploying the environment to test traffic through the Azure Firewall in Forced Tunnelling Mode
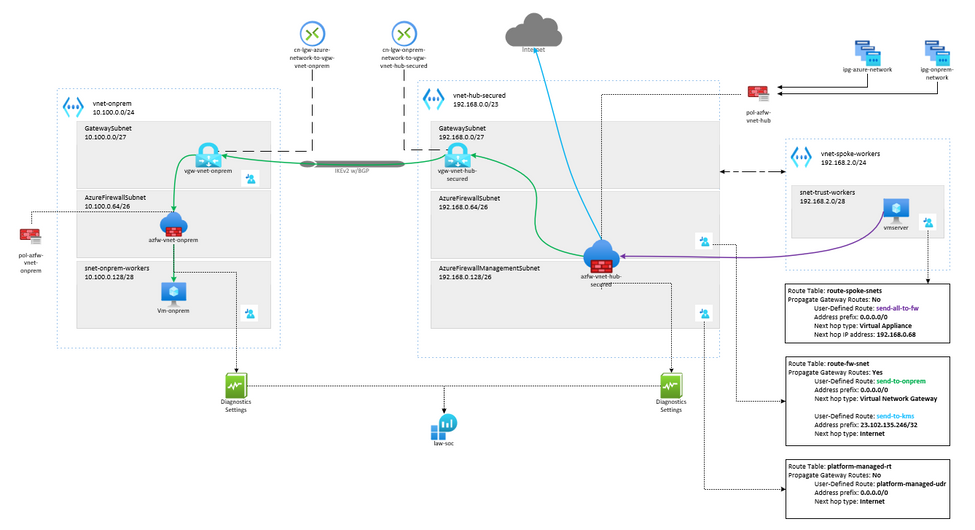
The environment we will use in this blog is demonstrated in the diagram below. In this environment, we will route the traffic originating from resources in a Spoke network in Azure to another Azure network that will represent an on-premises environment. We will be using a VPN gateway to securely pass the traffic from Azure resources to another resource on the on-premises site.
Environment Details:
- Resource Group A called rg-fw-azure which contains all the resources representing an Azure environment.
- A Hub Virutal Network called vnet-hub-secured with the following configuration:
- IPv4 Address space of 192.168.0.0/23
- The following subnets will be created:
- Subnet called GatewaySubnet with address range 192.168.0.0/27. The Virtual Network Gateway will be deployed in this subnet, and the subnet name must be GatewaySubnet.
- Subnet called AzureFirewallSubnet with address range 192.168.0.64/26. The Azure Firewall will be deployed in this subnet, and the subnet name must be AzureFirewallSubnet.
- Subnet called AzureFirewallManagementSubnet with address range 192.168.0.128/26. The firewall management interfaces will be in this subnet, and the subnet name must be AzureFirewallManagementSubnet.
- A Spoke Virtual Network called vnet-spoke-workers with the following configuration:
- IPv4 Address space of 192.168.2.0/24
- The following subnets will be created:
- Subnet called snet-trust-workers with address range 192.168.2.0/28.
- Resource Group B called rg-fw-onprem which contains all the resources representing the on-premises environment.
- On-premises Virtual Network called vnet-onprem with the following configuration:
- IPv4 Address space of 10.100.0.0/24
- The following subnets will be created:
- Subnet called GatewaySubnet with address range 10.100.0.0/27. The Virtual Network Gateway will be deployed in this subnet, and the subnet name must be GatewaySubnet.
- Subnet called snet-onprem-workers with address range 10.100.0.64/28.
- Subnet called AzureFirewallSubnet with address range 10.100.0.128/26. The Azure Firewall will be deployed in this subnet, and the subnet name must be AzureFirewallSubnet.
1-Click Deployment:
If you’d like to learn more about the resources and configurations for this environment, or if you would like a step-by-step guide to deploy this environment via the Azure Portal, please visit the GitHub repository where the template is hosted and review the Read Me document.
III. Test Azure Firewall in Forced Tunneling mode and How-To Split Traffic
Testing traffic from Azure to on-prem
For our first test, we want to verify the connectivity from our Azure VM to the “on-premises” VM to confirm if our forced tunneling setup and routing is correctly configured.
If you look at the diagram in section II, you will see that the traffic originates from the VM hosted in the subnet snet-trust-workers within the virtual network vnet-spoke-workers, which routes the packets to the Hub Azure Firewall in the virtual network vnet-hub-secured. Azure Firewall will then send the traffic to the VPN gateway, vgw-vnet-hub-secured, because of the default route learned from the GatewayDefaultSite command. Typically default route would be learned via BGP. Our traffic is then sent to the “on-premises” firewall where it will be forwarded to the “on-premises” VM. It will take the same route going back to the Azure VM to avoid asymmetric routing.
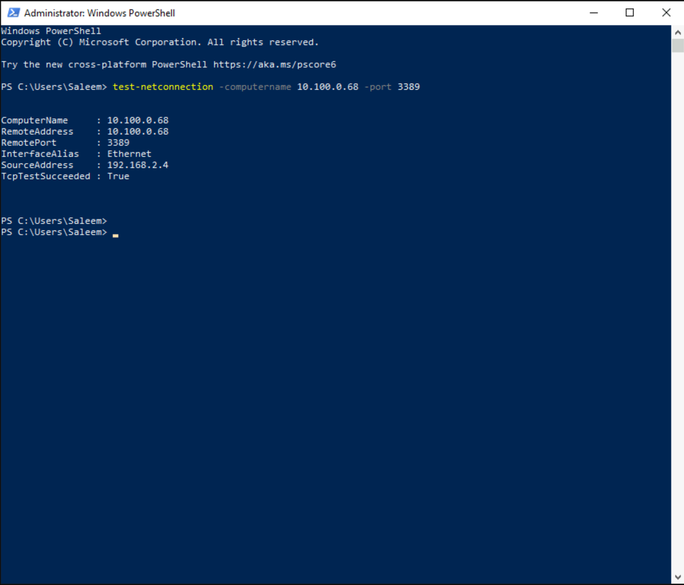
Connect to your VM in the vnet-spoke-workers virtual network using the DNAT rule configured in Azure Firewall policy and bring up a PowerShell command prompt. Type in the following command:
Test-NetConnection -ComputerName 10.100.0.68 -port 3389
This command will initiate a TCP connection to port 3389 which is by default opened on Windows machines. 10.100.0.68 is the IP address of our "on-premises" VM.
If you get the following output TcpTestSucceeded : True, that indicates that our first test is successful and forced tunneling is setup correctly.
Testing On-premises as an internet gateway for your Azure resources
Since we’ve confirmed that the traffic that we’re allowing through is reaching our on-premises VM, let’s now try accessing a public IP from our Azure VM. We'll be able to see how the request is reaching the "on-premises" firewall due to the forced tunnel configuration. This test is to show that forced tunneling throughout the environment is working for traffic with a public IP as the destination and that application rules also work.
Make sure your application rule on Azure Firewall to owaspdirect.azurewebsites.net FQDN is configured with the following details:
Name: Internet
Source Type: IP Address
Source IP Addresses: 192.168.2.0/24
Destination Type: FQDN
Target FQDNs: owaspdirect.azurewebsites.net
Protocol: 80, 443
Open the web browser on your Azure VM and navigate to the site owaspdirect.azurewebsites.net. We will use this FQDN since it will resolve the same public IP from any region.
You should see this in your web browser “Action: Deny. Reason: No rule matched. Proceeding with default action.” That’s because the Azure Firewall in the on-premises environment is dropping the traffic. If we go to our log analytics workspace, law-soc, you will see 2 entries for this request, 1 per Azure Firewall.
The first entry will show that the traffic was allowed by the Internet application rule on the “Azure” firewall.
And if we look at the second log, we will see that it was denied by the “on-premises” firewall. This confirms that all internet traffic is being forced to our on-premises network.
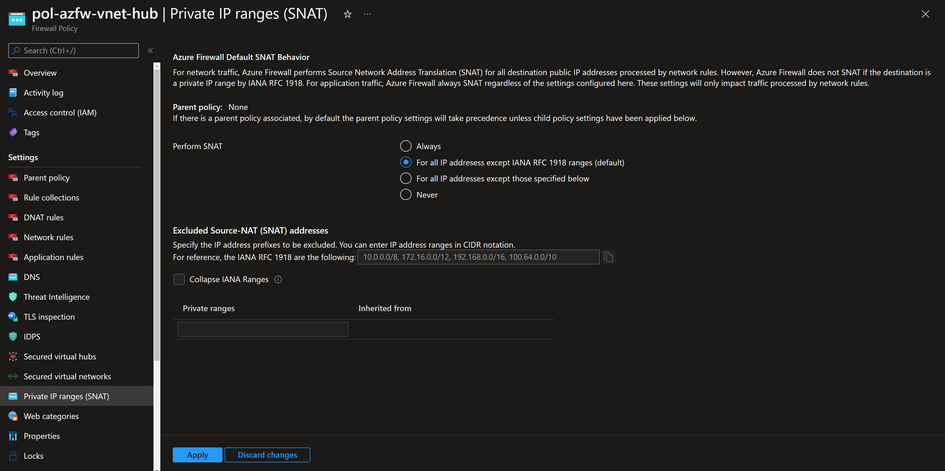
If you look at the source IP on the "on-premises" firewall, you will notice that it has been SNAT'd to the private IP of one of the Azure Firewall instances, 192.168.0.70. This behavior is expected and is done by default, as all traffic going through the Azure Firewall with a destination IP address outside of RFC 1918 ranges will be source Nat’d. If you want to change that behavior, then you can change it by going to Private IP ranges (SNAT) tab and choosing one of the available options to control firewall SNAT behavior.
Note: The information above only applies to traffic processed by Network rules, traffic going though Application rules will be Nat’d regardless of the configuration in Private IP ranges (SNAT)
Testing split tunnel traffic to the Internet
For our third test, we will create a split tunnel to route specified traffic to the internet. A common scenario where this is necessary, is during Windows activation, when activations fail due to forced tunneling. Since all the traffic from our virtual machine is routed back to our on-premises network, the VMs can’t connect to KMS servers to activate Windows. You can read more about this scenario here:
We will show you how we configured our setup to prevent this issue from happening and enable connection from our Azure VMs to KMS servers for Windows activation.
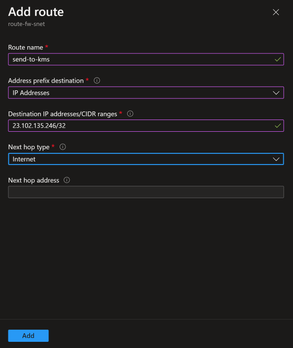
First, we added a route to our route table, route-fw-snet, which is attached to the AzureFirewallSubnet. We called this route send-to-kms and added 23.102.135.246/32 as the destination and chose Internet as Next hop type. The IP 23.102.135.246, is one of three KMS servers that handle the Windows Activations for Azure VMs globally.
Next, we needed to allow this traffic through the Azure Firewall. We added a rule collection called To-Internet and applied 1 rule with the following details:
Name: KMS Activation
Source type: IP Address
Source: 192.168.2.0/24
Protocol: Any
Destination Ports: 1688
Destination Type: IP Address
Destination: 23.102.135.246/32
We are basically allowing any connections from 192.168.2.0/24 subnet to KMS servers through the internet.
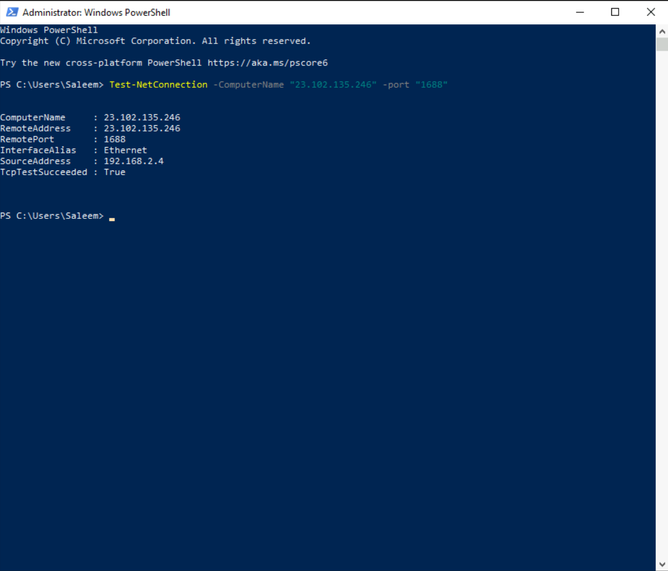
Let’s test the connection. Run this command in your Azure VM PowerShell session:
Test-NetConnection -ComputerName 23.102.135.246 -port 1688
Port 1688 is an open port on KMS servers used for testing and troubleshooting connectivity. If the connection is successful, you will see TcpTestSucceeded : True, which means that our Azure VM now has connection to KMS servers for windows activation and all other traffic will be sent to on-prem.
If you look at your Azure Firewall logs, you will see the following log which confirms that the traffic went through the firewall and the TCP request was allowed to the internet.
Summary
Forced tunneling continues to be a critical security requirement for enterprise security teams. The need to inspect and audit internet bound traffic sourced from Azure resources grows as our adoption into the cloud expands. Configuring the Azure Firewall to force tunnel all its respective traffic downstream for additional auditing allows security teams to meet these stringent requirements and to maintain compliance for their environments. Additionally, having the capability to split specific traffic to meet other dependencies and requirements is key in maintaining an operational and controlled infrastructure.
Additional Resources:
Azure Firewall rule processing logic | Microsoft Docs
Azure Firewall policy rule sets | Microsoft Docs
Azure Firewall forced tunneling | Microsoft Docs
Published on:
Learn moreRelated posts
Azure Cosmos DB TV Recap: Supercharging AI Agents with the Azure Cosmos DB MCP Toolkit (Ep. 110)
In Episode 110 of Azure Cosmos DB TV, host Mark Brown is joined by Sajeetharan Sinnathurai to explore how the Azure Cosmos DB MCP Toolkit is c...
Introducing the Azure Cosmos DB Agent Kit: Your AI Pair Programmer Just Got Smarter
The Azure Cosmos DB Agent Kit is an open-source collection of skills that teaches your AI coding assistant (GitHub Copilot, Claude Code, Gemin...
Introducing Markers in Azure Maps for Power BI
We’re announcing a powerful new capability in the Azure Maps Visual for Power BI: Markers. This feature makes it easier than ever for organiza...
Azure Boards additional field filters (private preview)
We’re introducing a limited private preview that allows you to add additional fields as filters on backlog and Kanban boards. This long-reques...
What’s new with Azure Repos?
We thought it was a good time to check in and highlight some of the work happening in Azure Repos. In this post, we’ve covered several recent ...

