Using Azure Site Recovery & Microsoft Defender for Servers to securely failover to malware-free VMs

The last few years have witnessed an increase in the number of ransomware attacks aimed at disrupting businesses to extract a ‘ransom’ from the victims. As a result, organizations have employed various measures to ensure their data is well protected from any such attacks and there are ways to recover effectively. Business Continuity and Disaster Recovery (BCDR) forms an important part of the overall ransomware & malware protection strategy to minimize data loss and allow affected systems to recover as quickly as possible. We had earlier released a solution that demonstrates integration of Azure Backup with Microsoft Defender for Cloud for detection and response to alerts to accelerate response.
In this article, we will see how Azure Site Recovery offers an automated way to help you ensure that all your DR data, to which you would fail over, is safe and free of any malware using Microsoft Defender for Cloud.
Azure Site Recovery helps ensure business continuity by keeping business apps and workloads running during outages. Site Recovery replicates workloads running on physical and virtual machines (VMs) from a primary site to a secondary location. After the primary location is running again, you can fail back to it. Azure Site Recovery provides Recovery Plans to impose order, and automate the actions needed at each step, using Azure Automation runbooks for failover to Azure, or scripts.
Microsoft Defender for Cloud is a cloud-native application protection platform (CNAPP) with a set of security measures and practices designed to protect cloud-based applications from various cyber threats and vulnerabilities.
Solution Details
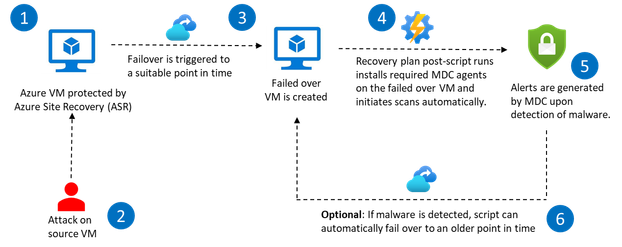
In this solution, an Azure Site Recovery (ASR) recovery plan is utilized to execute a at the time of failover to automatically initiate Microsoft Defender on the failed-over virtual machines. Microsoft Defender then scans the new virtual machine, which is created as a result of the failover, to ensure that it is free of malware. In case of issues like malware being detected in the newly failed over VM, an alert is created in Defender for further actions.
This solution also provides an optional mitigation which can help you to automatically fail over to an on older recovery point till a malware-free failed-over VM is achieved. Any malware infected (failed-over) virtual machines that are created in the process are also automatically deleted.
This solution can be used for Azure to Azure (A2A) or VMWare to Azure (V2A) scenarios.
How it works
Pre-requisites:
- Enable Azure Site Recovery for Virtual Machines
- Enable Microsoft Defender for Servers Plan 2 for the Subscription
For virtual machines protected using ASR, follow the steps mentioned below to recover your data from a recovery point which is free of malware.
- Create an Azure Automation account.
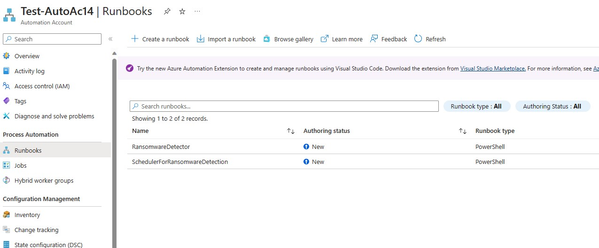
- In your automation account, create two automation runbook for executing the detection scheduler script and the ransomware detection script. You can download these scripts from this location on GitHub-
- Runbook for the detection scheduler script: Use the script SchedulerForRansomwareDetection.ps1 from Github to create the first runbook. This script installs Defender on all virtual machines in the subscription of the failed over VM. It also creates a schedule for the RansomwareDetection runbook (discussed below).
- Runbook for the ransomware detection script: Download the script RansomwareDetector.ps1 from Github for using in the second runbook. This script, whenever executed, checks if any alerts are created for the failed over VM in Microsoft Defender for Cloud. This runbook will run as per the schedule created by the scheduler script discussed above. You can also modify certain parameters like changing the frequency of the scan through the automation account. Moreover, if opted for, it also allows you to automatically delete the failed over VM and initiate a failover to a previous point in time.
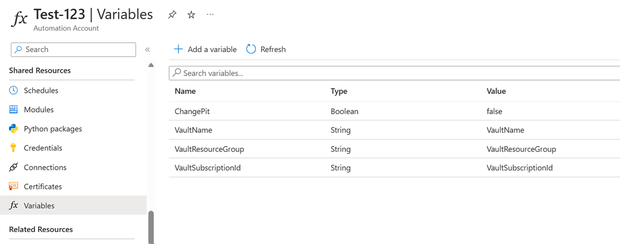
- In the automation account, define the following variables under the ‘Variables’ item on the left navigation pane:
- VaultName: This is the name of the of the Recovery Services vault to which the virtual machines are protected with ASR.
- VaultResourceGroup: This is the Resource Group of the of the Recovery Services vault to which the virtual machines are protected with ASR.
- VaultSubscription: This is the Subscription of the of the Recovery Services vault to which the virtual machines are protected with ASR. Provide the ID of the subscription only.
- ChangePit Choose if you wish to enable automatic failover to an older point in time for recovery if any high-severity alert (this condition can be customized in the RansomwareDetector script) is detected in the current failed-over virtual machine (the current failed-over machine will be deleted). Enter ‘True’ if you want to enable automatic failover to older recovery points, else choose ‘False’.
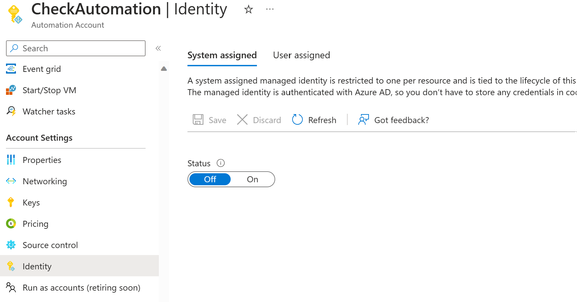
- The Azure Automation account’s identities must have owner permissions on the subscription where the failed-over VMs are getting created. To do this, you can either enable the system-assigned managed identity for the account or associate a user-assigned managed identity with the account.
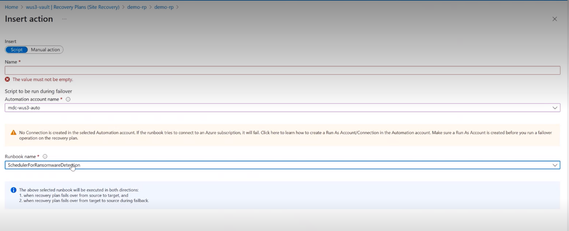
- Create an ASR recovery plan, and add a post action that would run the detection scheduler runbook (for the script SchedulerForRansomwareDetection.ps1) for the virtual machine after failover. Please note that the detection script does not need to be added as a post-action and will be executed from the scheduler script.
- Trigger the failover operation in ASR, which creates the failed-over virtual machine in the secondary environment in Azure.
- Once the failover is complete, the postscript runs automatically and sets up policies and configurations that install and set up Microsoft Defender on the new virtual machine. As part of the process, agents required for running Defender are also installed.
Note: It is important to note that a key step of this process is to enable auto-provisioning of Defender, which enables Defender for all virtual machines in the subscription and scans them for malware.
- You would need to check Microsoft Defender for Cloud for any alerts that get created for this VM if any malware is detected.
- If you have opted for the script to choose older recovery points in case of high severity alerts (or custom alert conditions defined in the RansomwareDetector script) in the failed over VM, the script will start identifying the replicated item for which this alert was raised. It will automatically performs a 'Change PIT' operation to failover to a previous recovery point that created before the detection time of the security alert. The default duration for this is 1-day older recovery points, however, you can configure it as per your needs.
- The newly created VM will once again be scanned and checked for any ransomware and the script will continue to iterate until we find a secure recovery point and create a malware-free VM.
Published on:
Learn moreRelated posts
Fabric Mirroring for Azure Cosmos DB: Public Preview Refresh Now Live with New Features
We’re thrilled to announce the latest refresh of Fabric Mirroring for Azure Cosmos DB, now available with several powerful new features that e...
Power Platform – Use Azure Key Vault secrets with environment variables
We are announcing the ability to use Azure Key Vault secrets with environment variables in Power Platform. This feature will reach general ava...
Validating Azure Key Vault Access Securely in Fabric Notebooks
Working with sensitive data in Microsoft Fabric requires careful handling of secrets, especially when collaborating externally. In a recent cu...
Azure Developer CLI (azd) – May 2025
This post announces the May release of the Azure Developer CLI (`azd`). The post Azure Developer CLI (azd) – May 2025 appeared first on ...
Azure Cosmos DB with DiskANN Part 4: Stable Vector Search Recall with Streaming Data
Vector Search with Azure Cosmos DB In Part 1 and Part 2 of this series, we explored vector search with Azure Cosmos DB and best practices for...
General Availability for Data API in vCore-based Azure Cosmos DB for MongoDB
Title: General Availability for Data API in vCore-based Azure Cosmos DB for MongoDB We’re excited to announce the general availability of the ...
Efficiently and Elegantly Modeling Embeddings in Azure SQL and SQL Server
Storing and querying text embeddings in a database it might seem challenging, but with the right schema design, it’s not only possible, ...
