Dataverse Dynamics 365 Load testing for Model-driven app
Dataverse Dynamics 365 Load testing for Model-driven app
Introduction
In today's digital landscape, where user expectations for seamless, high-performing applications are at an all-time high, ensuring the reliability and scalability of software systems is paramount. Performance testing emerges as a critical practice in the software development lifecycle, aimed at evaluating the responsiveness, stability, and scalability of applications under various conditions.
Performance testing encompasses various types, each serving specific objectives in evaluating the performance characteristics of a system. Here are some common performance test types:
- Load Testing: Determines how a system behaves under expected load conditions by subjecting it to a specific number of users or transactions, assessing its response times and resource utilization.
- Stress Testing: Pushes the system beyond its normal operational capacity to identify its breaking point and understand how it behaves under extreme conditions, helping determine its resilience and stability.
- Soak Testing (Endurance Testing): Evaluates the system's performance over an extended period under a consistent load to detect memory leaks, resource depletion, or degradation of performance over time.
- Spike Testing: Assesses the system's ability to handle sudden increases or spikes in load, such as traffic surges, to ensure it can scale appropriately and maintain performance without crashing or slowing down.
- Scalability Testing: Measures how well the system can scale up or down to accommodate changes in load or user demand, helping determine its capacity to handle growth or fluctuations in traffic.
In this article, we will focus how to conduct a load testing of a Dynamics 365 Model-driven App.
What is Load Testing ?
Load testing is a crucial aspect of performance testing focused on evaluating how a system behaves under specific levels of concurrent user activity or workload. The primary objective of load testing is to assess the system's performance, reliability, and scalability by subjecting it to simulated loads that represent expected usage patterns in real-world scenarios.
During load testing, the system is subjected to various levels of load, typically represented by a specific number of concurrent users, transactions, or requests per unit of time. By gradually increasing the load, testers can observe how the system responds and identify any performance issues, such as slow response times, errors, or system crashes.
When performing a load test, several important factors should be considered to ensure its effectiveness and relevance to the application's performance goals. Here are some key considerations:
- Define Clear Objectives: Clearly define the objectives and goals of the load test. Understand what aspects of the application's performance you are testing, such as response times, throughput, scalability, or resource utilization.
- Identify Key Scenarios: Identify the critical user scenarios or workflows that are most representative of real-world usage patterns. Focus the load test on these scenarios to simulate realistic user behavior.
- Set Realistic Load Levels: Determine the appropriate load levels based on expected traffic volumes, peak usage periods, and scalability requirements. Ensure that the load levels accurately reflect the anticipated production environment.
- Simulate Production Environment: Mimic the production environment as closely as possible during the load test. Consider factors such as network latency, hardware configurations, and software dependencies to create a realistic testing environment.
- Analyze Results: Analyze the results of the load test thoroughly to identify performance issues, bottlenecks, and areas for improvement. Look for patterns in system behavior and correlate performance metrics to identify root causes of performance degradation.
How to load test a model-driven app ?
Microsoft is providing the following documentation : https://learn.microsoft.com/en-us/dynamics365/guidance/resources/test-scale-dynamics-365-solution
In this article, we're gonna walk through using those test samples from Microsoft, step by step.
Requirements
- Microsoft Dynamics 365 Customer Service environment with Customer Service-Hub model-driven application
- At least one user account with multi-factor authentication disabled
- Sample data in Dataverse
- Min. 10 active accounts
- Min. 10 active products
- Min. 10 active subjects
- Azure subscription (optional): It's a requirement if you plan to load test in Azure Load Testing (https://azure.microsoft.com/en-us/products/load-testing).
1. Download samples files
You will find all the samples files here : https://github.com/microsoft/Dynamics-365-FastTrack-Implementation-Assets/tree/master/Customer%20Service/Testing/At%20Scale/Samples
In this walkthrough, we will use the CreateCase sample. To start, you can download the following files :
- CaseCreate.csv
- CreateCase.docx
- CreateCase.jmx
2. Install Apache JMeter
First, you need to install Apache JMeter https://jmeter.apache.org/usermanual/get-started.html#lets_start.
Apache JMeter is an open-source, Java-based software designed for load testing, performance testing, and functional testing of web applications.
Apache JMeter has two modes, GUI mode and CLI mode.
- Use GUI mode for test creation, editing, and debugging.
- Use CLI mode to run a load test.
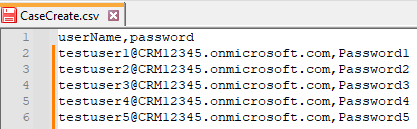
3. Populate CSV file
The file CaseCreate.csv contains the test user's information (username and password). Open the file and add your test user's credentials.
Be careful, if the passwords contain special characters like % or #, it can be misinterpreted during test execution and generate errors.
4. Edit load test script
Run Apache JMeter in GUI mode by opening jmeter.bat in the bin folder.
Open the CreateCase.jmx file.
- In Apache JMeter, click File – Open
- Use the explorer window to navigate to file or repository containing the CreateCase.jmx file.
- Select the CreateCase.jmx file and click Open.

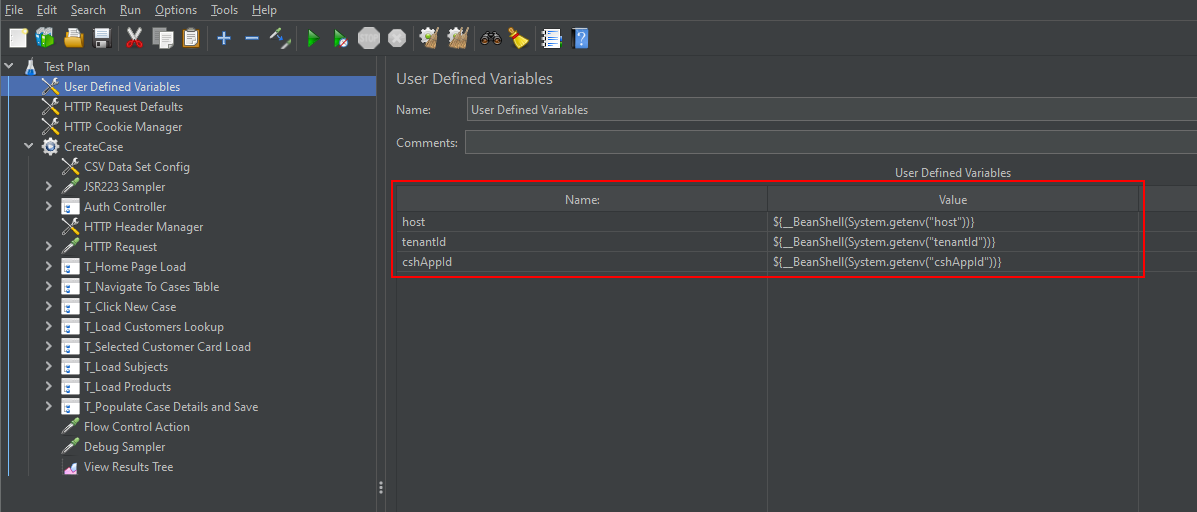
Update User Defined Variables
- Click on the User Defined Variables element
- Update the following values
- host – your Microsoft Dataverse environment url (e.g., yourorg.crm.dynamics.com)
- tenantId - your Microsoft 365 tenantid.
- cshAppId - the GUID of your Customer Service Hub model-driven application
Update the Thread Group Properties
- Click on the CreateCase element
- Update the following values
- Number of Threads (users) – total concurrent users to simulate.
- Ramp up period (seconds) – duration to increase the threads to the total number of threads.
- Loop Count – number of times to execute a single thread.
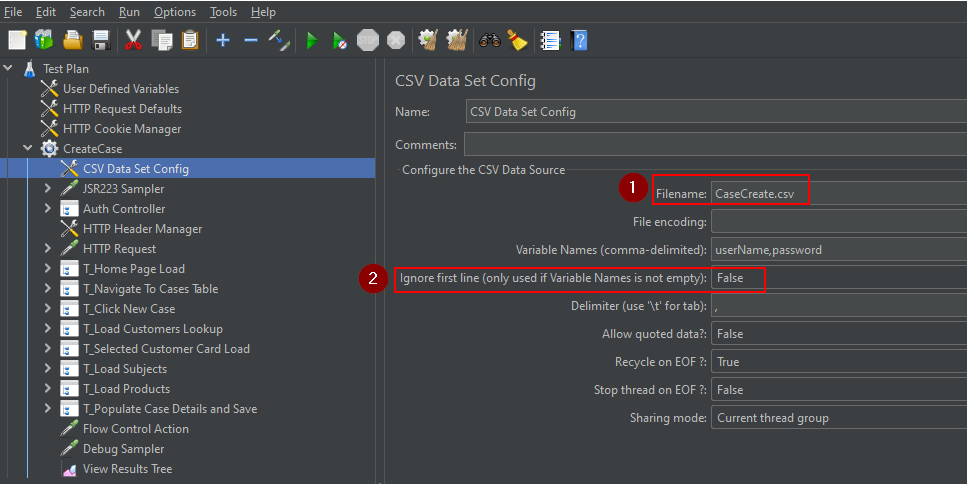
Configure the CSV Data Source
- Click on the CSV Data Set Config
- Update the filename value with your updated csv file
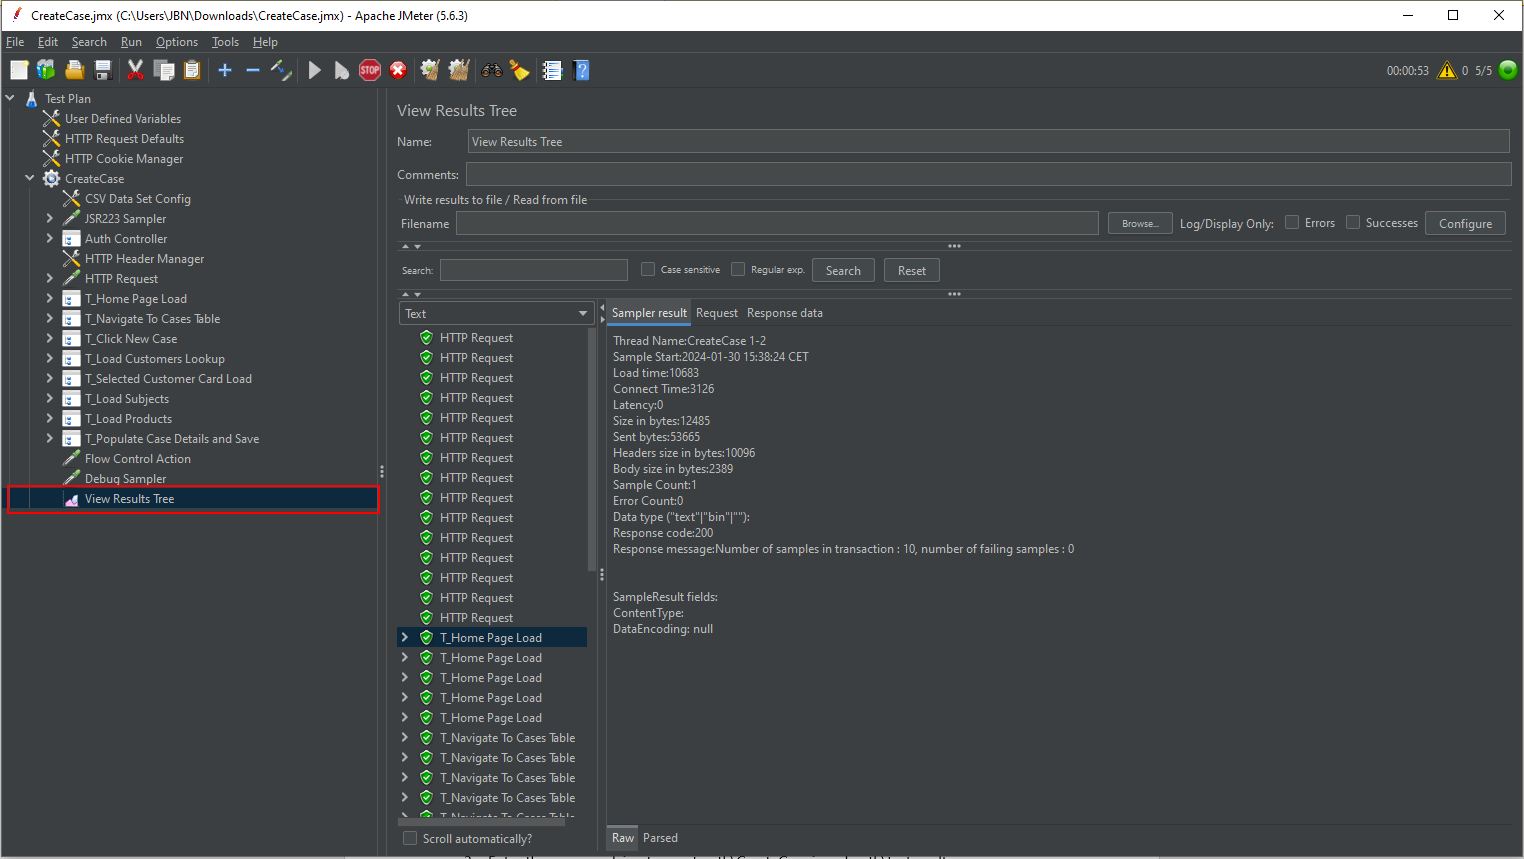
5. Execute in GUI mode
Test can be started in GUI mode using one of the following methods:
- In the Run menu, click Start
- Click the Start button in the toolbar
- Right-click on CreateCase element and click Start
You can use the View Results Tree to monitor the progress of the test and to debug, checking the request and response of the calls.
6. Execute in CLI mode
GUI mode has limitations that might impact the performance of a load test. Use CLI mode when executing a load test at full scale.
Test can be started in CLI mode following the steps below:
- Open CMD and change the directory to the jmeter bin folder
- Enter the following command
jmeter -n -t path\CreateCase.jmx -l path\testresults.csv -e -o path\Results
| Option | Definition |
|---|---|
| -n | This specifies JMeter is to run in cli mode. |
| -t | Name of JMX file that contains the Test Plan |
| -l | Name of JTL or CSV file to log sample results to |
| -e | Generate report dashboard after load test |
| -o | Output folder where to generate the report dashboard after load test. The folder must not exist or be empty. |
Sometimes, JMeter throws a heap dump along with an ‘out of memory’ error while executing the load test. In this case, you need to increase the heap size by editing the jmeter.bat file. The size has been updated to 8 GB in the example below:
if not defined HEAP (
    rem See the unix startup file for the rationale of the following parameters,
    rem including some tuning recommendations
    set HEAP=-Xms1g -Xmx8g -XX:MaxMetaspaceSize=256m
)
6.1 Report
After running the load test using CLI mode with the command above, a HTML report is generated in the folder defined.
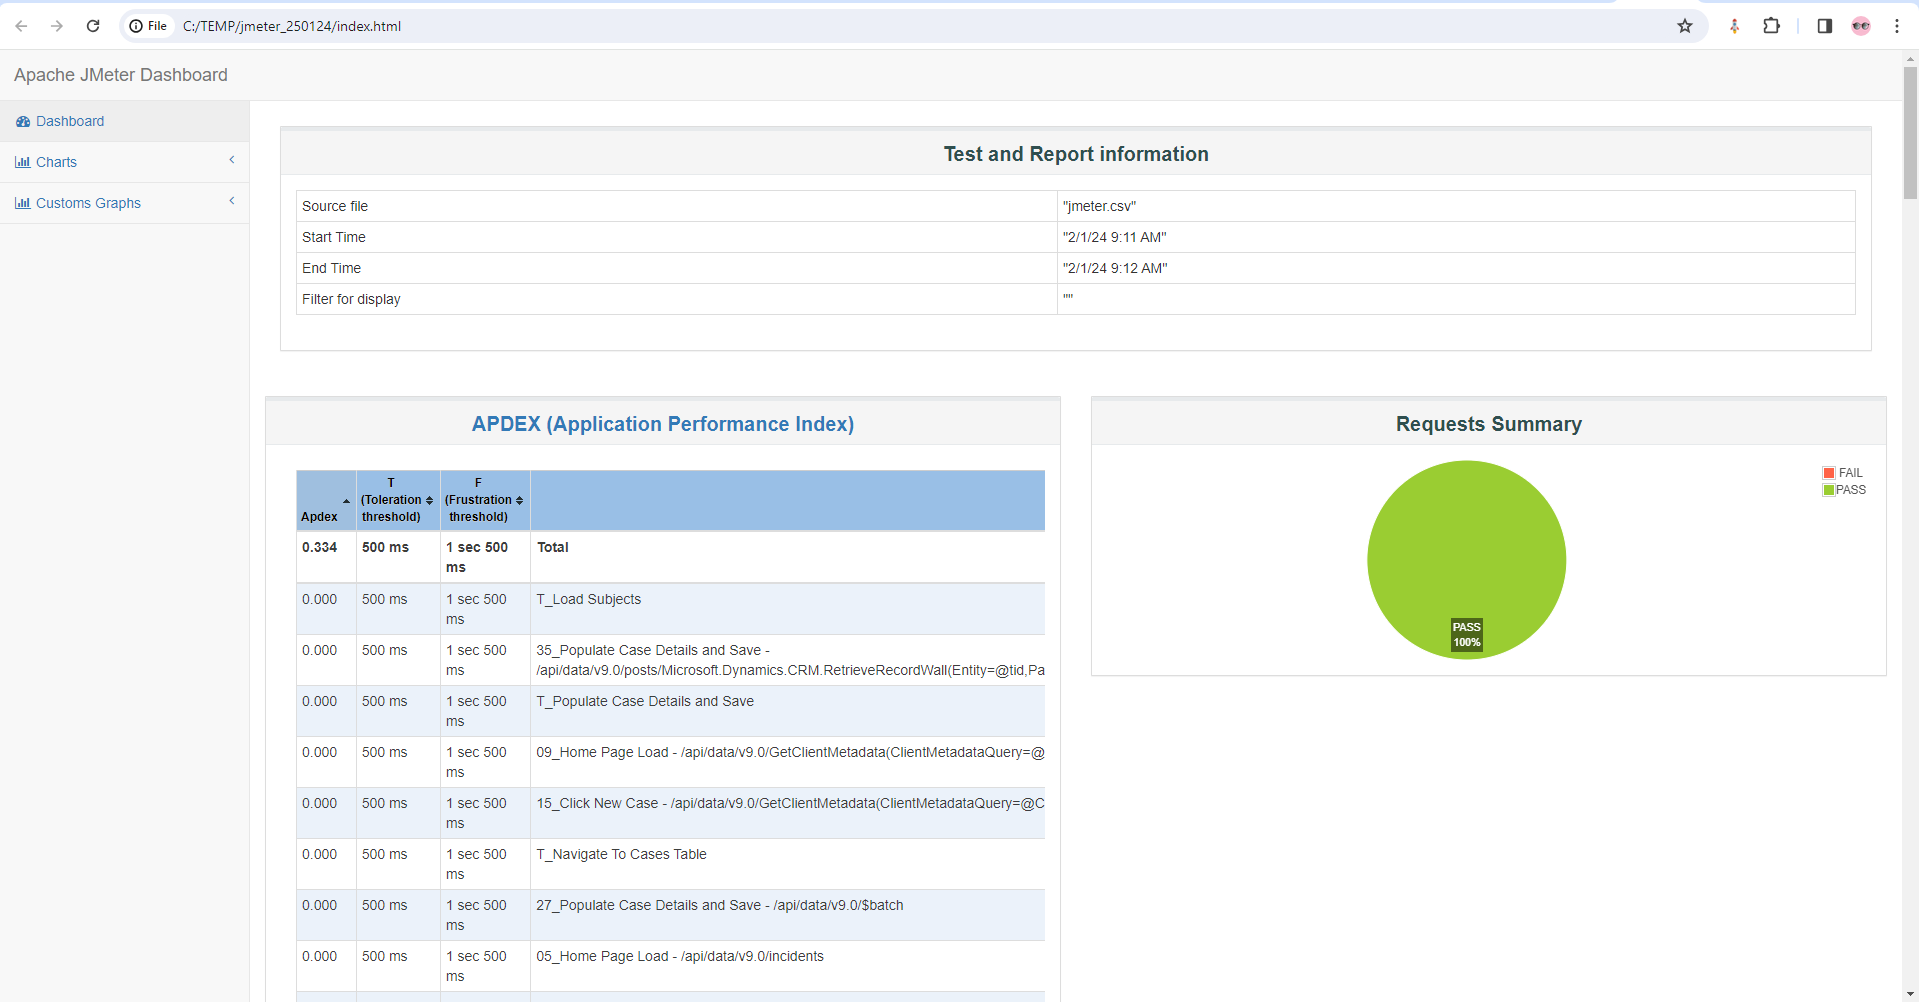
This report offers valuable insights into all requests conducted during the testing phase, presenting a comprehensive overview of the test execution. Additionally, it includes a detailed table illustrating the APDEX.
APDEX (Application Performance Index) is a metric used to evaluate the user satisfaction of an application based on its response times. APDEX is a standardized method for measuring and reporting the satisfaction level of users with the responsiveness of web applications or services.
APDEX categorizes response times into three zones:
- Satisfied: Response times that meet or exceed the user's expectations.
- Tolerating: Response times that are acceptable but not ideal.
- Frustrated: Response times that are considered unacceptable by users.
The APDEX score is calculated based on the following formula:
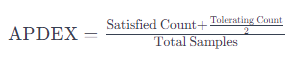
In JMeter, APDEX can be calculated using the following steps:
- Define the thresholds for response times that determine whether a sample is categorized as satisfied, tolerating, or frustrated. These thresholds are typically defined based on the application's performance goals and user expectations.
- Configure JMeter to track the response times of requests during the test execution.
- After the test execution, JMeter calculates the APDEX score based on the collected response times and the defined thresholds.
- The APDEX score provides a standardized measure of user satisfaction with the application's performance, helping testers and developers assess whether the application meets its performance goals and user expectations.
By using APDEX in JMeter, testers can quantitatively measure and report the user satisfaction level of web applications or services, allowing them to identify performance issues and prioritize improvements to enhance the overall user experience.
7. Execute in Azure Load Testing
First, you need to deploy Azure Load Testing using your Azure subscription.
Now, before diving into creating a load test in Azure Load Testing with a JMeter script, there are a few configurations we need to tweak:
7.1 Update CSV Data Set Config
In Azure Load Testing the JMX file and all related files are uploaded in a single folder. When you reference an external file in your JMeter script, verify that you only use the file name and remove any file path references.
- Remove any file path and reference the filename only in the filename field
- Set "Ignore first line" to False
- Remove the header row (userName,password) from CreateCase.csv
7.2 Update User Defined Variables
- Replace User Defined Variables with the following values :
${__BeanShell(System.getenv("host"))}
${__BeanShell(System.getenv("tenantId"))}
${__BeanShell(System.getenv("cshAppId"))}
7.3 Create and run the test in Azure Load Testing
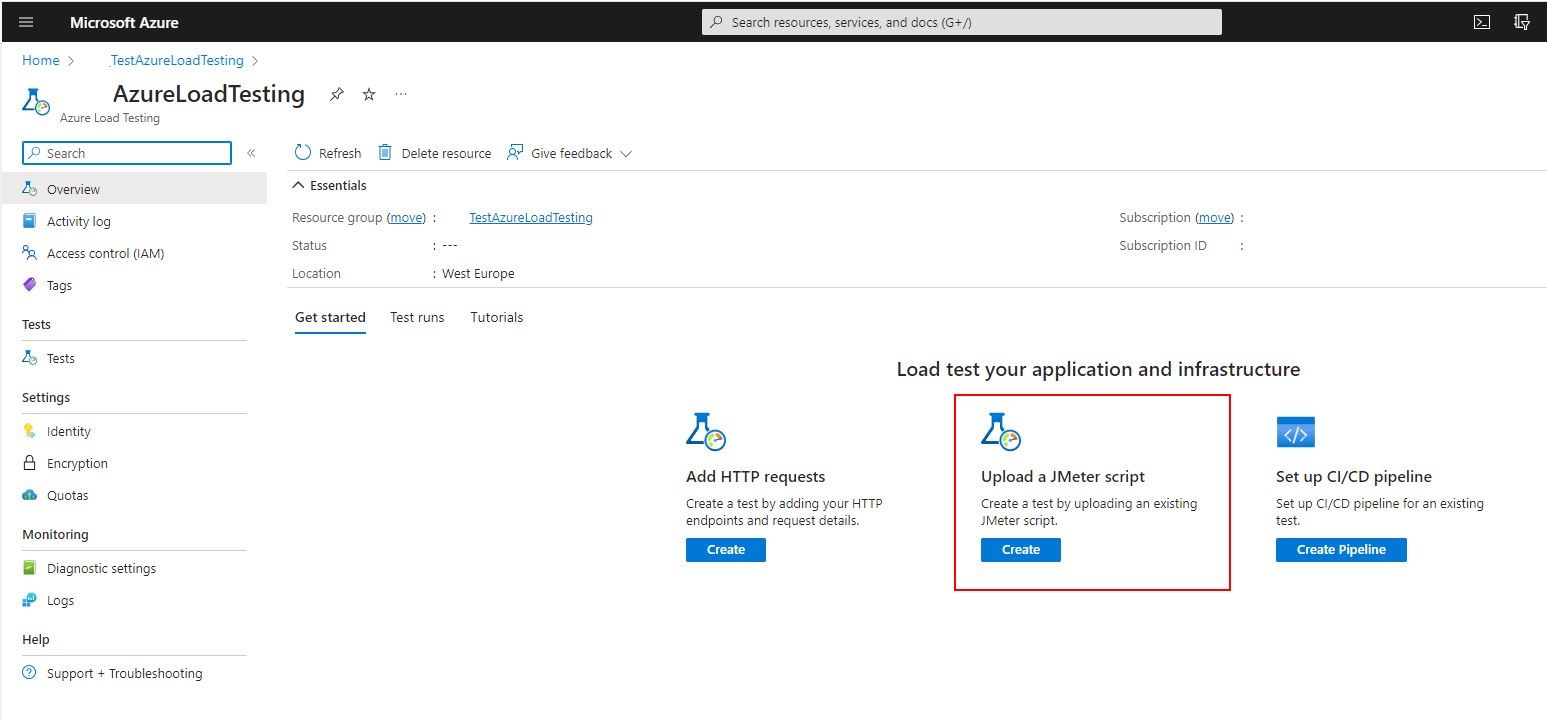
- In Microsoft Azure, navigate to and open your Azure Load Testing resource.
- From "Get started" dashboard, select "Create" with the option "Upload a JMeter script" or create it from Tests menu.
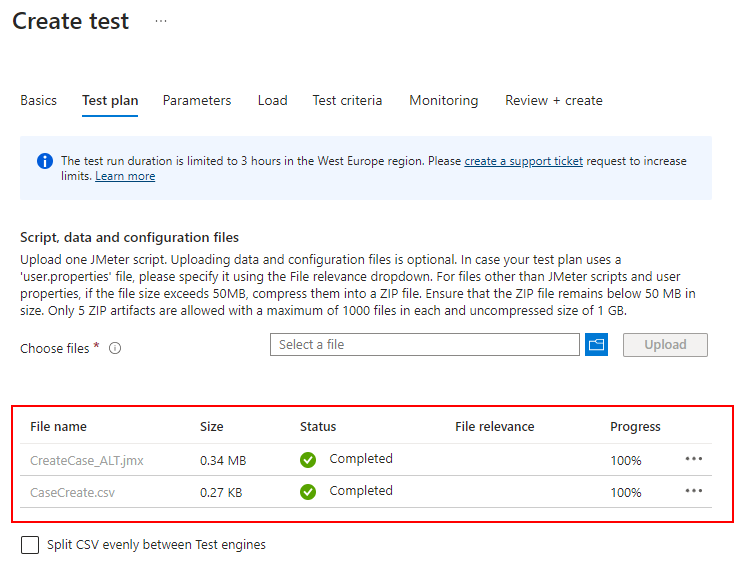
- On the Basic tab, enter a test name and description
- On the Test plan tab, upload both CreateCase.jmx (the one adapted for Azure Load Testing) and CreateCase.csv (without header row)
- Uncheck "Run test after create" if you don't want to run it directly after creation
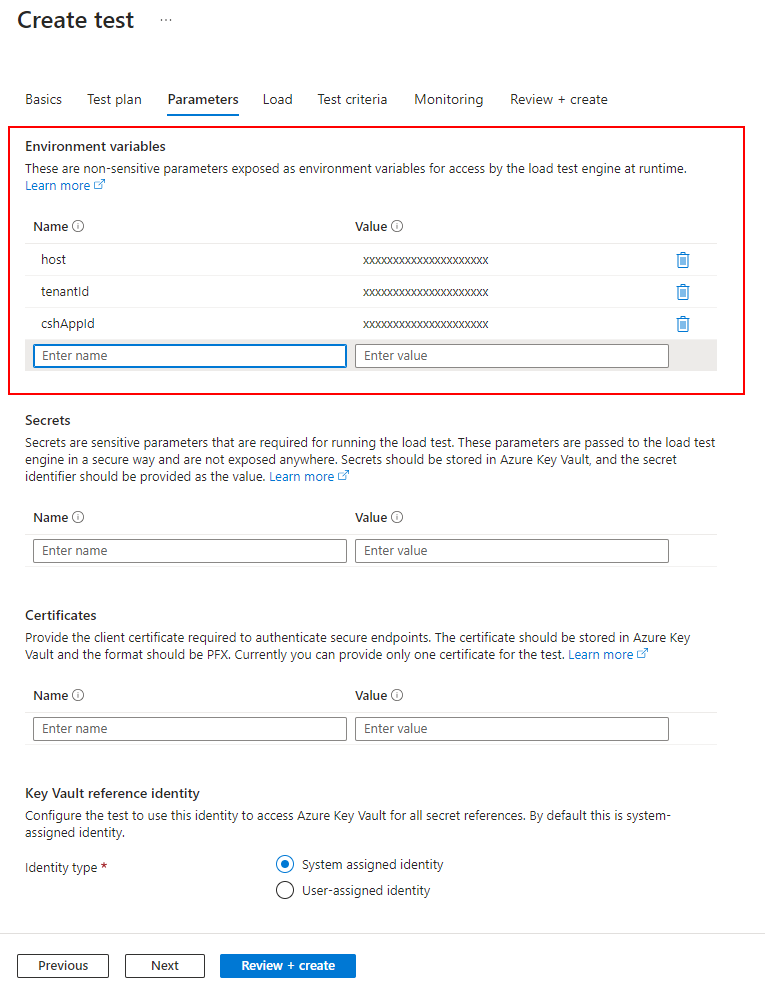
- On the Parameters tab
- Add the correct values for the variables host, tenantId and cshAppId
- On the Load tab
- Configure the test engine instances to a meet the target load for the test. The number of threads specified in the jmx file represents the number of thread (virtual users) executed by one test engine instance.
- Network traffic to Power Platform applications will be routed through Public networks.
- On the Test criteria tab
- (Optional) Define the criteria to specify the performance expectations of the system under test. Use the defined criteria to determine the failure conditions for the test when the criteria evaluate to true.
- On the Monitoring tab
- (Optional) Configure application components to monitor server-side metrics during the test run.
- Once all tabs completed, you can review and create your test.
- Then, if you have unchecked the box at point 4.1, you need to open and run your test manually
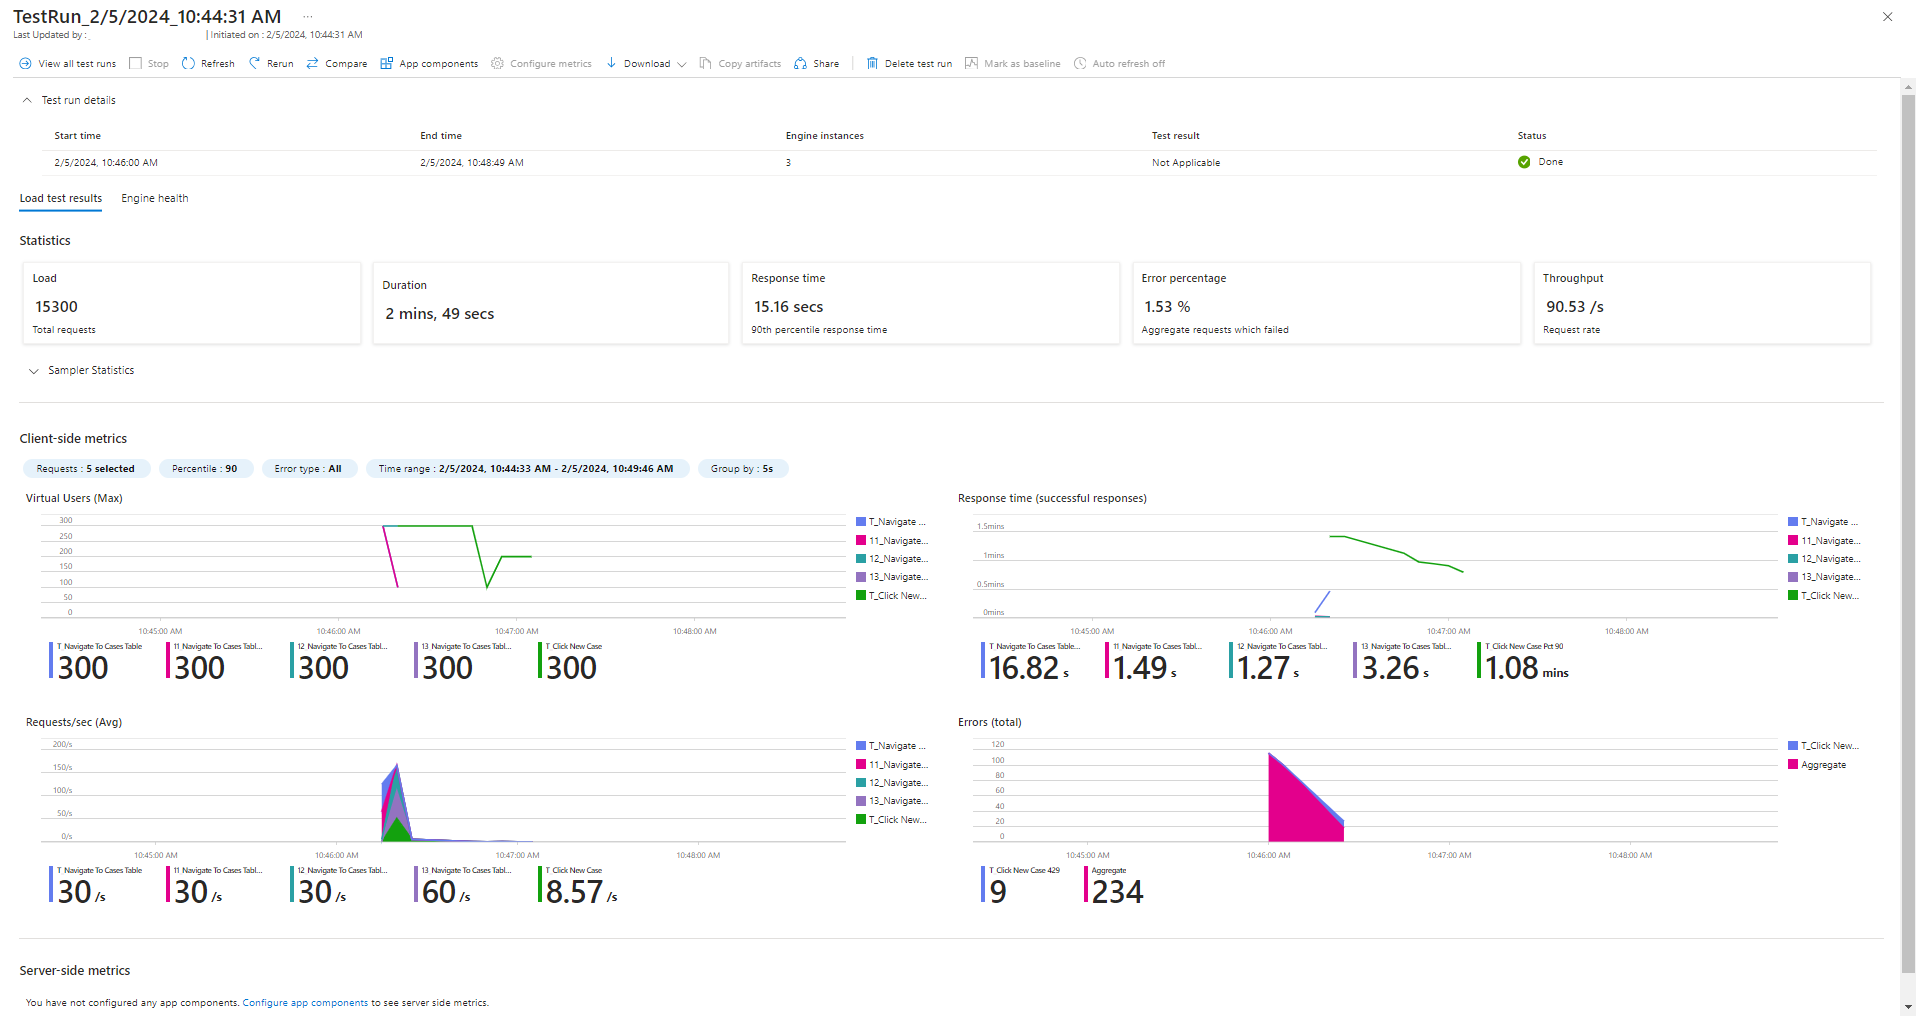
- Once the test is executed, you can open it to see the load test results
Conclusion
I hope you enjoyed this tutorial on running a load test sample in a model-driven app. This article provided an overview of load testing using JMeter and Azure Load Testing, and perhaps it will inspire other bloggers to delve into topics such as:
- How to build his own test case in JMeter ?
- How to analyze the results ?
In conclusion, it's crucial to recognize that JMeter has limitations when it comes to measuring user experience elements occurring at the client side, such as load time or page rendering. JMeter functions as a performance testing tool but does not emulate a real browser. If we aim to test the user interface (UI) using JMeter, we'd need to incorporate tools like the WebDriver Sampler. This component facilitates integration with the Selenium browser automation framework, enabling more comprehensive UI testing capabilities within the performance testing context. Essentially, JMeter, while proficient at server-side performance assessments, requires additional tools like WebDriver Sampler for thorough evaluation of user interface aspects.
Dataverse Dynamics 365 Load testing for Model-driven app
Published on:
Learn moreRelated posts
Top Power Platform Trends That Will Dominate 2026
Introduction The Microsoft Power Platform has evolved from a low-code development suite into one of the world’s most powerful enterprise...
Microsoft 365 & Power Platform Call (Microsoft Speakers) – July 14th, 2026 – Screenshot Summary
Call Highlights SharePoint Quicklinks: Primary PnP Website: https://aka.ms/m365pnp Documentation & Guidance SharePoint Dev Videos Issues...
Computer use enhancement | Power Platform Shorts
Step by Step | Power Platform Pay-as-you-go – Create a Billing Plan and Link an Environment
Power Platform Pay-as-you-go is a plan that bills Power Apps, Power Automate, Dataverse, and Copilot Studio consumption directly to an Azure s...
Power Platform | Environment Creation | self-service plan is required
If you encounter the following error while creating a new Power Platform environment from the Admin Center : A self-service signup plan is req...
Microsoft 365 & Power Platform Community Call – July 9th, 2026 – Screenshot Summary
Call Highlights SharePoint Quicklinks: Primary PnP Website: https://aka.ms/m365pnp Documentation & Guidance SharePoint Dev Videos Issues...
Tips to Export Data To Data Lake From MS Dynamics 365 CE And Use It In Power BI.
Integrating Dynamics 365 with Azure Data Lake allows you to continuously sync operational data for cost-effective big data analytics, AI workl...
Microsoft Power Platform governance and administration – Safety Grader
We are announcing the ability to evaluate AI responses using configurable safety graders to identify unsafe or policy-violating outputs in Mic...
Microsoft 365 & Power Platform Call (Microsoft Speakers) – July 7th, 2026 – Screenshot Summary
Call Highlights SharePoint Quicklinks: Primary PnP Website: https://aka.ms/m365pnp Documentation & Guidance SharePoint Dev Videos Issues...