Add Two-level up Related Column to a View in Model-driven Apps


Example Scenario

Possible Solutions
1) Calculated Column in Related Table


- Quick and easy
- Normalised data
- No development effort required
- A new calculated column is required to be created for each column to be displayed from the second level related table
2) Direct Relationship with Second Level Related Table


2A) Column Mapping in Relationship


- Quick and easy
- No development effort required
- Denormalised data
- It only works when the Invitation is created from the subgrid/associated view of the Account form.
- It does not work for an update of the Account lookup
- It does not work if the Invitation is created from anywhere else other than the Account form
- It does not work if the Invitation is created by the backend processes (SDK, plug-in, workflow, cloud flow, etc.)
2B) Automated Process

- Consistent data
- Denormalised data
- More effort required for the configuration/development of the automated process
- A thorough analysis is required to cover all scenarios
- e.g. If the Primary Contact of the Account is changed, another process is required to trigger the automated process of the related Invitation rows to the affected Account (to fetch the updated Primary Contact value).
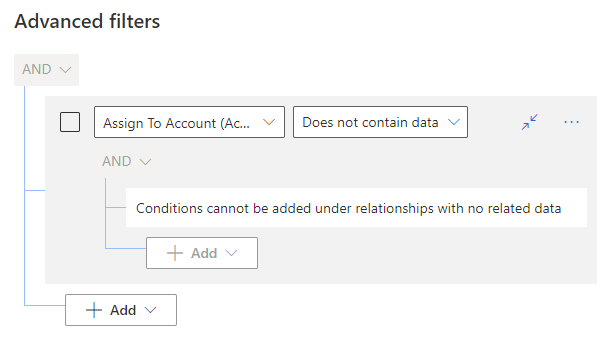
3) FetchXML and LayoutXML of the View (UNSUPPORTED)
This approach is not documented and not supported by Microsoft. Even if it may be working right now, it might break anytime in the upcoming updates to the grid view control. Even in the latest Power Apps read-only grid control, the column header is empty for those columns added to the view with this approach. Use it at your own risk.


<fetch version="1.0" output-format="xml-platform" mapping="logical">
  <entity name="adx_invitation" >
    <attribute name="adx_invitationid" />
    <attribute name="adx_invitationcode" />
    <attribute name="adx_assigntoaccount" />
    <link-entity name="account" from="accountid" to="adx_assigntoaccount" link-type="outer" alias="account" >
      <attribute name="accountnumber" />
      <attribute name="primarycontactid" />
      <link-entity name="contact" from="contactid" to="primarycontactid" link-type="outer" alias="contact" >
        <attribute name="emailaddress1" />
      </link-entity>
    </link-entity>
  </entity>
</fetch>

<grid name="resultset" object="10137" jump="adx_name" select="1" icon="1" preview="1" >
  <row name="result" id="adx_invitationid" >
    <cell name="adx_invitationcode" width="150" />
    <cell name="adx_assigntoaccount" width="150" />
    <cell name="account.accountnumber" width="150" />
    <cell name="account.primarycontactid" width="150" />
    <cell name="contact.emailaddress1" width="150" />
  </row>
</grid>

- Normalised data
- No development effort required
- The column header is alias + logical name instead of proper column display name
- The advanced filtering pane is not working for the view
- The view filter cannot be updated in the view designer
- Other view configurations such as adding/removing columns can still be done
- The view filter can only be updated using the View Designer tool
-
- The view is not working in the Advanced Find too


- The column header is empty for those columns added to the view with this approach in the Power Apps read-only grid control

Summary
Published on:
Learn more
Related posts
Architecting Scalable Business Logic in Dynamics CRM Using Plugin Life Cycle
Dynamics CRM Plugin Life Cycle: Optimizing for Scalability means designing plugins in a way that keeps the system fast, stable, and easy to ma...
Avoiding Currency Mismatch Errors in Dynamics 365 CE
When working with Dynamics 365 Sales, it’s important to understand how currency behaves across related entities like Opportunity, Quote, Order...
Sales Collaboration: How Sales Teams Work in Dynamics 365 CE
A Sales Team in Microsoft Dynamics 365 Sales represents a group of users who collaborate to manage and close sales opportunities efficiently. ...
Environment Variables vs Configuration Tables vs Hardcoding in Dynamics 365 Customer Engagement (CE)
In Dynamics 365 Customer Engagement (CE), managing configuration values effectively is key to building scalable and maintainable solutions. En...
Ticket sales management with Dynamics CRM in the Sports Industry
Mohona Dutta By Mohona Dutta | Reading time 5 mins So, how do you prospect? Pulling names out of lists on your laptop? Repeatedly calling...
How to create an impactful fan experience in sports with Dynamics CRM?
Mohona Dutta By Mohona Dutta | Reading time 5 mins For a salesperson, every day is game day. Sports organizations are always looking to i...
Updating JavaScript code in Dynamics CRM Made Easy for Developers
Hema Shamala By Hema Shamala | Reading time 5 mins Why do we need JavaScript in D365 CRM? It allows us to implement custom logic by using...
How To Use Advanced Find in Dynamics CRM 365
Nikhil Rajendran By Nikhil Rajendran | Reading time 5 mins One of the most commonly used features in Dynamics 365 is Advanced Find. A d...
Security Model of Dynamics CRM
Business Unit – It is a way to group business activities.When an organization is created, a Root Business Unit is created by default. Thi...