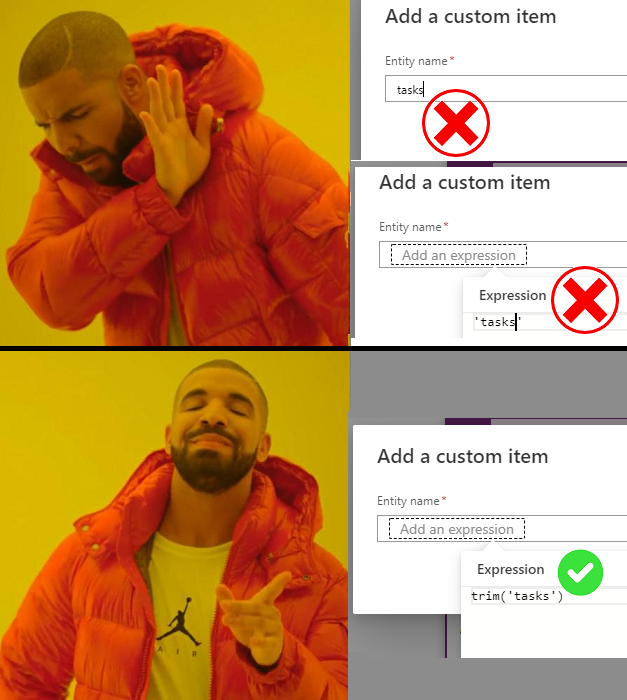
Dynamically Populate Polymorphic Lookup Value in Power Automate without using Condition Step

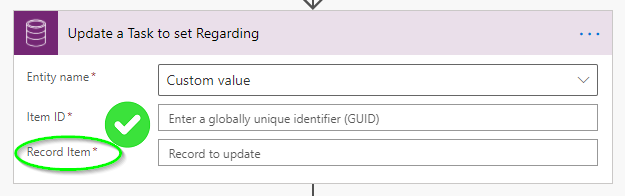
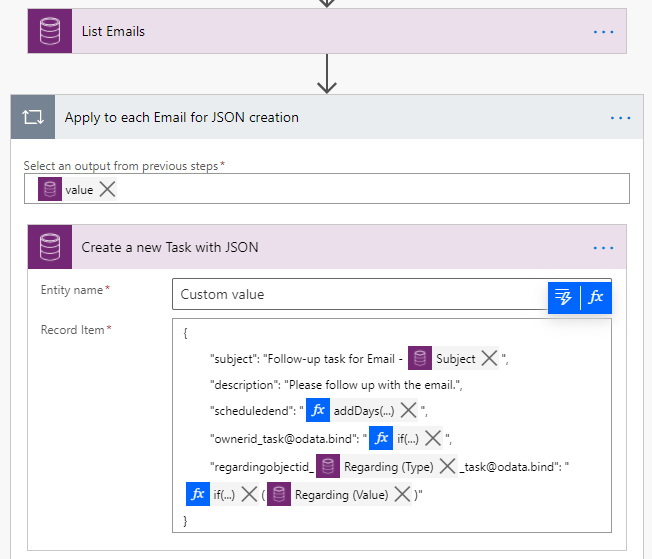
Update Polymorphic Lookup Value
The Power Automate Experimental Features are enabled for the account that I use to build this flow, so the expression builder in the screenshots of this post is different from the classic one. You can either follow this blog post to enable Experimental Features in your Power Automate settings or you will have to figure out the equivalent option in the classic expression builder.

{
	"[email protected]": "accounts(6e060750-ab16-eb11-a812-000d3a6aa8dc)"
}
- Single-valued navigation property (e.g. regardingobjectid_account_task)
- EntitySetName (e.g. accounts)
- Row GUID (e.g. 6e060750-ab16-eb11-a812-000d3a6aa8dc)
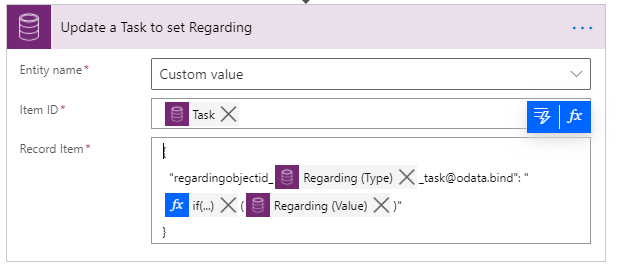
- part of the single-valued navigation property with the logical name of the Regarding (Type)
- EntitySetName needs to be built using an expression (more details below)
- Regarding (Value) can be used for GUID
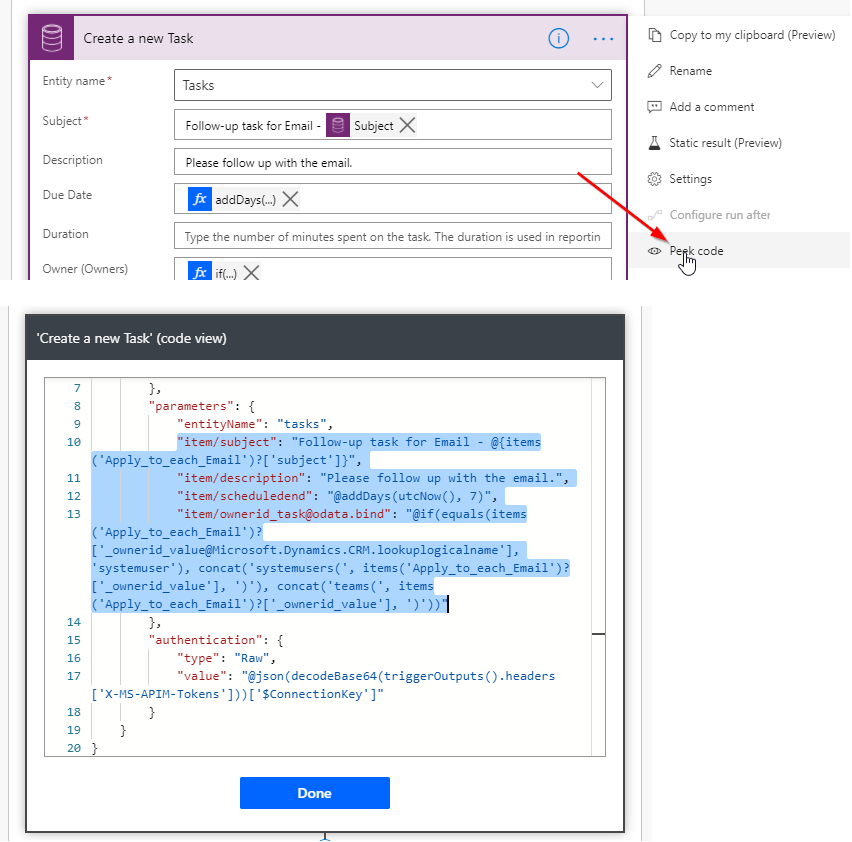
if
(
    equals
    (
        items('Apply_to_each_Email')?['_regardingobjectid_value@Microsoft.Dynamics.CRM.lookuplogicalname'],
        'account'
    ),
    'accounts',
    if
    (
        equals
        (
            items('Apply_to_each_Email')?['_regardingobjectid_value@Microsoft.Dynamics.CRM.lookuplogicalname'],
            'contact'
        ),
        'contacts',
        if
		(
			equals
			(
				items('Apply_to_each_Email')?['_regardingobjectid_value@Microsoft.Dynamics.CRM.lookuplogicalname'],
				'incident'
			),
			'incidents',
			'ERROR'
		)
    )
)
Create Row with Polymorphic Lookup Value
Create Connection with Dynamic Connected To Lookup Value
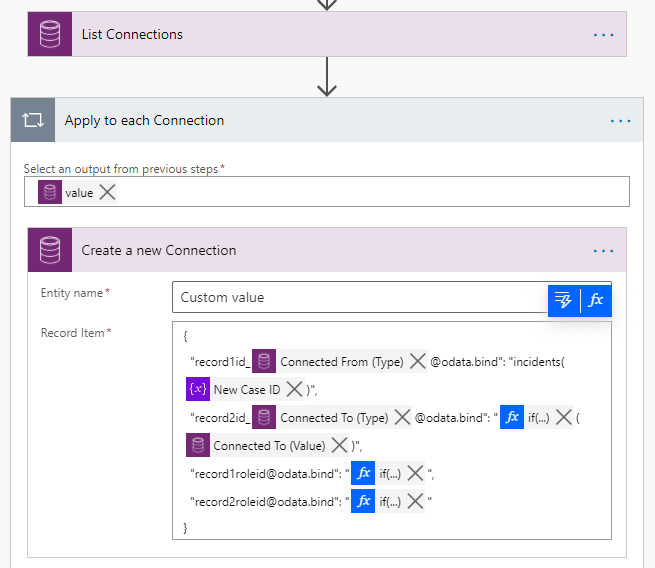
{
  "record1id_@{items('Apply_to_each_Connection')?['[email protected]']}@odata.bind": "incidents(@{variables('New Case ID')})",
  "record2id_@{items('Apply_to_each_Connection')?['[email protected]']}@odata.bind": "@{if
(
    equals
    (
        items('Apply_to_each_Connection')?['[email protected]'],
        'account'
    ),
    'accounts',
    if
    (
        equals
        (
            items('Apply_to_each_Connection')?['[email protected]'],
            'contact'
        ),
        'contacts',
        if
		(
			equals
			(
				items('Apply_to_each_Connection')?['[email protected]'],
				'incident'
			),
			'incidents',
			'ERROR'
		)
    )
)}(@{items('Apply_to_each_Connection')?['_record2id_value']})",
  "[email protected]": "@{if(
    empty(items('Apply_to_each_Connection')?['_record1roleid_value']),
    '',
    concat(
        'connectionroles(',
        items('Apply_to_each_Connection')?['_record1roleid_value'],
        ')'
    )
)}",
  "[email protected]": "@{if(
    empty(items('Apply_to_each_Connection')?['_record2roleid_value']),
    '',
    concat(
        'connectionroles(',
        items('Apply_to_each_Connection')?['_record2roleid_value'],
        ')'
    )
)}"
}

- QuoteClose: JSON object with column values for Quote Close Activity
- Status: 4 (for Won statuscode)
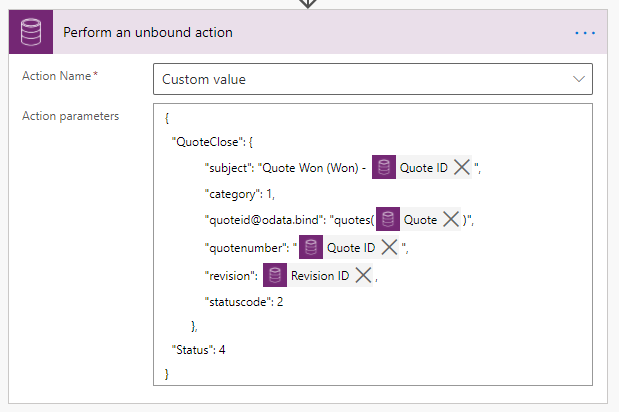
{
  "QuoteClose": {
            "subject": "Quote Won (Won) - @{outputs('Get_a_record')?['body/quotenumber']}",
            "category": 1,
            "[email protected]": "quotes(@{outputs('Get_a_record')?['body/quoteid']})",
            "quotenumber": "@{outputs('Get_a_record')?['body/quotenumber']}",
            "revision": @{outputs('Get_a_record')?['body/revisionnumber']},
            "statuscode": 2
        },
  "Status": 4
}
Summary
- Creating multiple types of table dynamically with one single step (e.g. create different types of activities conditionally) by providing the "Entity name" with expression
- Populating different number of columns dynamically by add/removeProperty of JSON object based on the condition
Published on:
Learn more
Related posts
Extending Power Automate Run History Beyond 28 Days Using Cloud Flow Run Metadata
Power Automate has become the backbone for many business processes, integrations, and automation scenarios across the Power Platform ecosystem...
Power Automate – Restore accidentally deleted flows
We are announcing the ability to restore accidentally deleted flows in Power Automate. This feature will reach general availability on July 30...
Power Automate – Review Firewall Configuration for Upcoming Platform Infrastructure Updates
We identified that one or more flows in your environment may be affected by existing firewall or IP allow list configurations. What action do ...
Power Automate – Export work queue items to CSV
We are announcing the ability to export work queue items to CSV in Power Automate. This feature will reach general availability on July 31, 20...
Power Automate – UI automation repair agent
We are announcing the UI automation repair agent in Power Automate. This feature will reach public preview on July 16, 2026. How does this aff...
Power Automate – View machine and flow utilization in dashboards
We are announcing the ability to view machine and flow utilization in dashboards in Power Automate. This feature will reach general availabili...
Power Automate – Build better forms with integrated Power Apps
We are announcing the ability to launch interactive Power Apps directly from desktop flows within Power Automate. This feature will reach gene...
Dynamics 365 Attachment Offloading: Power Automate vs. Dedicated Solution
TL;DR 30-second summary Dynamics 365 stores attachments in the Dataverse by default. That’s fine... until it isn't. As your file storag...
Power Automate Flow — HTTP Trigger to Azure OpenAI
Build the secure Power Automate HTTP trigger flow that receives free text from the portal, calls Azure OpenAI using your smart-form-extract de...