Azure portal May 2022 updates
Messaging Services > Service Bus
Analytics > Real time analytics
Databases > SQL Database
General
Compute / Virtual machines
Intune
Let’s look at each of these updates in greater detail.
Messaging Services > Service Bus
Announcing Service Bus Explorer for Azure portal public preview
Today we are pleased to announce the preview of the completely revamped Service Bus Explorer tool on the Azure portal. Azure Service Bus has two types of operations which can be performed against it:
- Management operations; Create, update, delete of Service Bus namespace, queues, topics, and subscriptions.
- Data operations; Send to and receive messages from queues, topics, and subscriptions.
While we have offered a portal-based Service Bus Explorer for data operations for a while now, our customers have provided us with feedback that the experience was still lacking compared to the community managed Service Bus Explorer OSS tool.
To empower our customers even further, we are now releasing a new version of Service Bus Explorer, which brings many new capabilities to the portal for working with their messages, right from the portal. For example, it is now possible to send, receive, and peek messages on queues, topics, and subscriptions, including their dead-letter sub-queues. The tool allows you to perform operations such as complete, re-sending, and deferral. Moreover, this can be done on a single message or for multiple messages at once.
To access the tool:
- Navigate to the namespace.
- Select the specific queue or topic that you want to perform your data operations on.
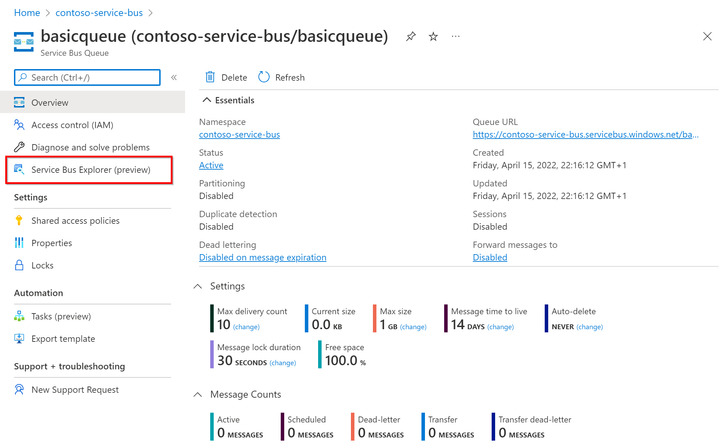
- Open "Service Bus Explorer (preview)" from the left menu navigation pane. When working with a topic, it's also possible to select a specific subscription within.
For all information about the tool, and step-by-step guidance for the different operations, please check our documentation.
Demo steps:
To use the Service Bus Explorer, navigate to the Service Bus namespace on which you want to do data operations.
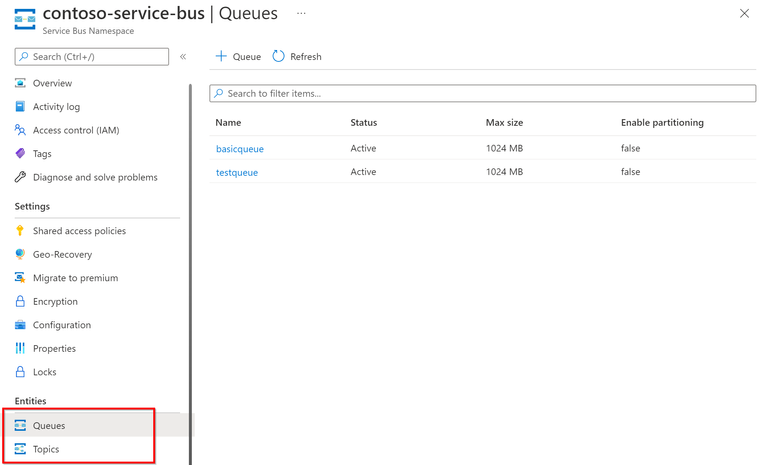
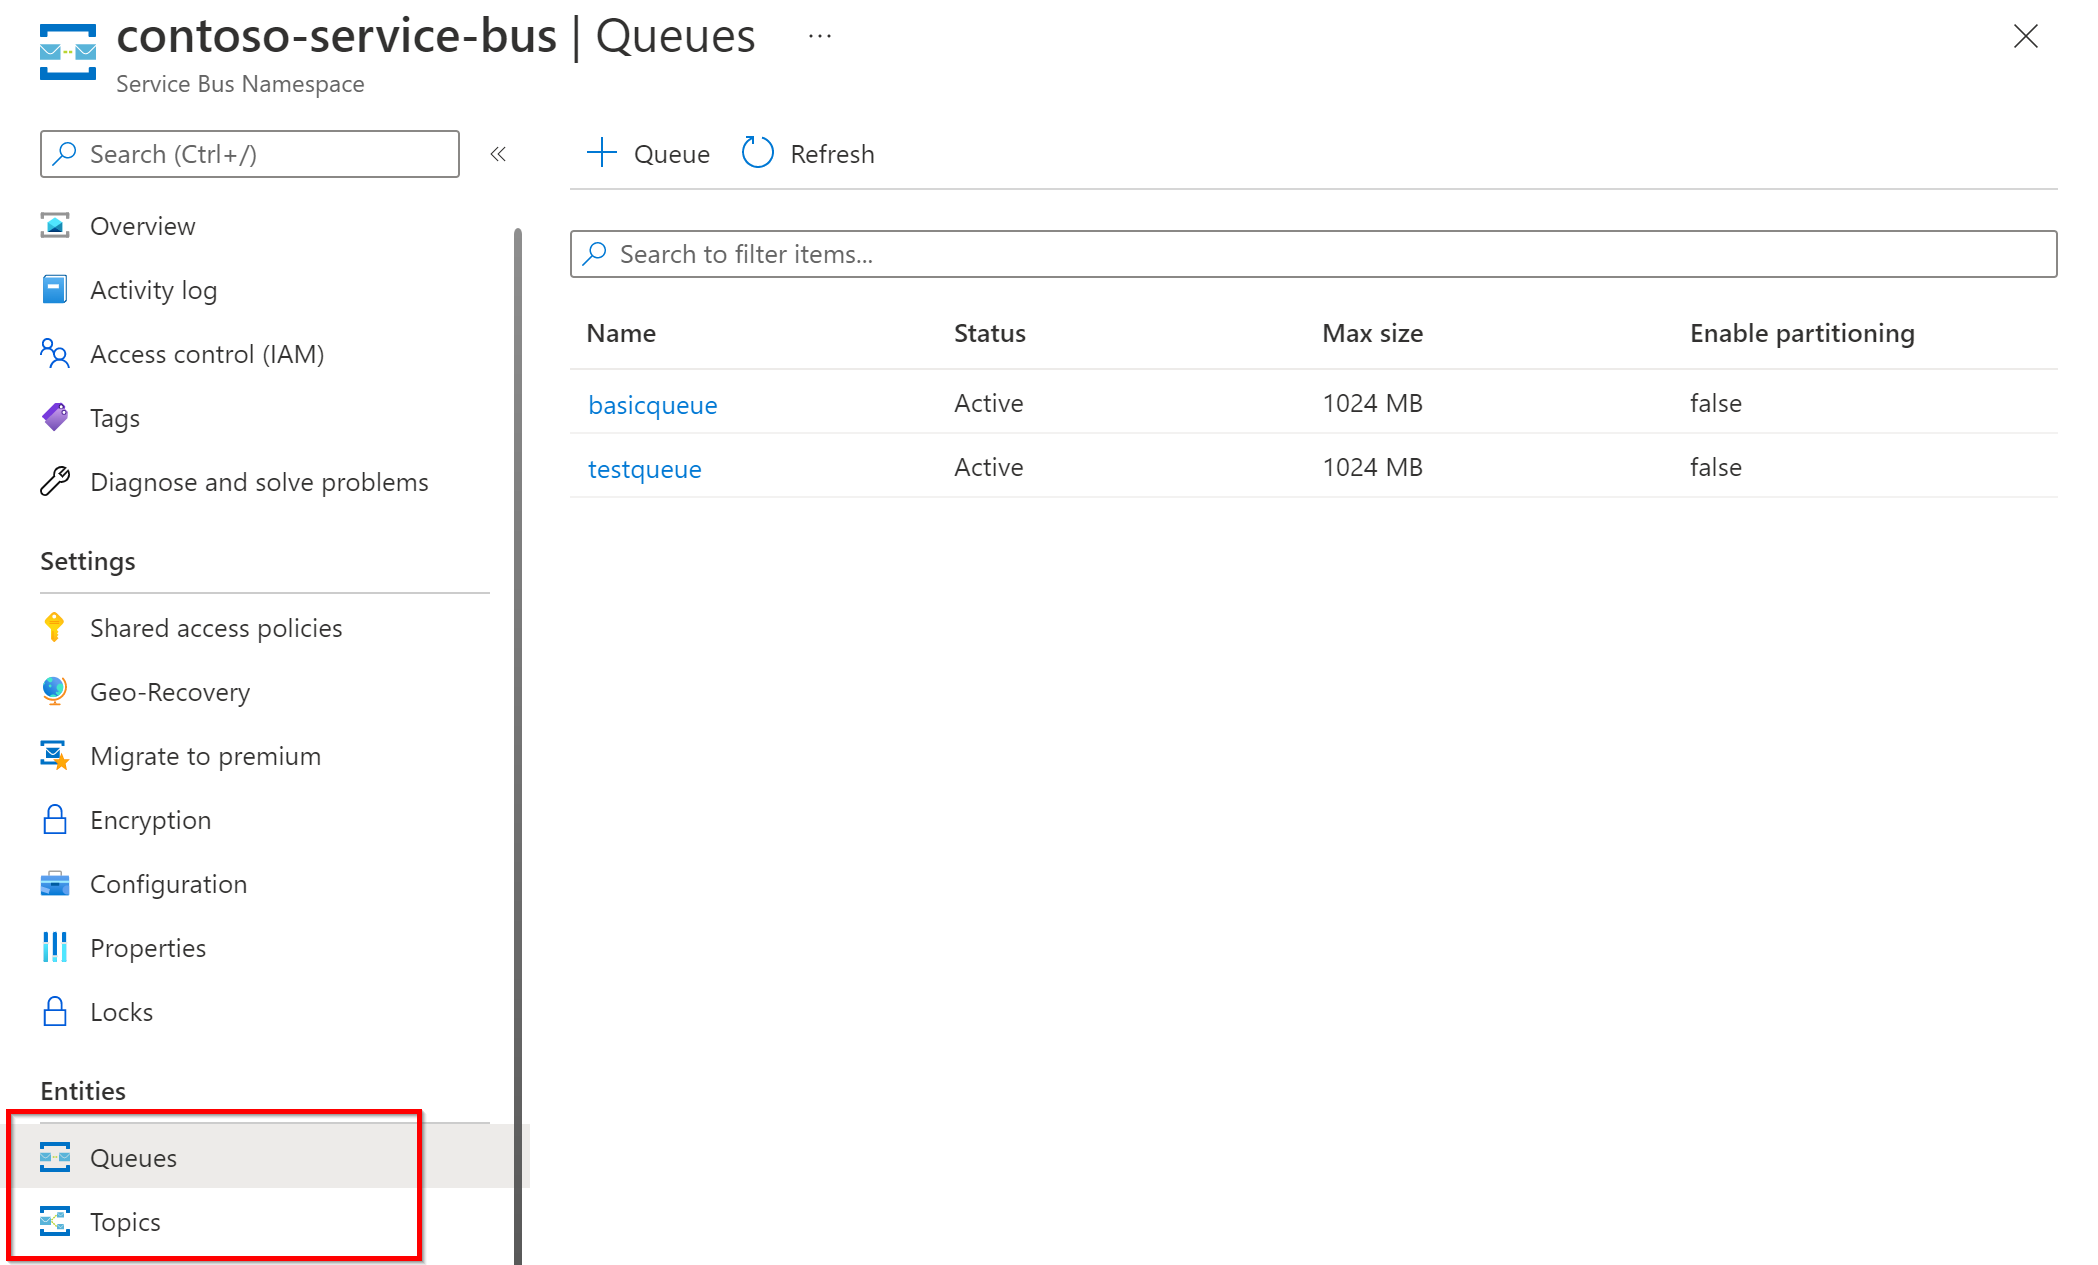
- If you're looking to run operations against a queue, select Queues from the navigation menu. If you're looking to run operations against a topic (and it's related subscriptions), select Topics.
After selecting Queues or Topics, select the specific queue or topic.
Select the Service Bus Explorer (preview) from the left navigation menu
Now you can use the tool to manage your messages.
Analytics > Real time analytics
Stream Analytics portal improvements are live with three new ways to simplify job development workflow
This month, we announced exciting improvements to the Azure Stream Analytics portal experience aimed at simplifying the job development workflow. These include:
- A new Get Started experience that introduces key concepts and steps to be done for users new to Azure Stream Analytics
- Autoscale settings which allow you to dynamically change the number of Streaming Units of your job based on input load or schedule.
- Query editor improvements which allow you to get more done without having to leave the page
New Get Started experience (Generally Available)
When you create your Azure Stream Analytics job, you are greeted with a brand new Get Started experience. This helps you get familiarized with the different steps needed to configure your job such as adding an input, developing a query, adding an output and enabling resource logs before you start the job.
The Monitoring tab gives you a quick summary of how your job is performing by showing the most important metrics.
Autoscale Streaming Units (SUs) of your job (Preview):
With the new built-in autoscale capabilities, you can configure your job to dynamically scale up and down based on input load or a pre-defined time schedule. You can configure autoscale settings by opening your Stream Analytics job in the Azure portal and clicking on Scale.
Improved query development experience (Generally Available):
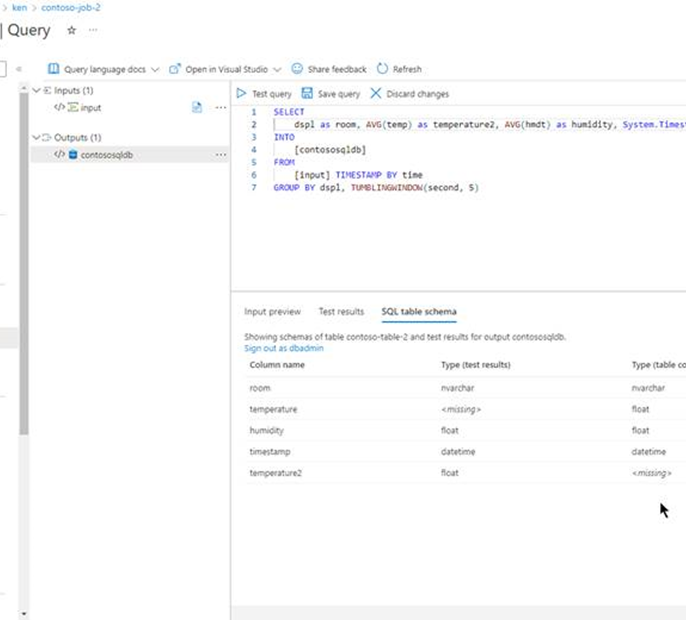
When you develop a query that writes to Azure SQL Database output, you can now see the schema of the results produced by your job and validate if it matches what your SQL table expects. This allows you to quickly address any errors directly in the query editor without having to run your job.
When you are developing your query, you may want to see the details of the inputs or outputs you are working with and might also want to open those target resources to change some settings. You can do this now without ever leaving the query development experience! Just click on the three dots near the input or output and choose if you want to edit it or navigate to the resource page.
Get up and running faster with the new post-database creation experience on the Azure Portal
The Azure SQL Database Portal team recently launched a new Getting Started experience, available in select regions, to help you get your database up and running faster. Our goal is to help you create, provision, and connect to your projects seamlessly so you can get back to developing.
Check out the new experience for yourself by following these steps:
1) Log into the Azure Portal
2) Click 'Create a resource'
3) Click 'Create' under the SQL Database listing (you can search 'SQL Database' in the search bar, or find SQL Database in the Popular Azure Services section)
4) Create your SQL Database (learn more about creating a single database in the Azure Portal)
5) Once your database has finished its deployment, click 'Go to resource'
By clicking 'Go to resource' you will be automatically redirected to the Getting Started page
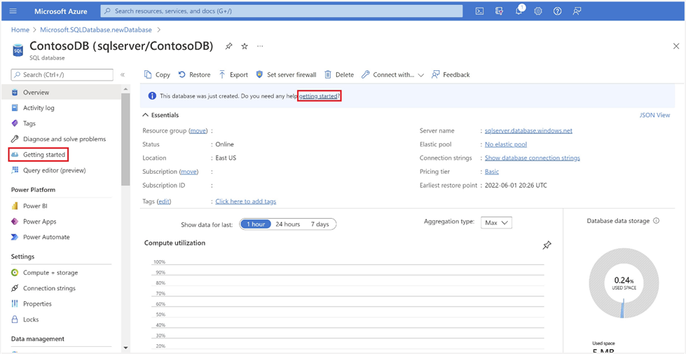
6) You should be automatically directed to the Getting Started screen, otherwise you can find it as a menu item on the left- hand side of the screen, or in a banner at the top of the Overview section.
Additional Getting Started entry points – a banner along the top of Overview, and an item in the lefthand menu
Now that you've arrived at the Getting Started page, let's take a closer look at what you can do.
Configure access
Clicking the 'Configure' button takes you to the server-level Networking settings, allowing you to configure public network access, private access, and outbound networking rules. To protect your SQL Database, the server-level networking settings restrict public access through firewall rules. Through the 'Configure' button you can quickly add a firewall rule to allow connections from your IP address. Learn more about configuring networking settings.
Select the 'Configure' button to configure various server-level networking settings
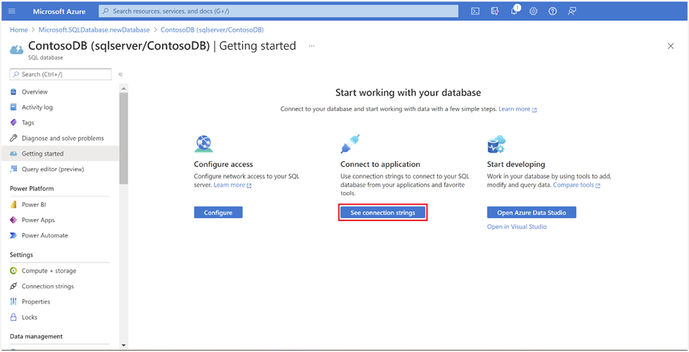
Connect to application
Clicking the 'See connection strings' button takes you to the pre-populated connection strings. These connection strings can be used to connect the application you are developing to your database. Examples areavailable in several popular languages, including C#, Python, NodeJS, Go, such that you can integrate your database with your project quickly. Select the connection string that corresponds to your project. Since Azure SQL Database is preconfigured to best practices for encryption and certificate trust, the connection string will have encryption=true and trustServerCertificate=false set as defaults.
Select 'See connection strings' to copy your pre-formatted connection strings to connect your SQL
Database to your application
Start developing
Clicking 'Open Azure Data Studio' or 'Open in Visual Studio' takes you to a landing page where you can download or open either application. Azure Data Studio provides an interface for administration and development with SQL Database and is available for Windows, macOS, and Linux. Visual Studio can be used to query and develop with SQL Database and is available for Windows. After you install or open your preferred tool your server and database details should pre-populate into the Connection window. All you need to do is supply your username and password and you're ready to work with your database!
In the coming months, we will continue to improve our post-database create experience to provide you with a lower friction, friendlier, and more efficient experience.
Get quick and easy access to your favorite resources in the Azure portal
A new feature has been released in the Azure portal allowing you a quick and easy way to a navigate from the home page to your favorite resources. You can favorite any resource instance by:
Navigating to the resource and then selecting the favorite 'star' icon in the header
Browse to the list of resources and then select the favorite 'star' icon from the resource card.
Alternatively, you can access it directly from the home page for first time setup.
Once favorited, you can switch to the 'Favorite' tab on Azure home and quickly access your favorite resources.
Happy favoriting!
Automation tooling improvements to Azure VM
We’ve introduced an experience in the Azure VM user experience that enables customers to access most common command line interface and PowerShell commandlets. This helps new users get started with CLI/PS commands directly from Portal. Please watch the video below to learn more about how it works. We plan to roll this experience out to more Azure services in the coming months.
Updates to Microsoft Intune
The Microsoft Intune team has been hard at work on updates as well. You can find the full list of updates to Intune on the What's new in Microsoft Intune page, including changes that affect your experience using Intune.
Azure portal “how to” video series
Have you checked out our Azure portal “how to” video series yet? The videos highlight specific aspects of the portal so you can be more efficient and productive while deploying your cloud workloads from the portal. Check out our most recently published videos:
- How to get a visualization view of your resources
- How to manage applications in Azure Kubernetes Service
- How to get started in Azure using the Azure Quickstart Center
Next steps
The Azure portal has a large team of engineers that wants to hear from you, so please keep providing us your feedback in the comments section below or on Twitter @AzurePortal.
Sign in to the Azure portal now and see for yourself everything that’s new. Download the Azure mobile app to stay connected to your Azure resources anytime, anywhere. See you next month!
Published on:
Learn moreRelated posts
Semantic Reranking with Azure SQL, SQL Server 2025 and Cohere Rerank models
Supporting re‑ranking has been one of the most common requests lately. While not always essential, it can be a valuable addition to a solution...
How Azure Cosmos DB Powers ARM’s Federated Future: Scaling for the Next Billion Requests
The Cloud at Hyperscale: ARM’s Mission and Growth Azure Resource Manager (ARM) is the backbone of Azure’s resource provisioning and management...
Automating Business PDFs Using Azure Document Intelligence and Power Automate
In today’s data-driven enterprises, critical business information often arrives in the form of PDFs—bank statements, invoices, policy document...
Azure Developer CLI (azd) Dec 2025 – Extensions Enhancements, Foundry Rebranding, and Azure Pipelines Improvements
This post announces the December release of the Azure Developer CLI (`azd`). The post Azure Developer CLI (azd) Dec 2025 – Extensions En...
Unlock the power of distributed graph databases with JanusGraph and Azure Apache Cassandra
Connecting the Dots: How Graph Databases Drive Innovation In today’s data-rich world, organizations face challenges that go beyond simple tabl...
Azure Boards integration with GitHub Copilot
A few months ago we introduced the Azure Boards integration with GitHub Copilot in private preview. The goal was simple: allow teams to take a...
Microsoft Dataverse – Monitor batch workloads with Azure Monitor Application Insights
We are announcing the ability to monitor batch workload telemetry in Azure Monitor Application Insights for finance and operations apps in Mic...
Copilot Studio: Connect An Azure SQL Database As Knowledge
Copilot Studio can connect to an Azure SQL database and use its structured data as ... The post Copilot Studio: Connect An Azure SQL Database ...
Retirement of Global Personal Access Tokens in Azure DevOps
In the new year, we’ll be retiring the Global Personal Access Token (PAT) type in Azure DevOps. Global PATs allow users to authenticate across...
