
Azure OpenAI Private Endpoints: Connecting Across VNET’s

Introduction to Azure OpenAI Private Endpoints:
Azure OpenAI Private Endpoints emerge as a pivotal solution within the Azure ecosystem. These endpoints play a vital role in fortifying the connection between your Azure resources and OpenAI services, ensuring that data transmission remains shielded from public internet exposure. By establishing a private link, Azure OpenAI Private Endpoints provide a secure and efficient channel for transmitting data between your infrastructure and the OpenAI service, mitigating potential security vulnerabilities associated with traditional public endpoints. This blog post takes you on a comprehensive journey, unraveling the intricate processes involved in setting up, configuring, and optimizing Azure OpenAI Private Endpoints, while shedding light on their indispensable role in safeguarding sensitive data in today's interconnected digital landscape.
Architecture:
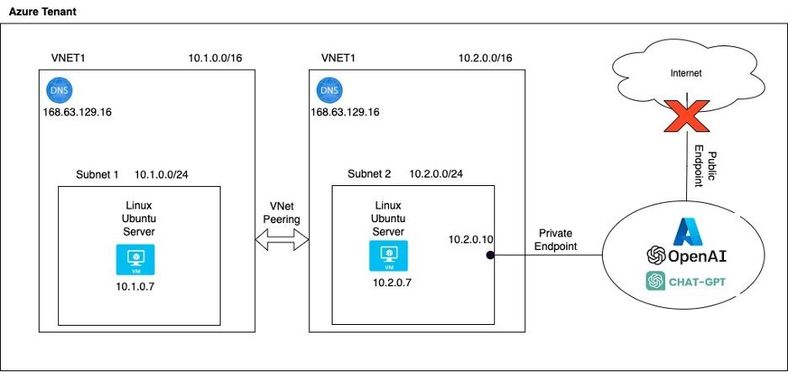
Environment Setup Guide:
Step 1. Create a VNet.
- Go to https://portal.azure.com
- Login if you already have an account, otherwise, create one
- Create a new subscription
- Create a new Azure VNet by using an ARM template or manually creating one. Azure ARM (Azure Resource Manager) templates allow you to create and deploy an entire Azure infrastructure declaratively.
- Create a subnet in each VNet where the VM with the Azure OpenAI script will reside.
Step 2. Azure Portal - Create a VM in each VNet\Subnet that will host OpenAI Script.
- Create a new resource: click on the “create a resource” button on the left-hand side of the Azure portal.
- Create a virtual machine (VM) in Azure:
- Select Virtual Machine: In the "New" pane, search for "Virtual Machine" and select "Virtual Machine" from the list of available options.
- Choose a deployment option: Azure offers two deployment models for virtual machines: Resource Manager and Classic. Choose the Resource Manager deployment model for the latest features and capabilities.
- Configure the basics: Provide the necessary information such as the subscription, resource group, and virtual machine name. Select the region where you want to deploy the VM.
- Select an image: Choose an operating system image for your VM, such as Windows or Linux. You can select from a range of pre-configured images available in the Azure Marketplace.
- Choose a size: Select the size of the VM based on your requirements, considering factors such as CPU, memory, and storage capacity.
- Configure optional features: Customize additional settings like networking, storage, availability options, and management options according to your needs. You can also configure advanced settings if required.
- Set up authentication: Specify the username and password or SSH key for the VM's login credentials. This will be used to access the VM remotely.
- Review and create: Double-check all the configurations you have made and click on the "Create" button to start the deployment process.
- Monitor deployment: Azure will begin provisioning the VM based on your specifications. You can monitor the progress in the Azure Portal.
- Access and manage the VM: Once the deployment is complete, you can access and manage the VM through the Azure Portal, Azure CLI, PowerShell, or any other preferred method.
Step 3. Update and configure VMs
- Sudo update
- Install Python PIP
- Sudo apt-get install python3-pip
- Install Azure OpenAI for Python script use
- Sudo pip install openai
Setup VNet Peering between VNets:
Virtual Network (VNet) peering in Azure is a networking feature that allows seamless connectivity between two Azure Virtual Networks in the same region or across different regions. VNet peering enables resources within these VNets to communicate as if they were on the same network, without the need for any gateway devices or additional hardware. This secure and low-latency connection facilitates the sharing of resources, data, and services between VNets, enhancing application deployment flexibility and streamlining network architecture.
- From the Azure portal select Virtual Networks
- Select the Virtual Network you would like to Peer
- Under Settings, Select Peerings
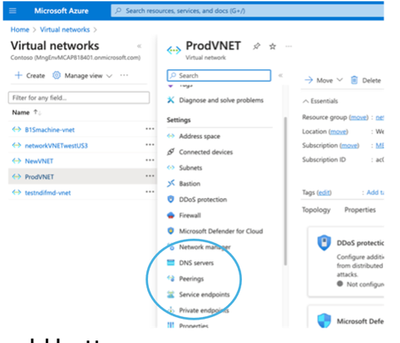
- Click on the add button
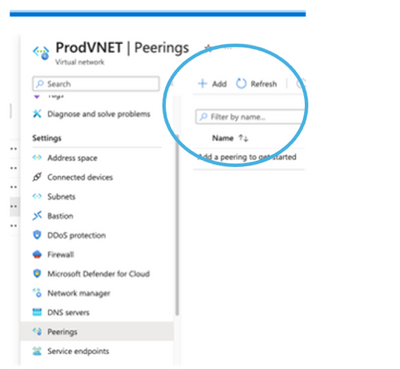
- Name your peering connections both local and remote
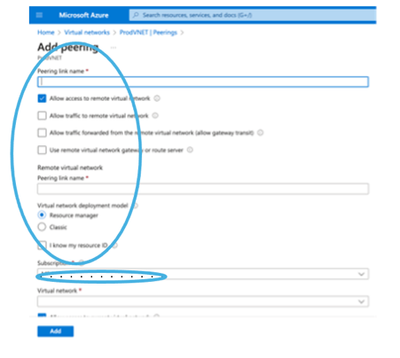
- Select the Remote Virtual Network (either same subscription or different subscription) as there is no difference in the configuration.

- Click the Add button.
- When the Peering status changes to “Connected” you are ready to proceed.

Configure OpenAI Private Endpoint:
- From the Azure portal select Azure OpenAI
- Select your Azure OpenAI instance

Make note of the Endpoint. This is the endpoint to be used even after the private endpoint is created, since DNS for the Destination VNet will be updated automatically as shown below.
The Azure Regions do not need to be the same. Azure OpenAI can be in one region and the destination VNet in a different Region.
- Select Networking under Resource Management

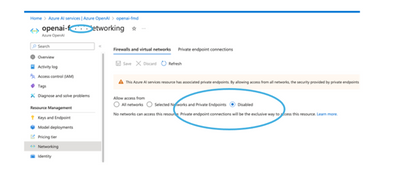
- The First section is Firewalls and Virtual Networks.
If you intend to only allow access to this service using the Private endpoint and nothing else, set this to “Disabled.” Any other connection will NOT be allowed (Disabled).
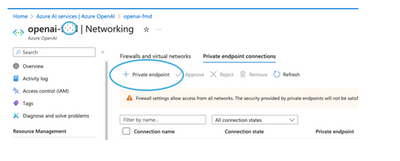
- Click on + Private Endpoint
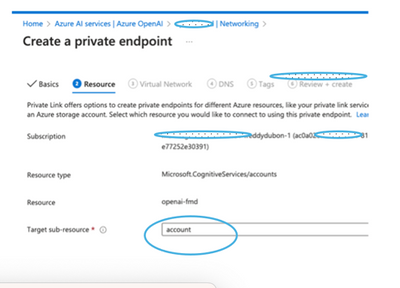
- Select the Subscription
- Resource Group
- Enter a name for the private endpoint
- The interface name will automatically use the name and will add “-nic”
- This is the Network Interface that will be created in the destination VNet/Subnet (an IP address in that subnet will be assigned to this interface)
- Select the Region for the End point. This should be the same as where the destination VNet is located.

Target Sub-resource is account
- Select the Destination VNet and Subnet. (A Network Interface will be created in this subnet and an interna IP address will be assigned)
- If you do not see the correct VNet/Subnet, check the region.

- By Default, the creation of a private endpoint will update the DNS settings of the Destination VNet. This means that you can continue using the endpoint name (not the privatelink name) and the “regular” endpoint will correctly resolve to the internal IP address I.E 10.2.0.10.

- Click Review and Create
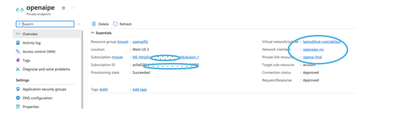
- Next verify and check the internal IP address given to the private endpoint.
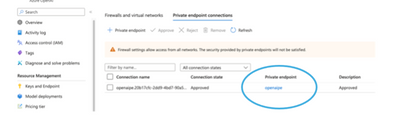
- You will see the Virtual Network/Subnet and interface, click on Network interface
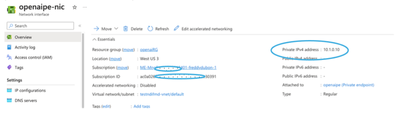
- You will see the private IP address given to the Private Endpoint.
You can use this in your own DNS server or a local hosts file.
- Nothing extra needs to be done when accessing the Azure OpenAI service from the same VNet where the endpoint was created.
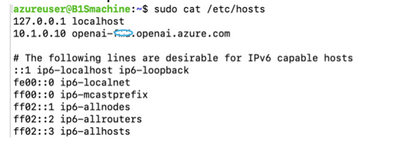
- However, for the Peered VNet, either the DNS needs to be updated to point to the internal IP address or the Hosts file needs to be updated.
- Hosts File example for a Linux workstation
Other Networking Considerations:
When accessing this private endpoint from anywhere else, you need to follow this DNS example or use the internal IP address for your Endpoint connection.
To further secure access to this endpoint, you can adjust the Network Security Group assigned to the Subnet where the endpoint was created. Just make sure the security group is assigned to the subnet as shown below:
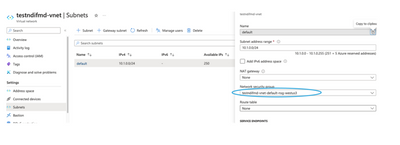
Adjusting the Inbound security rules or outbound security rules.

Published on:
Learn moreWe can help you with Azure OpenAI Private Endpoints: Connecting Across VNET’s
If you want help implementing, troubleshooting, or improving this product, contact us and we’ll point you in the right direction.
Related posts
End-to-End Full-Stack Web Application with Azure AD B2C Authentication: A Complete Guide
Application Overview The purpose of this sample application is to demonstrate the usage of Azure Active Directory B2C (Azure AD B2C) for authe...
Complex Data Extraction using Document Intelligence and RAG
Section 1: Introduction Historically, data extraction from unstructured documents was a manual and tedious process. It consisted of a c...
Harnessing Generative AI with Weaviate on Azure Kubernetes Service and Azure NetApp Files
Table of Contents Introduction Prerequisites Install Weaviate Approximate Nearest Neighbor (ANN) Benchmarks ANN Benchmarks Setup ANN Benchmark...
Securing Containerized Applications with SSH Tunneling
As cloud engineers and architects embrace containerization, ensuring secure communication becomes paramount. Data transmission and access cont...
Exploring AI Agent-Driven Auto Insurance Claims RAG Pipeline.
Introduction: In this post, I explore a recent experiment aimed at creating a RAG pipeline tailored for the insurance industry, specificall...
Azure NetApp Files now stores sensitive data DoD IL5 compliant in Azure US Government regions
Table of Contents Introduction Why Azure NetApp Files? DoD IL5 compliance in Azure Government Azure NetApp Files reaches feature parity betwee...
Data Intelligence End-to-End with Azure Databricks and Microsoft Fabric
This Azure Architecture Blog was written in conjunction with Isaac Gritz, Senior Solutions Architect, at Databricks. The Data Inte...
AI Studio End-to-End Baseline Reference Implementation
Azure AI Studio is designed to cater to the growing needs of developers seeking to integrate advanced AI capabilities into their appli...
Mastering AI adoption: Essentials to building, operating and optimizing genAI workloads on Azure
Mastering your AI adoption: Essentials to building, operating and optimizing genAI workloads on Azure As the demand for scalable, efficient AI...
Optimize Azure Stack HCI with the Well-Architected Framework
Azure Stack HCI is a hyperconverged infrastructure (HCI) solution that provides storage, network, and compute resources in on-premises...