
Loading...

Optimize Azure Kubernetes Service Node Cost by Combining OnDemand And Spot VMs
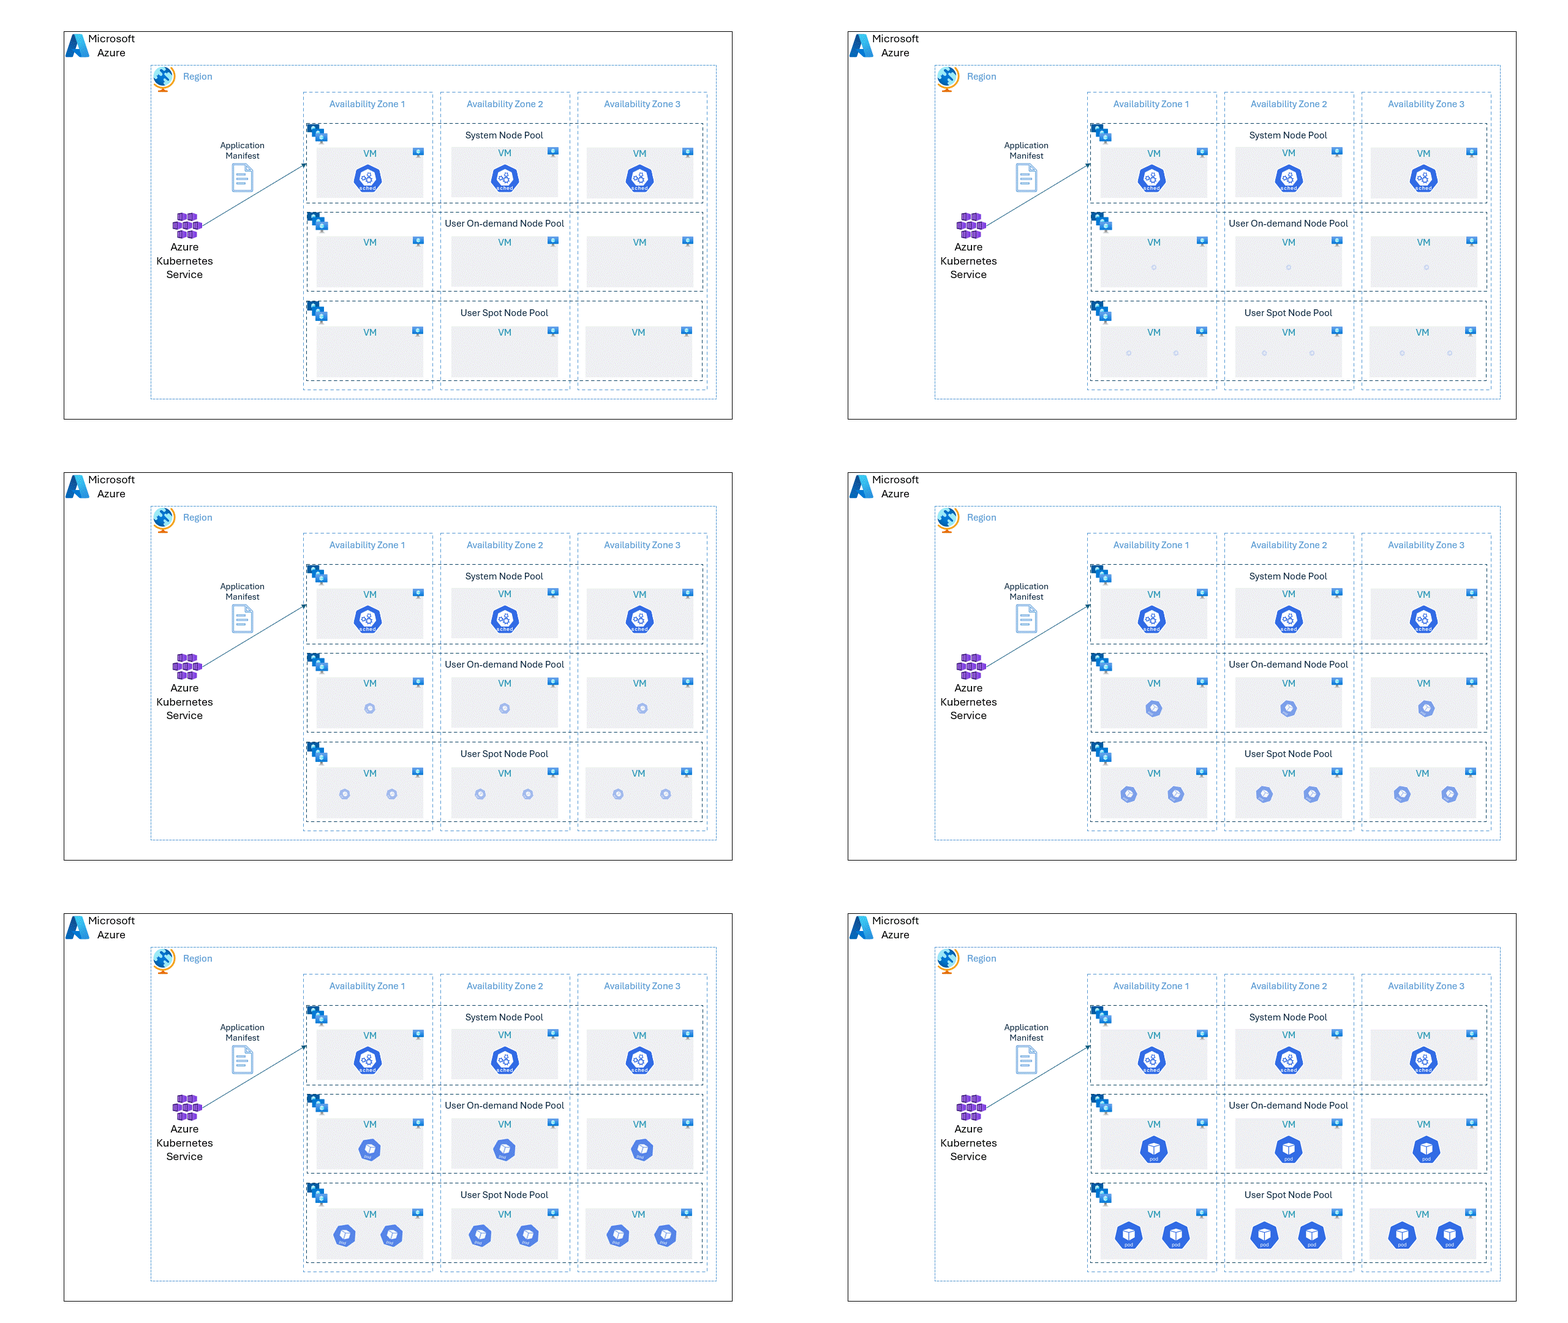
Optimize Azure Kubernetes Service Node Cost by Combining OnDemand And Spot VMs

While it's possible to run the Kubernetes nodes either in on-demand or spot node pools separately, we can optimize the application cost without compromising the reliability by placing the pods unevenly on spot and OnDemand VMs using the topology spread constraints. With baseline amount of pods deployed in OnDemand node pool offering reliability, we can scale on spot node pool based on the load at a lower cost.
Kubernetes Topology SpreadKubernetes Topology Spread

 In this post, we will go through a step by step approach on deploying an application spread unevenly on spot and OnDemand VMs.


Prerequisites

  • Azure Subscription with permissions to create the required resources
  • Azure CLI
  • kubectl CLI


1. Create a Resource Group and an AKS Cluster


Create a resource group in your preferred Azure location using Azure CLI as shown below

az group create --name CostOptimizedK8sRG --location westeurope --tags 'Reason=Blog'

Let's create an AKS cluster using one of the following commands.

If you already have your own SSH keys use the following command to use the existing keys
az aks create -g CostOptimizedK8sRG -n CostOptimizedCluster --auto-upgrade-channel node-image --enable-managed-identity --enable-msi-auth-for-monitoring --enable-cluster-autoscaler --min-count 1 --max-count 5 --kubernetes-version 1.26.0 --ssh-key-value ~/.ssh/id_rsa.pub --tags 'Reason=Blog' --uptime-sla -z 1 2 3

OR

To generate a new SSH Keys while creating the AKS cluster use the following command
az aks create -g CostOptimizedK8sRG -n CostOptimizedCluster --auto-upgrade-channel node-image --enable-managed-identity --enable-msi-auth-for-monitoring --enable-cluster-autoscaler --min-count 1 --max-count 5 --generate-ssh-keys --kubernetes-version 1.26.0 --tags 'Reason=Blog' --uptime-sla -z 1 2 3


2. Create two node pools using spot and OnDemand VMs


Add a spot based node pool to the cluster and add a label deploy=spot. We set the spot max price to that of OnDemand cost.
az aks nodepool add -g CostOptimizedK8sRG --cluster-name CostOptimizedCluster -n appspotpool -e -k 1.26.0 --labels 'deploy=spot' --min-count 3 --max-count 5 --max-pods 10 --mode User --os-sku Ubuntu --os-type Linux --priority Spot --spot-max-price -1 --tags 'Reason=Blog' -z 1 2 3
 
Add a on-demand based node pool to the cluster and add a label deploy=ondemand
az aks nodepool add -g CostOptimizedK8sRG --cluster-name CostOptimizedCluster -n appondempool -e -k 1.26.0 --labels 'deploy=ondemand' --min-count 3 --max-count 5 --max-pods 10 --mode User --os-sku Ubuntu --os-type Linux --priority Regular --tags 'Reason=Blog' -z 1 2 3


Configure kubectl to connect to the newly created Kubernetes cluster
az aks get-credentials -g CostOptimizedK8sRG -n CostOptimizedCluster
Let's confirm that the nodes in the spot and on-demand node pools are distributed across all availability zones evenly.
kubectl get nodes -o custom-columns='Name:.metadata.name,Zone:.metadata.labels.topology\.kubernetes\.io/zone'
  This should output the list of Nodes and their corresponding availability zones as shown below
Name Zone aks-appondempool-79574777-vmss000000 westeurope-1 aks-appondempool-79574777-vmss000001 westeurope-2 aks-appondempool-79574777-vmss000002 westeurope-3 aks-appspotpool-41295273-vmss000000 westeurope-1 aks-appspotpool-41295273-vmss000001 westeurope-2 aks-appspotpool-41295273-vmss000002 westeurope-3 aks-nodepool1-17327460-vmss000000 westeurope-1


3. Deploy a sample application


Now let's deploy a sample application Vote App as shown in this documentation. Copy the application manifest in the documentation to a file named azure-vote.yaml and apply the manifest using kubectl as shown below
kubectl apply -f azure-vote.yaml
 
It will crate two deployments and two services one each for frontend and backend as shown below
deployment.apps/azure-vote-back created service/azure-vote-back created deployment.apps/azure-vote-front created service/azure-vote-front created
 
Let's check the list pods and which node it's been deployed currently using the following kubectl command
kubectl get pods -o wide
As you notice that there is one pod each of frontend and backend. Both of them are running OnDemand node pool because we haven't added tolerations to support Spot taint.
NAME READY STATUS RESTARTS AGE IP NODE NOMINATED NODE READINESS GATES azure-vote-back-65c595548d-249xw 1/1 Running 0 90s 10.244.9.4 aks-appondempool-79574777-vmss000002 <none> <none> azure-vote-front-d99b7676c-2nvg2 1/1 Running 0 90s 10.244.11.4 aks-appondempool-79574777-vmss000000 <none> <none>
 

4. Update the application deployment using topology spread constraints


Let's update the number of replicas of front end application to 9. I have chosen 9 to have a better distribution of pods across 3 Availability Zones where the nodes are running. We need to add tolerations to the deployment manifest to enable the possibility of deploying the pods in spot VMs.
tolerations: - key: kubernetes.azure.com/scalesetpriority operator: Equal value: spot effect: NoSchedule
 
Now let's use Node affinity to constrain which nodes that scheduler can use to place the pods. Using requiredDuringSchedulingIgnoredDuringExecution we ensure that the pods are placed in nodes which has deploy as key and the value as either spot or ondemand. Whereas for preferredDuringSchedulingIgnoredDuringExecution we will add weight such that spot nodes has more preference over OnDemand nodes for the pod placement.
affinity: nodeAffinity: requiredDuringSchedulingIgnoredDuringExecution: nodeSelectorTerms: - matchExpressions: - key: deploy operator: In values: - spot - ondemand preferredDuringSchedulingIgnoredDuringExecution: - weight: 99 preference: matchExpressions: - key: deploy operator: In values: - spot - weight: 1 preference: matchExpressions: - key: deploy operator: In values: - ondemand
 
With Tolerations & Node Affinity in place now let's configure topologySpreadConstraints with two label selectors. One with deploy label as topology key, the attribute maxSkew as 3 and DoNotSchedule for whenUnsatisfiable which ensures that not less than 3 instances (as we use 9 replicas) will be in single topology domain (in our case spot and ondemand). As the nodes with spot as value for deploy label has the higher weight preference in node affinity, scheduler will most likely will place more pods on spot than OnDemand node pool. For the second label selector we use topology.kubernetes.io/zone as the topology key to evenly distribute the pods across availability zones, as we use ScheduleAnyway for whenUnsatisfiable scheduler won't enforce this distribution but attempt to make it if possible.
topologySpreadConstraints: - labelSelector: matchLabels: app: azure-vote-front maxSkew: 3 topologyKey: deploy whenUnsatisfiable: DoNotSchedule - labelSelector: matchLabels: app: azure-vote-front maxSkew: 1 topologyKey: topology.kubernetes.io/zone whenUnsatisfiable: ScheduleAnyway
Now let's apply the updated manifest to deploy the 9 replicas based on topology spread that we configured above. Full manifest is available this gist.
kubectl apply -f azure-vote.yaml
 Which will update only the frontend deployment as we changed only that configuration
deployment.apps/azure-vote-back unchanged service/azure-vote-back unchanged deployment.apps/azure-vote-front configured service/azure-vote-front unchanged
Now let's look at the list of pods to identify which host it's being placed using the following command
kubectl get pods -o wide -l=app=azure-vote-front
As you notice below, 3 pods are placed in OnDemand node pool while 6 pods are placed in spot node pool and all the pods are evenly distributed across the three availability zones.
NAME READY STATUS RESTARTS AGE IP NODE NOMINATED NODE READINESS GATES azure-vote-front-97b44f89b-627md 1/1 Running 0 4m37s 10.244.9.8 aks-appondempool-79574777-vmss000002 <none> <none> azure-vote-front-97b44f89b-66878 1/1 Running 0 100s 10.244.6.6 aks-appspotpool-41295273-vmss000001 <none> <none> azure-vote-front-97b44f89b-68tn6 1/1 Running 0 100s 10.244.8.6 aks-appspotpool-41295273-vmss000000 <none> <none> azure-vote-front-97b44f89b-79gz6 1/1 Running 0 100s 10.244.10.7 aks-appondempool-79574777-vmss000001 <none> <none> azure-vote-front-97b44f89b-7kjzz 1/1 Running 0 100s 10.244.9.9 aks-appondempool-79574777-vmss000002 <none> <none> azure-vote-front-97b44f89b-gvlww 1/1 Running 0 100s 10.244.8.4 aks-appspotpool-41295273-vmss000000 <none> <none> azure-vote-front-97b44f89b-jwwgk 1/1 Running 0 100s 10.244.8.5 aks-appspotpool-41295273-vmss000000 <none> <none> azure-vote-front-97b44f89b-mf84z 1/1 Running 0 100s 10.244.7.4 aks-appspotpool-41295273-vmss000002 <none> <none> azure-vote-front-97b44f89b-p8sxw 1/1 Running 0 100s 10.244.6.5 aks-appspotpool-41295273-vmss000001 <none> <none>


Conclusion


We have seen how we can use topology spread constraints to distribute the pods across the node pools in a cluster. We have also seen how we can use node affinity to constrain the nodes that scheduler can use to place the pods. We have also seen how we can use tolerations to enable the possibility of deploying the pods in spot VMs.

While this approach thrives to achieve optimal placement, it doesn't guarantee that the maximum number of pods will be in spot VMs. This is because the scheduler will try to place the pods in the nodes with higher weight with preference, but it's not required to do so. Similarly the maxSkew configuration in topology spread constraints is the maximum skew allowed as the name suggests, so it's not guaranteed that the maximum number of pods will be in a single topology domain. However, this approach is a good starting point to achieve optimal placement of pods in a cluster with multiple node pools.

As a next step, to improve the spot VM usage we can create additional node pools with different instance types and use node affinity to constrain the pods to be placed in those node pools. This will help us to achieve better spot VM usage.

Published on:

Learn more
Need help with this product?

We can help you with Optimize Azure Kubernetes Service Node Cost by Combining OnDemand And Spot VMs

If you want help implementing, troubleshooting, or improving this product, contact us and we’ll point you in the right direction.

Azure Architecture Blog articles

Azure Architecture Blog articles

Share post:

Related posts

End-to-End Full-Stack Web Application with Azure AD B2C Authentication: A Complete Guide

Application Overview The purpose of this sample application is to demonstrate the usage of Azure Active Directory B2C (Azure AD B2C) for authe...

1 year ago

Complex Data Extraction using Document Intelligence and RAG

Section 1: Introduction   Historically, data extraction from unstructured documents was a manual and tedious process. It consisted of a c...

1 year ago

Harnessing Generative AI with Weaviate on Azure Kubernetes Service and Azure NetApp Files

Table of Contents Introduction Prerequisites Install Weaviate Approximate Nearest Neighbor (ANN) Benchmarks ANN Benchmarks Setup ANN Benchmark...

1 year ago

Securing Containerized Applications with SSH Tunneling

As cloud engineers and architects embrace containerization, ensuring secure communication becomes paramount. Data transmission and access cont...

1 year ago

Exploring AI Agent-Driven Auto Insurance Claims RAG Pipeline.

Introduction: In this post, I explore a recent experiment aimed at creating a RAG pipeline tailored for the insurance industry, specificall...

1 year ago

Azure NetApp Files now stores sensitive data DoD IL5 compliant in Azure US Government regions

Table of Contents Introduction Why Azure NetApp Files? DoD IL5 compliance in Azure Government Azure NetApp Files reaches feature parity betwee...

1 year ago

Data Intelligence End-to-End with Azure Databricks and Microsoft Fabric

This Azure Architecture Blog was written in conjunction with Isaac Gritz, Senior Solutions Architect, at Databricks.   The Data Inte...

1 year ago

AI Studio End-to-End Baseline Reference Implementation

  Azure AI Studio is designed to cater to the growing needs of developers seeking to integrate advanced AI capabilities into their appli...

1 year ago

Mastering AI adoption: Essentials to building, operating and optimizing genAI workloads on Azure

Mastering your AI adoption: Essentials to building, operating and optimizing genAI workloads on Azure As the demand for scalable, efficient AI...

2 years ago

Optimize Azure Stack HCI with the Well-Architected Framework

  Azure Stack HCI is a hyperconverged infrastructure (HCI) solution that provides storage, network, and compute resources in on-premises...

2 years ago

Newsletter

Get the latest Dynamics 365 and Power Platform content in your inbox

A curated digest of community blogs, product news, videos, and podcasts — delivered without the noise.

Weekly updates Unsubscribe anytime Fresh community picks
We use your email only for the newsletter and you can unsubscribe at any time.
By subscribing, you agree to the privacy policy.