Confidential Computing is Child's Play with ACI

We recently announced the public preview of Confidential Containers with Azure Container Instances (ACI) this is a serverless platform for running your container workloads.
Because this innovation happens at the platform layer it’s as simple as ‘lifting & shifting’ an existing container from on-premises, or another container platform and deploying it into Azure Container Instances (ACI) using a Confidential Computing SKU.
In this blog we’ll look at a simple example of deploying a community provided Minecraft server container from Geoff Bourne (“itzg” on GitHub) onto Confidential Containers on ACI using simple to modify ARM templates.
You can use the knowledge you learn here to experiment with your own organization's container workloads on Confidential ACI.
- An Azure subscription, if you don’t have one already you can create a free trial at https://azure.microsoft.com/free/
- Azure CLI https://learn.microsoft.com/cli/azure or you can use Azure Cloud Shell https://learn.microsoft.com/azure/cloud-shell/overview
- A Minecraft client https://minecraft.net/get-minecraft clients are available for a variety of PC, Mac(1) and mobile platforms, free trials are available.
- The ARM templates for this example - available on the Azure Container Samples page on GitHub
git clone https://github.com/Azure-Samples/confidential-container-samples.git
Note: substitute values in angle-brackets to suit your environment
Step 1: Setup variables for the resource group and subscription
Step 2: Login to your Azure tenant and select the target subscription
Step 3: Create a resource group to hold the Azure objects
Step 4: Get the existing ACI Service Principal (1 per tenant, located using well known GUID)
Make a note of the "id" parameter that is returned by the command (you will need this for step 7)
Step 5: Edit the 1.MinecraftConfidential-CMKconfig.json file adjusting values in angle-brackets to suit your environment
Step 6: Run the 1. ARM template to create the Azure Key Vault (AKV) instance + 1 x encryption key for Customer Managed Key and note the output for use in subsequent steps.
*Hint: Make a note of the values returned by the az deployment command, for example:
      "keySize": 2048,
      "keyUri": "https://YourKeyVaultName.vault.azure.net/keys/YourKeyName",
      "keyUriWithVersion": "https://YourKeyVaultName.vault.azure.net/keys/YourKeyName/52cae0abaaec32538bcfd38939088630",
      "kty": "RSA"
Step 7: Give the ACI Service Principal access to the Azure Key Vault so it can read the Customer Managed Key (CMK) and unlock the container image.
Step 8: Edit the 2.MinecraftConfidentialBedrockCMK.json file to suit your environment, using values from the output of the previous commands to enter parameters noted in angle brackets
*Hint: The Azure Key Vault properties in the ARM template should look like the following (with the values returned by step 6)
keyVersion is the alphanumerical string at the end of keyUriWithVersion in step 6*
"encryptionProperties": {
                "vaultBaseUrl": "https://YourKeyVaultName.vault.azure.net",
                "keyName": "YourKeyName",
                "keyVersion": "52cae0abaaec32538bcfd38939088630"
Step 9: Finally, create a Confidential Azure Container Instance using the ARM template you've built.
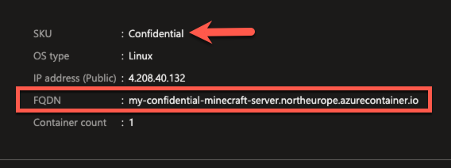
Once the command completes, look in the Azure Portal for the DNS name assigned to your ACI deployment, you’ll note that the deployment is using a Confidential SKU which means it is running on hardware that supports a Trusted Execution Environment (TEE) based on AMD SEV-SNP hardware.
This simple example uses a development Confidential Computing Enforcement ( cce) policy that is recommended only for development and testing. Confidential Computing policies that reflect the container measurements and the configurations can be calculated using the confcom extension for Azure CLI azure-cli-extensions/src/confcom at main · Azure/azure-cli-extensions · GitHub
A sample deployment using a custom cce policy can be found at Tutorial - Prepare a deployment for a confidential container on Azure Container Instances - Azure Container Instances | Microsoft Learn
For example, the development policy blocks exec access to the container.
As an Azure Confidential Computing customer you are fully in-control of how data is protected in this example;
|
At-Rest (on-disk) |
Using Customer Managed Key with least-privilege access to the encryption key.
Note that this simplified example does not include the Secure Key Release (SKR) process which further protects the disk encryption keys by only releasing them to the container when attestation is passed, you can read more about this here. |
|
In-Transit (over the network) |
Application controlled traffic encryption (https://wiki.vg/Protocol_Encryption) |
|
In-Use (in-memory and CPU) |
All of the in-use data on the Minecraft server is hosted on a hardware-based and attested Trusted Execution Environment (TEE) running on AMD SEV-SNP hardware.
ACI will not be able to start the container unless the hardware confirms and cryptographically signs that it is providing SEV-SNP protections for confidential computing to the container using the Azure Attestation Service |
As you can see using this fun example, it’s simple to take an existing application and deploy it in a way that enhances a defense in depth strategy.
After 2-3 minutes you'll be able to connect to your Minecraft server using a Minecraft client (get clients here https://www.minecraft.net/en-us/download) by adding a server using the FQDN of your container (e.g. YourDnsLabel.northeurope.azurecontainer.io)
Further Reading
Published on:
Learn more

